In summary:
- Embrace transparency to reduce “visual weight,” making your venue feel open and uncluttered.
- Master the practical details: proper cleaning, strategic lighting, and careful transport are key to a flawless look.
- Use acrylic not just for seating, but for functional elements like room dividers and signage to maintain an airy feel.
- The goal is seamless integration, where decor elements enhance the space by almost disappearing.
When you’re planning a wedding in an intimate venue, every square inch matters. The conventional wisdom often involves mirrors and pale color palettes, but these can feel impersonal and generic. You’ve likely been drawn to the sleek, modern allure of acrylic decor—ghost chairs, transparent tables, and crystalline signage that promise to melt away, leaving behind an illusion of boundless space. It’s a brilliant choice, one that speaks to a contemporary aesthetic and a desire for an uncluttered celebration.
However, the internet is full of pretty pictures, but short on practical advice. What they don’t tell you is that the magic of acrylic lies in mastering its challenges. Its very transparency, which creates that coveted “invisible” effect, is also what makes every fingerprint, scratch, and stray reflection a potential focal point. The true secret to using acrylic to expand a small space isn’t just choosing it; it’s about understanding how to manage its unique properties with an expert’s touch.
This guide moves beyond inspiration and into execution. As a designer who specializes in using transparency as a tool, I’ll walk you through the real-world considerations. We’ll cover everything from last-minute cleaning drills to positioning lights so they don’t blind your guests, ensuring your acrylic elements create the seamless, expansive, and breathtakingly modern effect you’ve dreamed of.
Here, we will explore the practical strategies to turn acrylic decor into your most powerful tool for creating a sense of space and elegance. This is your guide to mastering the material’s nuances for a flawless result.
Summary: The Designer’s Guide to Flawless Acrylic Wedding Decor
- How to remove fingerprints from ghost chairs 1 hour before guests arrive?
- Which transparent element gives the best “invisible” effect for the price?
- How to position pin spots so they don’t bounce blindingly off acrylic chairs?
- Creating a modern seating chart on acrylic without bubbles or peeling
- Why acrylic tables scratch easily during transport and how to protect them?
- Pipe and drape tricks: cutting a room in half to fit your guest count
- The polishing check: ensuring the venue polishes glasses before setup
- How to Manage Natural Daylight to Ensure Flattering Photos?
How to remove fingerprints from ghost chairs 1 hour before guests arrive?
The clock is ticking, guests are about to arrive, and your pristine ghost chairs are covered in smudges from setup. This is a common panic point, but entirely manageable. The beauty of acrylic comes from its flawless transparency, which means any imperfection, especially fingerprints, becomes glaringly obvious. This is a matter of material honesty; the material can’t hide flaws. Your strategy needs to be quick and effective, focusing on cleaning without leaving streaks or scratches.
Forget harsh chemicals or paper towels, which can create fine scratches and static, attracting more dust. Your emergency toolkit should consist of two key items: a mild soap solution (a drop of dish soap in a spray bottle of water) and several clean, dry microfiber cloths. Microfiber is essential as it lifts grease and dirt without being abrasive. According to event furniture specialists, this type of gentle, regular cleaning is a standard requirement to maintain the integrity of acrylic pieces after each use.
Here is the professional protocol for that final, pre-guest polish:
- Initial Dusting: First, use a dry microfiber cloth or a soft brush to gently wipe away any surface dust. Skipping this step means you’ll just be rubbing dust into the surface, which can cause scratches.
- Apply Solution: Lightly mist a separate, clean microfiber cloth with your mild soap solution. Never spray directly onto the chair, as this can lead to drips and uneven cleaning.
- Wipe Systematically: Wipe down the chair in a consistent pattern, such as top to bottom, to ensure you don’t miss any spots. Pay special attention to the top rail of the back and the seat edges, where hands are most likely to have touched.
- Final Polish: Immediately follow up with a completely clean, dry microfiber cloth. This final buffing step is what removes any remaining moisture and prevents streaks, leaving a perfectly clear, static-free finish.
By having this simple process ready, you can ensure your chairs retain their “invisible” quality, contributing to the open, airy feel of the room rather than displaying the history of their setup.
Which transparent element gives the best “invisible” effect for the price?
Choosing to use acrylic is the first step; deciding *which* acrylic pieces to invest in is the second. The goal is to maximize visual lightness—the feeling of space created by reducing visual clutter. With acrylic being an increasingly popular choice for modern weddings, recent wedding industry statistics show that nearly 40% of couples are choosing minimalist or acrylic designs. But not all transparent elements are created equal in terms of their spatial impact or their cost.
The key is to balance budget with the desired “invisible” effect. Ghost chairs are the most common entry point, but tables, plinths, and even smaller details offer different levels of impact. The most effective pieces are those that would typically be large, opaque objects. Replacing a solid dining table with a transparent one makes a far greater impact on perceived space than swapping out a small vase.
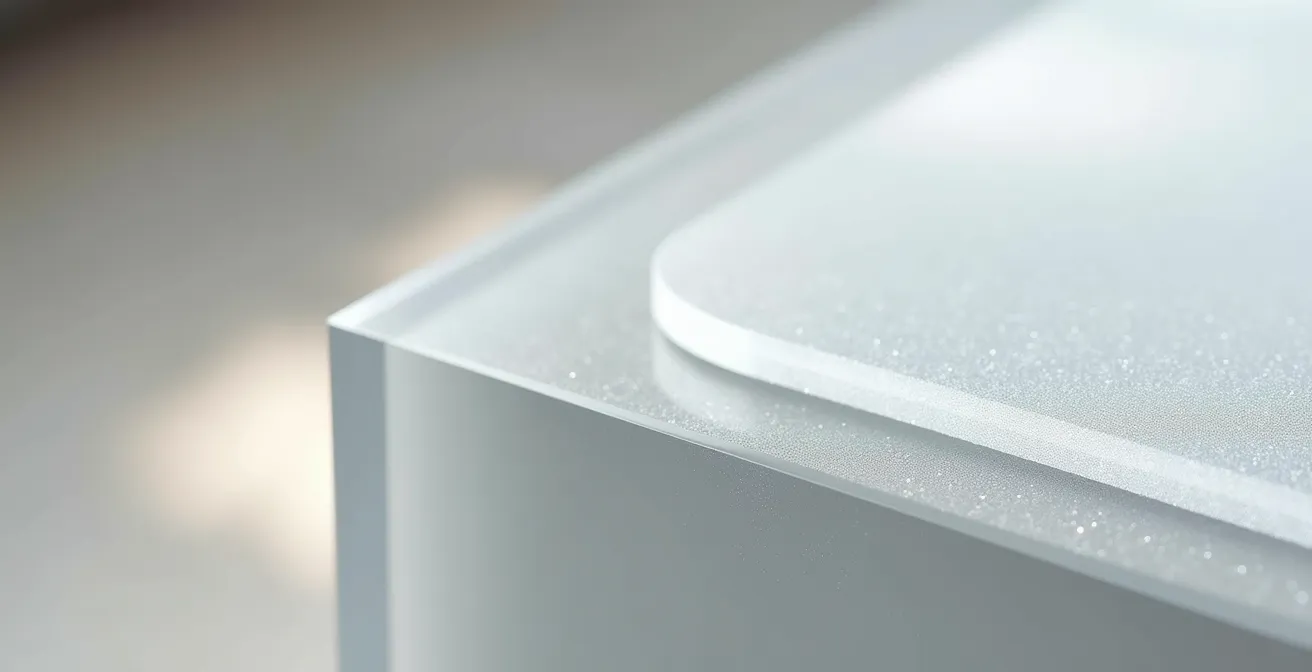
This image highlights the subtle but crucial differences in material quality. Higher-grade polycarbonate in chairs offers durability and clarity, while thicker, scratch-resistant acrylic for tables provides a flawless surface that can anchor a room without visually filling it. The choice depends on where you want to create the most significant illusion of space.
To make an informed decision, it’s helpful to compare the most common rental items directly. This table breaks down the typical cost versus the visual benefit.
| Element | Cost Range | Visual Impact | Durability |
|---|---|---|---|
| Ghost Chairs | $35-65/rental | High – creates open feel | Commercial-grade polycarbonate |
| Acrylic Tables | $150-300/rental | Very High – focal point | Scratch-resistant acrylic |
| Vertical Plinths | $75-125/rental | Medium – draws eye upward | Standard acrylic |
Ultimately, for the best price-to-impact ratio, ghost chairs are the clear winner for most couples. They replace dozens of visually obstructive elements with transparent ones, instantly opening up the room. However, if your budget allows, a single acrylic head table or cake table can create a stunning, high-impact focal point that feels both grand and weightless.
How to position pin spots so they don’t bounce blindingly off acrylic chairs?
Lighting is the secret weapon of great interior design, and with acrylic decor, it’s doubly important. While transparent furniture can beautifully catch and refract light, it can also create harsh, blinding glares if not lit thoughtfully. The goal of reflective management is to use light to enhance the ethereal quality of the acrylic without dazzling your guests. Pin spotting, the technique of using a focused beam of light to highlight a centerpiece or table, requires special consideration.
The common mistake is to light the acrylic piece directly from the front or above, which causes the light to bounce straight into the eyes of anyone sitting opposite. Instead, lighting should work *with* the material, not against it. As lighting experts note, the right approach transforms the space. The strategic use of lighting is about creating a mood, as noted by room designers.
Strategic use of uplighting, pin-spotting, and candlelight creates depth and mood, highlighting textures while casting dramatic shadows and adding warmth to spaces with acrylic elements.
– Room Genius, Wedding Venue Decoration Ideas
To achieve this beautiful effect without the blinding glare, your lighting technician should follow a few key principles. The idea is to illuminate the *object* on the table (like the floral centerpiece) and allow the acrylic to catch the ambient, secondary light, rather than making the chair itself the target. Here are the professional guidelines for positioning pin spots:
- Angle pin spots at a minimum of 45 degrees from the vertical. This steep angle ensures that any reflection is directed downward towards the floor, not outward at eye level.
- Position lights to illuminate *through* the acrylic rather than directly onto its surface. For instance, light the centerpiece from two opposing angles so the chair back simply picks up a gentle glow.
- Use gobos or textured patterns to break up the solid beam of light. A soft, dappled light pattern is much more forgiving and creates a more dynamic, interesting effect than a harsh, solid circle.
- Always test the lighting angles during setup. Have someone sit in the chairs from various vantage points around the room to confirm there are no uncomfortable hot spots.
A softer alternative to consider is using LED uplighting from the base of a table or near the legs of the chairs. This creates a gentle, ambient glow that radiates upward, illuminating the pieces from within without causing any direct glare.
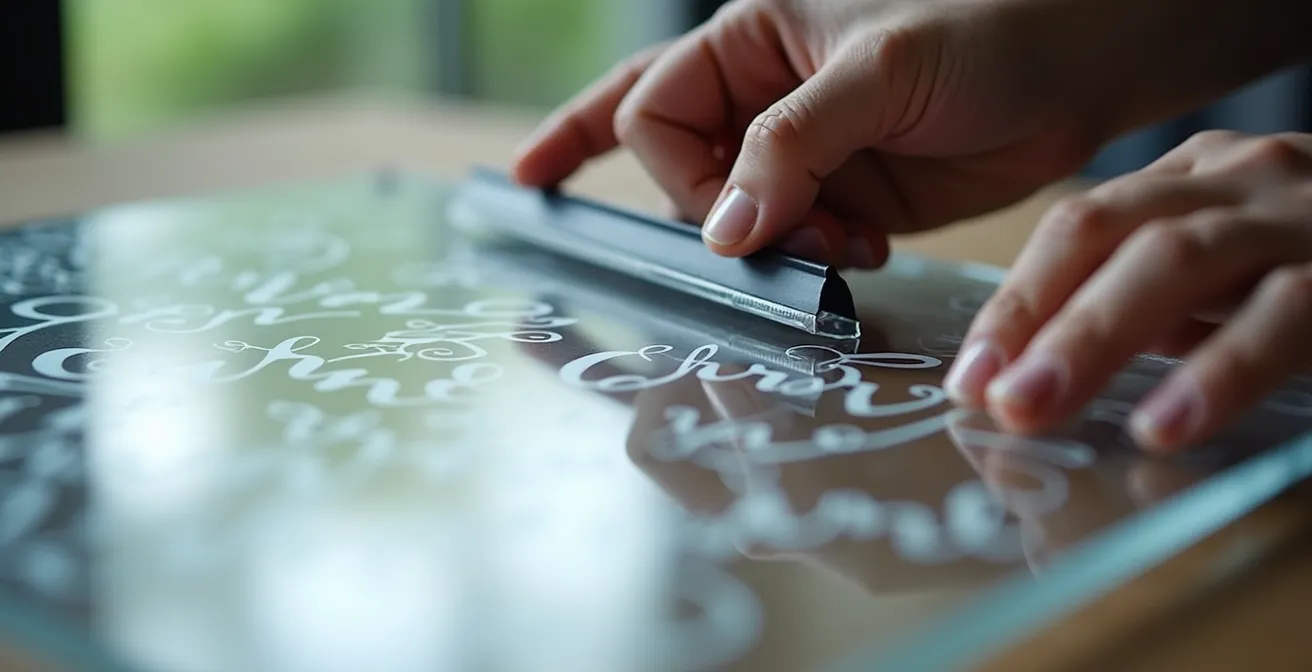
Creating a modern seating chart on acrylic without bubbles or peeling
An acrylic seating chart is a quintessential modern wedding detail. It serves a practical purpose while acting as a stunning decor piece that contributes to the venue’s feeling of openness. Unlike a solid board, it doesn’t create a visual barrier at the entrance, allowing guests to see through it and into the celebration space. However, achieving that flawless, professionally made look requires precision. The two biggest culprits that can ruin the effect are air bubbles under vinyl lettering and peeling decals.
Whether you’re a DIY-savvy couple or working with a stationer, understanding the proper application methods is key. The technique varies depending on whether you’re using vinyl decals or chalk markers. For a temporary, more forgiving option, erasable chalk markers are an excellent choice. For a crisper, more permanent look, vinyl is the standard. The process, as shown in the image, is one of careful craftsmanship.
Here’s a breakdown of the two most reliable methods for a bubble-free, peel-proof result:
The Chalk Marker Method (Erasable & Simple)
- Print a Template: Design and print your seating chart on paper that is the exact size of your acrylic sheet.
- Secure the Guide: Tape the paper template to the *back* of the acrylic board. You will now be able to see the text clearly through the transparent panel.
- Trace with Precision: Using high-quality erasable chalk markers, carefully trace over the letters on the front of the acrylic. Work slowly and steadily for the cleanest lines.
- Allow to Dry: Let the markers dry completely—at least an hour—before handling the sign or removing the paper template from the back.
The Vinyl Application Method (The “Wet” Technique)
This is the secret professional stationers use to get perfectly positioned, bubble-free vinyl. The key is a special application solution.
- Create Application Fluid: Mix a simple solution of water with a tiny drop of dish soap in a spray bottle.
- Apply Vinyl: After cleaning the acrylic surface, lightly mist it with the soap solution. This allows you to slide the vinyl decal around for perfect positioning.
- Squeegee Out Bubbles: Once the decal is in place, use a small squeegee or a credit card to firmly smooth the vinyl from the center outwards, pushing out all the water and air bubbles.
- Dry and Cure: The soap solution will evaporate, and the vinyl adhesive will cure, creating a strong, bubble-free bond.
This attention to detail ensures your seating chart is a beautiful feature, not a source of frustration, seamlessly integrating into your modern decor.
Why acrylic tables scratch easily during transport and how to protect them?
There’s a heart-stopping moment when you unwrap a rented acrylic table only to find a web of fine scratches across its once-perfect surface. The very quality that makes acrylic so desirable—its pristine, glass-like clarity—is also its greatest vulnerability. Unlike wood, which can gain character from a few marks, a scratch on an acrylic surface is a distraction that breaks the illusion of invisibility. It catches the light and draws the eye, undermining the entire reason you chose it.
Acrylic, particularly the standard cast acrylic used for many decor items, is a relatively soft material. It’s far more susceptible to scratching than glass. The main culprits are friction and pressure during transport. When pieces are stacked without proper protection, any dust or grit caught between them acts like sandpaper. Straps used to secure items can also rub against the surface, leaving dull marks. Protecting acrylic furniture isn’t just a good idea; it’s a non-negotiable part of the rental and setup process.
Your rental company should have a professional protocol, but it’s crucial for you or your wedding planner to be aware of what that entails and to inspect pieces upon delivery. A robust protection plan involves multiple layers of defense.
Here is a professional-grade transport protocol to ensure your pieces arrive in pristine condition:
- Use Rigid Protection: The first line of defense should be a rigid sheet, such as corrugated plastic (often sold under the brand name Coroplast), cut to the size of the tabletop. This prevents direct pressure and impact.
- Wrap in Soft Cushioning: Each individual piece should be generously wrapped in thick, soft moving blankets. This provides a crucial cushioning layer against bumps and vibrations.
- Secure with Non-Adhesive Straps: Use soft straps or fabric ties to secure the blankets. Never use tape directly on the acrylic surface, as it can leave a sticky, hard-to-remove residue. Ensure straps are placed over the blanketed areas, not in direct contact with the furniture.
- Stack with Dividers: If pieces must be stacked, always use protective dividers (like foam sheets or more corrugated plastic) between each item. Never allow two acrylic surfaces to touch directly.
- Document Everything: Before the furniture is even loaded for transport (both from the rental company and back from the venue), do a quick walk-around with your phone to video the condition of each piece. This pre- and post-event documentation can save you from being held liable for pre-existing damage.
By ensuring this level of care is taken, you can relax, knowing your clear decor will deliver the stunning, space-enhancing effect you planned for.
Pipe and drape tricks: cutting a room in half to fit your guest count
Sometimes, a small venue problem is actually a large venue problem: your guest count is intimate, but the room is vast and cavernous. This can leave a wedding feeling sparse and lacking energy. The classic solution is to use a “pipe and drape” system to build a temporary fabric wall, effectively shrinking the room to a more appropriate size and hiding unused areas. It’s a functional and effective trick that has been used for decades.
However, a wall of opaque fabric, no matter how elegant, fundamentally contradicts the goal of creating an open, airy atmosphere. It blocks light, shortens sightlines, and visually chops the space in two. As a designer focused on transparency, I propose a modern alternative: instead of hiding the extra space, incorporate it into the design in a way that feels intentional. We can use the principles of division but replace the opaque material with a transparent one.
Think of using a series of tall, slender acrylic plinths to create a perceived “hallway” or boundary, or suspending acrylic panels to act as ethereal room dividers. These elements define the space without closing it off. They allow light to pass through and maintain long sightlines, so the room feels both intimate and expansive at the same time. This approach turns a logistical necessity into a sophisticated design feature, creating a floating, ethereal effect that is perfect for a contemporary venue.
This method maintains the negative space as a design feature, rather than something to be hidden behind a curtain. The unused portion of the room becomes a backdrop, adding to the sense of scale without overwhelming the event itself. This strategy works particularly well in venues with interesting architectural features you don’t want to conceal.
By swapping opaque drapes for transparent structures, you align the solution with your overall aesthetic, ensuring that even practical decisions contribute to the goal of a light, open, and visually cohesive wedding environment.
The polishing check: ensuring the venue polishes glasses before setup
You’ve meticulously planned every transparent detail: the ghost chairs are smudge-free, the acrylic tables are gleaming, and the lighting is perfectly angled. But all that effort can be instantly undermined by one small, overlooked detail: cloudy glassware. When you’re curating an aesthetic based on clarity and shine, every reflective surface contributes to the overall effect. A table set with water-spotted wine glasses and dull silverware next to a pristine acrylic charger plate creates a jarring visual disconnect.
The “polishing check” is a crucial final step in your setup process. It’s about creating a unified shine standard across the entire tablescape. Your acrylic decor sets a high bar for clarity, and every other element should rise to meet it. This isn’t about micromanaging your venue’s staff, but about communicating your aesthetic vision and ensuring it’s executed consistently.
Most venue contracts include standard table settings, but the level of polish can vary. A pre-event conversation with your venue coordinator is essential. Explain the importance of this detail in the context of your decor. Ask them to ensure all glassware and flatware are hand-polished after washing to remove any mineral deposits or smudges. This one small request can elevate the entire look of your reception.
Thirty minutes before guests are scheduled to enter the room, you or your planner should perform a final walk-through with this specific checklist in mind. It’s the last chance to catch any inconsistencies and ensure the room delivers the maximum “wow” factor.
Your Unified Shine Standard Checklist
- Ghost Chairs: Do a final spot-check on the tops and backs of all ghost chairs. Look for any fingerprints or smudges left during the final table-setting process.
- Glassware: Hold a wine glass up to the light. It should be completely transparent, with no water spots or lint. All glasses on the table should match this standard.
- Acrylic Surfaces: Scan all acrylic tables, chargers, or signage. Ensure their shine is consistent and that no dust has settled on them during setup.
- Reflective Amplification: Look at the tablescape as a whole. Do all the reflective and transparent surfaces work together to amplify your lighting scheme, creating a beautiful sparkle?
- Final Walk-Through: Perform this check 30 minutes before guest arrival. This gives you just enough time to fix any minor issues (like wiping a single glass) without disrupting the entire setup.
–
–
–
This final quality control measure ensures that every detail, big or small, contributes to a single, stunning vision of clarity, light, and elegance.
Key takeaways
- The magic of acrylic lies in mastering its practical challenges—cleaning, lighting, and transport—not just in its aesthetic appeal.
- For the best value, ghost chairs offer the highest spatial impact by removing dozens of visual obstructions at once.
- A “Unified Shine Standard” is crucial: ensure glassware and flatware are polished to the same level of clarity as your acrylic decor for a cohesive look.
How to Manage Natural Daylight to Ensure Flattering Photos?
Natural light is a photographer’s best friend, and one of the primary benefits of a venue with large windows is the beautiful, soft light it provides. With many couples spending an average of $2,500 on photography services, optimizing every shot is a high priority. Acrylic decor has a unique and powerful relationship with daylight. Unlike opaque furniture that blocks light and creates harsh shadows, transparent pieces allow light to pass through, bounce, and diffuse, filling the room with a gentle, ambient glow.
This can be a tremendous asset. Ghost chairs, for example, don’t cast dark shadows under the table, which means the room feels brighter and more open. They work beautifully in outdoor or sun-drenched settings, reflecting the sky and scenery and enhancing the connection to the outdoors. Because they are made from high-quality, water-resistant acrylic, they maintain their pristine appearance even if there’s a passing shower, making them a reliable choice for indoor-outdoor venues.
However, this same reflectivity can also pose a challenge. A direct beam of sunlight hitting an acrylic table can create a “hot spot” of glare in photos, or a reflection that is distracting. The key is to manage the daylight, not just let it happen. Work with your photographer and planner to orient your key tables—like the head table and cake table—in relation to the windows. The ideal position is where they are bathed in indirect light, rather than being in the direct path of the sun’s rays. If a room has very intense, direct light, consider using sheer drapes to soften and diffuse it before it even enters the space. This gives you the brightness without the harshness.
By thoughtfully placing your acrylic elements within the space, you can harness the power of natural light to create photographs that are not just flattering, but truly luminous and ethereal, perfectly capturing the magical atmosphere of your day.