In summary:
- Embrace patina as a stylistic choice for depth and mood, rather than aggressively polishing it away.
- Use professional tricks like “Stick-Um” or museum gel to ensure every taper candle is perfectly stable and upright in antique holders.
- Adhere to a strict minimum distance between candle flames and floral elements to guarantee safety without sacrificing style.
- Confidently mix brass and silver by following an 80/20 dominant-to-accent metal ratio for intentional contrast.
- When using flameless candles, select high-quality, wax-dipped LEDs with a warm color temperature (2200K-2700K) to fool the eye.
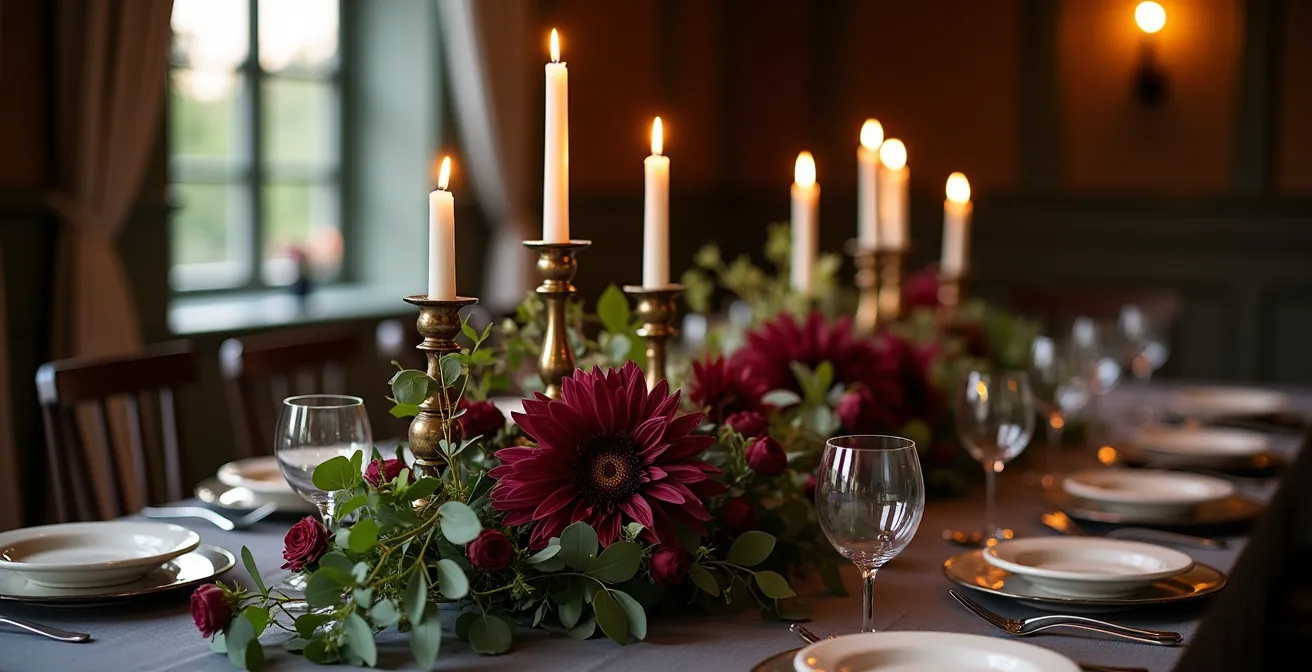
The vision is clear: a long, dramatic table bathed in the flickering glow of candlelight. For couples dreaming of a vintage, gothic-romance, or simply moody winter wedding, the antique brass candelabra is the undisputed centerpiece. It promises history, weight, and an atmosphere that feels both grand and deeply intimate. Many styling guides suggest simply adding flowers or using tall candles, but this approach often overlooks the critical details that elevate the look from amateur to truly breathtaking.
But what separates a pretty picture from a truly immersive, elegant experience lies in the professional’s playbook. It’s about more than just aesthetics; it’s a disciplined art. The real magic happens when you master the balance between atmosphere and safety, history and personal style. This involves understanding the character of the brass itself, from its aged patina to its unique imperfections. It’s about the practicalities of ensuring every candle stands perfectly straight and that your beautiful floral arrangements don’t become a fire hazard.
The secret to a truly sophisticated look isn’t in hiding the age of these pieces, but in celebrating it. It’s about making conscious decisions—when to polish, how to mix metals without creating a visual clash, and how to harness the power of light itself. This guide moves beyond the basics to give you the strategies of a tabletop stylist, ensuring your candelabra arrangements are not only beautiful but also stable, safe, and deeply resonant with your moody, elegant theme.
To help you master this art, this guide breaks down the essential considerations a professional stylist uses. From the practicalities of cleaning and safety to the nuanced aesthetics of patina and light, you’ll find the expert advice needed to bring your vision to life.
Summary: Crafting Moody Elegance with Brass Candelabras
- How to clean vintage brass after the wedding without stripping the finish?
- The “Stick-Um” trick: preventing candles from wobbling in old holders
- Distance from flowers: avoiding a centerpiece fire with multi-arm holders
- Can you mix brass candelabras with silver cutlery without it looking messy?
- To shine or not to shine: when is patina better than polished gold?
- Thrifting vs. Renting: where to find 150 vintage goblets efficiently?
- Wax-dipped LEDs vs. Plastic: finding fake candles that fool the eye
- How to Maximize Candlelight Impact Without Burning the Venue Down?
How to clean vintage brass after the wedding without stripping the finish?
After the celebration, you’re left with beautiful candelabras potentially dotted with wax and showing the effects of the evening. The immediate impulse might be to polish them back to a brilliant shine, but for a vintage or moody aesthetic, this is a mistake. The goal is to clean, not to strip. You want to remove wax and grime while preserving the rich, historical patina that gives the piece its character. Aggressive polishing can erase decades of history and turn a unique antique into a generic gold-colored object.
The professional approach focuses on gentle, targeted methods. Start with the least invasive technique first. For light wax drips, hot water is often all you need to soften the wax enough for it to be gently scraped away with a tool that won’t scratch the metal, like a wooden skewer or the edge of a credit card. For more stubborn wax or light tarnish, a simple, homemade paste offers more cleaning power without harsh chemicals. This preserves the patina narrative—the story told by the subtle darkening in the crevices and the soft glow of the raised surfaces.
Your Action Plan: Post-Wedding Brass Preservation
- For light wax drips: Use the hot water soak method for 10 minutes to soften wax, then gently scrape with a wooden utensil.
- For stubborn wax: Create a paste with one part white vinegar to four parts baking soda. Let it sit on the wax for 10 minutes before gently removing.
- For heavy tarnish: As a stronger option, an article on cleaning brass suggests mixing equal parts flour and salt with white vinegar to form a paste, applying for a maximum of 20 minutes.
- Rinse and Dry: Always rinse thoroughly with warm water and dry immediately with a microfiber cloth to prevent water spots which can mar the finish.
- Protect for Storage: Apply a thin layer of beeswax polish or clear wax to protect the patina and prevent further oxidation while in storage.
By following this sequential, gentle process, you ensure the candelabras are ready for their next appearance, retaining all the moody, elegant character you fell in love with. It’s a method of stewardship, not just cleaning.
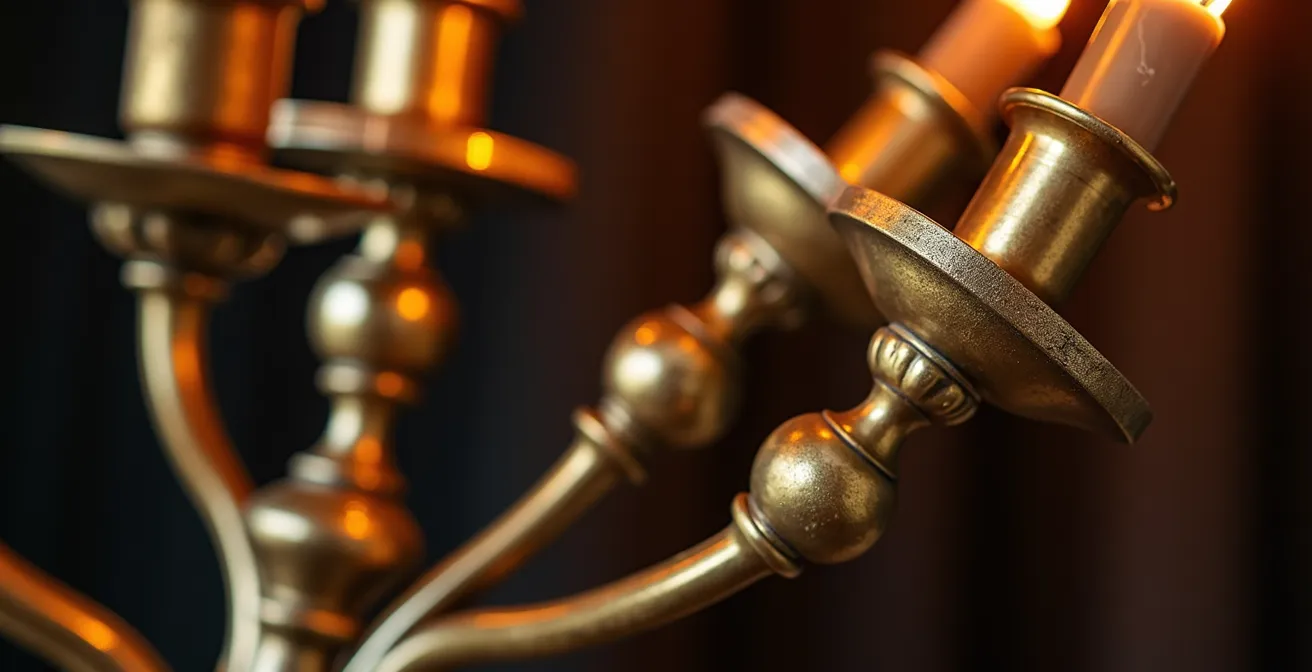
The “Stick-Um” trick: preventing candles from wobbling in old holders
There is nothing that shatters the illusion of effortless elegance faster than a crooked, wobbling candle. With antique brass candelabras, this is a common issue. The cups that hold the candles are often not standardized, and years of use can slightly alter their shape. A wobbly candle is not only aesthetically displeasing but also a significant fire hazard, as it can lean and drip hot wax or even topple over completely. The common amateur fix of melting wax into the base is messy, unreliable, and can damage the candelabra.
This is where professionals turn to a simple, invaluable tool: candle adhesive, often sold under brand names like “Stick-Um” or as clear “Museum Gel.” This tacky, pliable substance is the industry secret to securing tapers perfectly upright. A small pea-sized amount at the base of the candle creates a firm, invisible grip inside the holder. It provides the necessary stability without any mess or risk of damage, and it can be easily removed after the event. As Leanne Kesler of the Floral Design Institute notes, venue restrictions are increasingly common:
Many venues don’t allow true open flame any longer.
– Leanne Kesler, Floral Design Institute Video Tutorial
This makes the stability of even your LED candles paramount. A leaning LED candle, while not a fire risk, still looks unprofessional. The “Stick-Um” trick works just as well for faux flames, ensuring your entire tablescape maintains a look of polished perfection.
For a complete overview of your options, consider the pros and cons of each stabilization method.
| Method | Best For | Risk Level | Cost |
|---|---|---|---|
| Stick-Um/Museum Gel | Delicate antique holders | Very Low | $15-20 |
| Melted Wax Seal | Same-day events | Low | Free |
| Aluminum Foil Shims | Quick fixes | Medium | $2 |
| Candle Snuggers | Professional events | Very Low | $10-15 |
Distance from flowers: avoiding a centerpiece fire with multi-arm holders
The romantic pairing of candlelight and flowers is timeless, but it’s also a combination that demands the utmost respect for safety. A multi-arm candelabra, especially when adorned with lush greenery and florals, creates a significant fire risk if not designed with intention. The top priority for any event stylist is not just beauty, but the well-being of guests and the protection of the venue. A stray piece of dried eucalyptus or a delicate trailing vine that gets too close to an open flame can ignite in an instant, turning a dream centerpiece into a nightmare.
The cardinal rule is to establish clear safety zones. Professional event designers work with a strict minimum clearance. According to styling experts, you should be maintaining a 12-inch minimum distance between the tip of any candle flame and the nearest piece of flammable material. This applies to florals, ribbons, hanging crystals, and even tall, dry elements in surrounding arrangements. For a multi-arm candelabra, this means the entire floral design must be conceptualized around this rule, keeping arrangements low, compact, and well clear of the flames above.
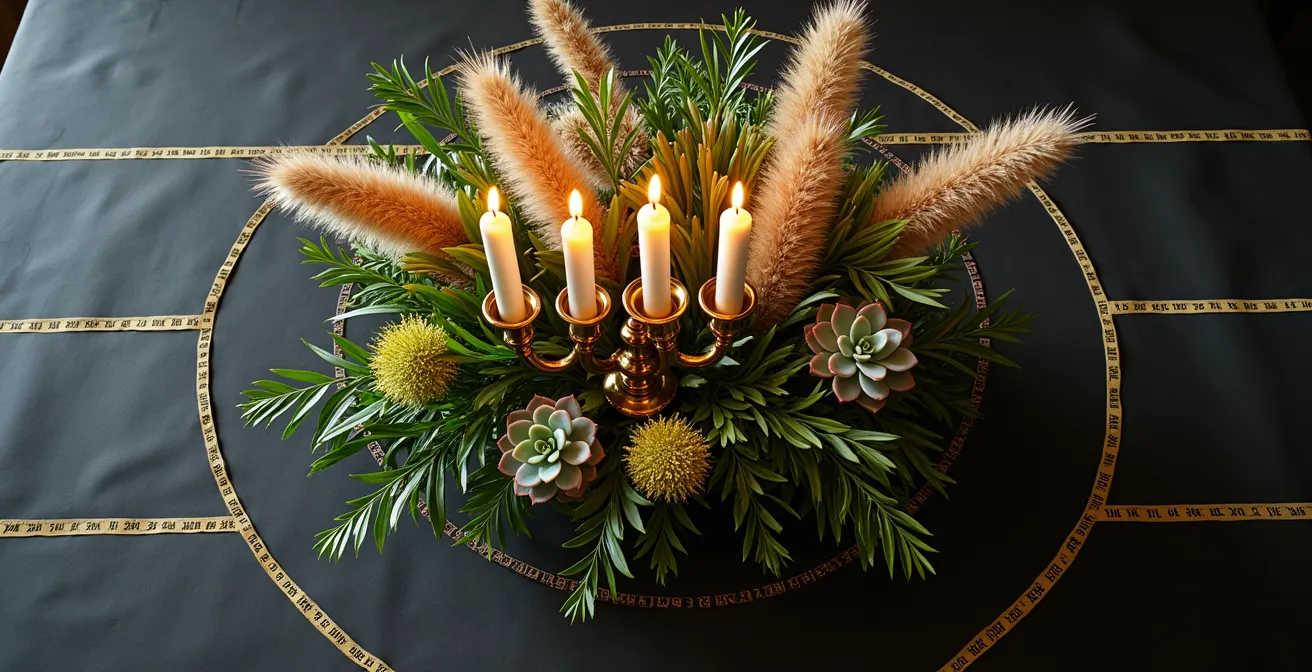
As the illustration demonstrates, a safe design is not a limited design. You can achieve a full, lush look by focusing the volume of the arrangement at the base of the candelabra and using non-flammable elements or low-profile, high-moisture greenery like succulents in the intermediate zones. This layered safety approach ensures that even if a candle drips or flickers unexpectedly, there is nothing within its immediate vicinity to catch fire. This diligence is the true mark of a professional design.
Can you mix brass candelabras with silver cutlery without it looking messy?
This is a frequent concern for couples curating a vintage look: the fear of creating a tablescape that looks accidental or chaotic rather than intentionally collected. The answer is a resounding yes, you can absolutely mix brass and silver, but it must be done with clear intention. The key is to avoid a 50/50 split, which can look competitive and visually confusing. A successful mixed-metal palette relies on establishing a dominant metal and using the other as a deliberate accent. This creates harmony and depth.
Think of it as a painter’s palette. The antique brass of your candelabras sets the warm, moody tone for the table. This is your dominant metal. The silver cutlery, therefore, becomes the accent, providing pops of cool, bright contrast. The design team at CV Linens notes that “Black or silver finishes can bring contrast and structure to softer color palettes.” This is precisely the effect you’re aiming for. The contrast should feel deliberate, not random. To achieve this, follow a few simple rules that guide professional stylists in creating cohesive, layered tablescapes.
Your Action Plan: The Rules of Intentional Metal Mixing
- The Dominant-Accent Ratio: A key principle in styling elegant wedding candelabra centerpieces is maintaining an 80/20 ratio. Make brass roughly 80% of your metal presence (candelabras, charger plates) and silver 20% (cutlery, small bud vases).
- The Bridging Technique: Use neutral elements to unite the different finishes. Charcoal grey or deep navy linens, for example, provide a sophisticated backdrop that makes both brass and silver pop.
- The Texture Rule: The most effective way to mix metals is by varying textures. Combine the deep, aged patina of your antique brass with the clean, polished shine of modern silver. This contrast feels purposeful and rich.
- Consider Venue Lighting: Remember that candlelight is your friend. The warm, flickering glow will soften the contrast between metals, unify the tablescape, and make everything feel cohesive and romantic.
- Test with Photography: Take sample photos of your place setting. Metallic combinations can look very different on camera than they do to the naked eye. A quick test shot will reveal if your balance is correct.
By following these guidelines, your mixed-metal table will look curated, sophisticated, and deeply personal, avoiding the dreaded “messy” look entirely.
To shine or not to shine: when is patina better than polished gold?
The question of whether to polish an antique brass candelabra is not a matter of right or wrong, but of stylistic intent. For a moody, elegant, or gothic-inspired wedding, the answer is almost always: patina is better. A high-polish, mirror-like finish reflects light sharply and can feel modern, glamorous, or even sterile. It competes with the candlelight, creating bright hotspots and potential lens flare in photographs. A deep, unpolished patina, on the other hand, absorbs light. It creates soft shadows and a gentle, mysterious glow that is the very essence of a moody atmosphere.
Patina is the story of the object. It’s the physical manifestation of its history, showing where it has been held, used, and exposed to the elements over decades or even centuries. This rich, complex surface adds a layer of authenticity and romance that a brand-new, highly polished piece simply cannot replicate. For a vintage theme, this visual texture is an invaluable asset. It contributes to a sense of timelessness and permanence. The decision between finishes should be directly informed by the specific theme and desired photographic impact of your event.
Choosing the right finish is about controlling the light and the mood. A deep patina helps to create the dramatic, shadowy look of a Dutch master’s painting, while a soft sheen can evoke a more gentle, romantic nostalgia.
This table can help guide your decision based on the specific aesthetic you’re aiming for.
| Finish Type | Best For | Light Reflection | Photography Impact |
|---|---|---|---|
| Deep Patina | Gothic/Dark Academia themes | Absorbs light | Moody, dramatic shadows |
| Soft Sheen | Romantic vintage weddings | Gentle glow | Warm, nostalgic feel |
| High Polish | Art Deco/Glamorous events | Maximum reflection | Risk of lens flares |
Thrifting vs. Renting: where to find 150 vintage goblets efficiently?
While your focus might be on the candelabras, creating a cohesive vintage tablescape often involves sourcing other elements in large quantities, like colored glass goblets or mismatched brass bud vases. The question of whether to thrift or rent these items is a critical one, balancing budget, aesthetics, and logistics. There is no single right answer; the best choice depends on your timeline, your desire for a specific look, and your willingness to handle the post-wedding logistics.
Renting is the path of efficiency and uniformity. A good rental company can provide 150 matching vintage-style goblets with guaranteed availability, and they handle all the cleaning and storage. This is the ideal choice for couples with a shorter timeline or those who desire a more consistent, less eclectic look. However, you are limited to the company’s inventory, and the cost can add up significantly. Thrifting, on the other hand, is a treasure hunt. It allows you to curate a truly unique, mismatched collection that is entirely your own. This approach is perfect for a truly authentic vintage aesthetic and can be more budget-friendly if you have the time to dedicate to searching flea markets, antique shops, and online marketplaces over several months.
A third option, the buy-and-resell model, is gaining popularity for design-savvy couples. You purchase the collection, use it for your wedding, and then resell it as a curated package to another couple. This can often be the most cost-effective route, but it requires significant effort in sourcing, storing, and eventually selling the items. To make the right call, a strategic decision tree is your best tool.
Your Action Plan: Vintage Sourcing Decision Tree
- If your event is in less than 3 months: Choose rental. This guarantees availability and matching sets, removing sourcing stress from your final preparations.
- If you have 6+ months lead time and want a mismatched look: Build your thrifted collection gradually. This makes the process enjoyable and spreads the cost.
- If a uniform style is required for all items: Contact specialist vintage rental companies. They are experts in sourcing and maintaining large, matching sets of specific vintage styles.
- If your budget is under $500: Use a hybrid approach. Mix thrifting for the bulk of your items with selective rentals for key statement pieces like the main candelabras.
- Consider the buy-and-resell model: If you have the time and storage, you can purchase your collection as an investment and resell it as a curated wedding collection after your event.
Wax-dipped LEDs vs. Plastic: finding fake candles that fool the eye
The reality of modern weddings is that many venues, for valid safety and insurance reasons, have a strict no-open-flame policy. For the candlelight purist, this can feel like a devastating blow to the moody, romantic vision. However, the world of flameless candles has evolved dramatically. The choice is no longer just between real flame and a cheap, orange-blinking plastic tube. The key to maintaining an elegant aesthetic is to become a connoisseur of faux flames, seeking out high-quality LEDs that are cinematically authentic even up close.
The most significant giveaway of a fake candle is its material and color temperature. Cheap plastic sheens reflect light unnaturally, and a cool, bluish light is an instant mood-killer. The gold standard for believable faux flames are real wax-dipped LEDs. The real wax exterior diffuses the light from within in the same soft, warm way a real candle does. When combined with a warm color temperature—specifically between 2200K and 2700K, the same range as an actual flame—the effect is incredibly convincing. As event professionals like Leanne Kesler have noted, the switch to battery-operated is often a necessity, making the quality of your choice paramount.
To ensure you’re investing in LEDs that will enhance, not detract from, your decor, you need a quality checklist. When sourcing your flameless tapers, look beyond the price tag and inspect for the details that separate the good from the tacky.
Your Action Plan: Faux Flame Connoisseur’s Checklist
- Randomized Flicker: Check for a randomized flicker algorithm. Avoid candles with a predictable, rhythmic looping pattern, which is a dead giveaway.
- Warm Color Temperature: Verify the color temperature is between 2200K-2700K. This ensures the warm, amber glow of an authentic flame, not a harsh orange or cool white light.
- Real Wax Exterior: A key feature mentioned by experts at the Floral Design Institute is a real wax coating. This provides proper light diffusion and a realistic texture.
- Realistic Wick Design: Look for a 3D flame shape or at least a realistic black “wick” at the top. This detail makes a huge difference for close-up viewing and photography.
- Battery Life: Test the battery life. Quality LEDs should last for 100+ hours on a single set of batteries, ensuring they’ll shine brightly through your entire event without any last-minute failures.
Key takeaways
- The choice of patina or polish fundamentally defines the mood; for a vintage look, patina’s light-absorbing quality is superior.
- Achieve stability in antique holders with professional tricks like museum gel, eliminating wobbly candles that ruin the aesthetic and pose a safety risk.
- A strict 12-inch clearance between flames and any flammable decor is the non-negotiable rule for combining candlelight with floral arrangements safely.
How to Maximize Candlelight Impact Without Burning the Venue Down?
Creating a breathtaking candlelight experience is about more than just placing a few candelabras on a table. It’s about strategic “light-scaping.” The goal is to create layers of light that add depth, drama, and romance to the entire room. A single candelabra is a beautiful object, but a thoughtfully arranged collection of them, supplemented with other light sources, creates an immersive atmosphere. This is how you achieve that truly moody, elegant feel that envelops your guests from the moment they enter the space.
One of the most effective strategies for maximizing impact is playing with height. A low, sprawling centerpiece creates intimacy, but it can get lost in a large reception hall with high ceilings. This is where tall candelabras become a powerful design tool. By using candelabras that are significantly tall, you draw the eye upward and make the tablescape feel grander and more dramatic. Professional designers often recommend using pieces that create a significant vertical presence to define the space. For example, some styling guides suggest that candelabras standing at 48 inches tall can dramatically enhance guest tables and buffet displays.
The final layer of a masterful light-scape involves creating a visual hierarchy. Your tall brass candelabras are the main event, the “stars” of the show. Supplement them with medium-height candle holders and low-lying votives scattered along the table. This creates a multi-layered glow that feels rich and complex. By varying the height and intensity of your light sources (while always adhering to safety rules), you move beyond simple decoration and into the realm of true atmospheric design, ensuring your wedding is remembered for its enchanting and unforgettable ambiance.
Now that you have the professional’s playbook, you can begin to curate the elements for your tablescape with confidence. Start by assessing your theme to decide on your ideal brass finish, and then use that as the foundation for building a safe, stable, and stunningly atmospheric candlelight experience.