Contrary to popular belief, an elegant whimsical wedding isn’t achieved by collecting quirky trinkets; it’s born from the deliberate curation of a mature, fantasy atmosphere.
- Ground your playful vision with sophisticated, deep jewel-toned color palettes instead of relying solely on pastels.
- Focus your budget and design energy on a single, dramatic focal point rather than scattering small, distracting details.
Recommendation: Think like an art director, not just a decorator. Prioritize large-impact installations and master the principles of color and light to create an immersive world your guests will never forget.
You’ve dreamt of a wedding that feels like stepping into a Midsummer Night’s Dream or a hidden fairy glade. The desire for a whimsical, magical celebration is strong, but so is the fear of it looking less like a sophisticated union and more like a child’s birthday party. The common advice often involves a predictable checklist: sprinkle some fairy lights, choose a pastel palette, and add a few quirky, cute details. While well-intentioned, this approach often leads to a scattered, juvenile aesthetic that misses the mark for an elegant adult event.
The secret to transcending this cliché lies not in adding more ‘stuff,’ but in shifting your perspective. The true art of a sophisticated whimsical wedding is in the Atmospheric Curation. This is about orchestrating an entire sensory experience with the discipline of an artist and the vision of a storyteller. It’s about understanding that magic comes from masterful control over light, a deliberate command of color, and a brave sense of scale. It’s about creating a ‘Grounded Fantasy’—a world that is enchanting yet believable, playful yet profound.
This guide will move beyond the basic tips and equip you with the core design principles needed to achieve this delicate balance. We will explore how to use color, scale, and lighting not as mere decorations, but as tools to build an immersive, mature, and truly magical environment. You will learn to think like a stylist, making intentional choices that create drama, emotion, and unforgettable moments of wonder.
This article provides a structured path to mastering sophisticated whimsy. The following sections will guide you through the key decisions that elevate a playful theme into an elegant experience.
Summary: How to Create a Whimsical Vibe That Doesn’t Look Like a Child’s Birthday Party?
- How to hang floating candles or clouds safely in a standard tent?
- Pastels vs. Jewel Tones: choosing colors that ground the whimsy
- How to mix 4+ colors in floral arrangements without creating a mess?
- Why you need one large “wow” piece instead of 50 small trinkets?
- Sunset magic: when to turn on the fairy lights for maximum whimsy?
- Scenting your wedding: how to diffuse fragrance without triggering allergies?
- Zig-zag vs. Parallel: which layout creates the best sense of volume?
- How to Install Hanging Dried Palms Safely and Stylishly?
How to Hang Floating Candles or Clouds Safely in a Standard Tent?
The vision of candles floating ethereally overhead is the very essence of whimsical romance. However, the magic instantly vanishes if an installation is unsafe or poorly executed. Before you even consider aesthetics, safety must be your unwavering foundation. A tent is a temporary structure with specific load-bearing limits and fire safety requirements. Ignoring these turns a dream into a significant liability. Professionalism is the first step to creating believable magic; a secure installation is a non-negotiable part of the illusion.
The most reliable way to achieve the floating candle effect without risk is by using high-quality, remote-controlled LED candles. Modern versions offer incredibly realistic flicker effects that are indistinguishable from real flames from a distance, completely eliminating fire hazards. For suspension, replace flimsy fishing line with professional-grade materials like thin aircraft cable. This ensures strength and prevents stretching or snapping. The weight must be distributed across the tent’s main structural truss or a purpose-built grid system, never hung from a single point on the tent fabric or a minor pole. This prevents dangerous sagging or structural damage.
If you are set on using real flame, the safety protocols become even more stringent. Each candle must be enclosed in a substantial, noncombustible base with a flame protection shield (like a glass hurricane). Furthermore, any use of open flame in a temporary structure almost always requires a formal inspection and permit from the local fire marshal. Planning this inspection is a critical part of your event timeline.
Your Essential Safety Checklist: Hanging Decor in a Tent
- Contact the fire marshal: For any open-flame devices, schedule an inspection at least one week before the event.
- Prioritize LEDs: Use LED candles with remote-controlled flicker effects as your primary and safest option.
- Secure real flames: If using real candles, ensure they are in substantial noncombustible bases with proper flame protection.
- Use professional rigging: Opt for professional-grade suspension systems like aircraft cable instead of fishing line for all hanging elements.
- Distribute the weight: Suspend your installation from a truss or grid system, never from single points on the tent’s canopy.
- Maintain clearance: Keep all candles and lighting elements a minimum of 12 inches away from any combustible materials, including tent fabric and other decor.
Pastels vs. Jewel Tones: Choosing Colors That Ground the Whimsy
Color is the emotional language of your wedding design. While whimsical themes are often instinctively paired with soft pastels—blush pink, baby blue, lavender—this palette is a slippery slope. Without a strong anchor, it can quickly drift into the territory of a baby shower or a children’s storybook. To achieve a sophisticated, mature fantasy, you need to ground the playfulness with depth and richness. This is where jewel tones become your most powerful tool. Colors like emerald green, sapphire blue, deep ruby, and rich amethyst carry an inherent weight and drama that elevates the entire aesthetic.
Think of it as creating a ‘Grounded Fantasy’. The deep, saturated jewel tones provide the “ground”—the sense of history, luxury, and substance. The whimsical elements then become the “fantasy” that plays against this rich backdrop. This contrast is what generates visual excitement and sophistication. A deep emerald velvet tablecloth doesn’t just add color; it adds texture and a feeling of regal importance, making the whimsical floral arrangement on top of it feel more intentional and artistic.
A case study in SuitShop’s 2025 wedding planning guide highlights this principle, showing how jewel tones are perfect for adding vibrancy to both boho and dark romantic styles. Their key recommendation is to pair these deep tones with strategic accents. Incorporating metallic elements like gold or copper catches the light and adds a layer of glamour, while soft neutrals like ivory or charcoal grey provide breathing room, preventing the deep colors from overwhelming the space. This curated balance is the hallmark of a professionally styled event.
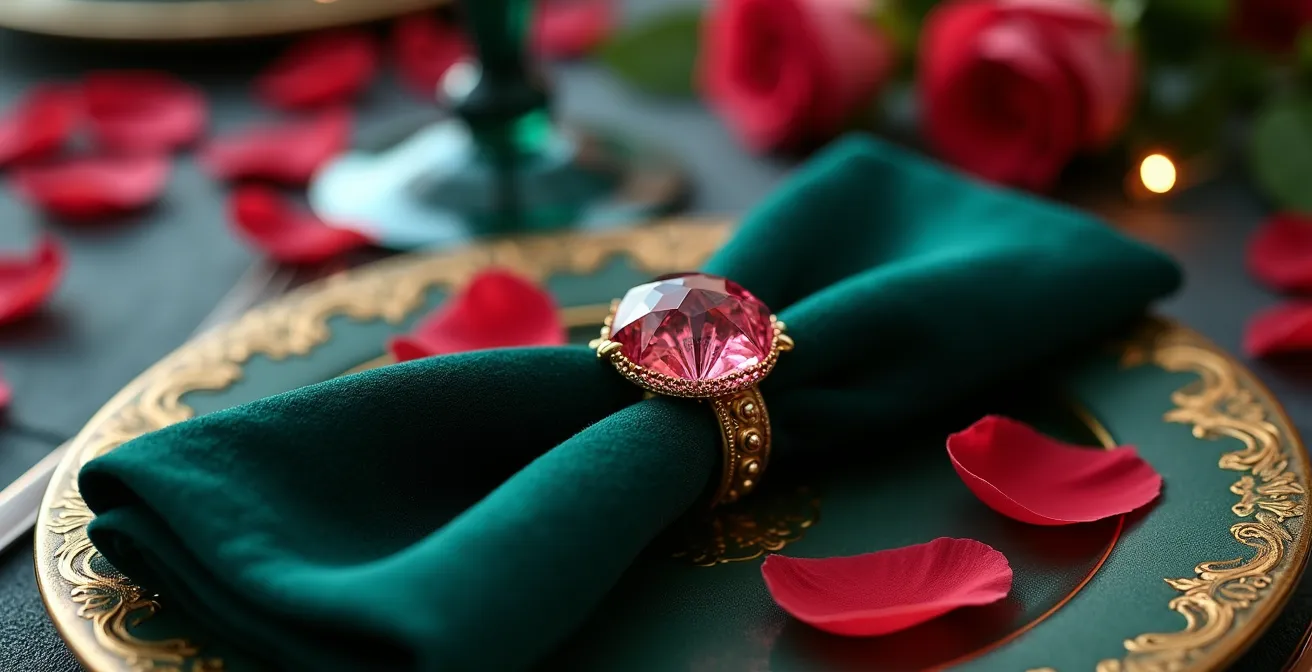
As seen in this example, the deep sapphire of the glassware and the rich green of the velvet napkin create a luxurious foundation. The gold accents provide a spark of magic, and the neutral linen allows each element to shine without competing. This is color theory used not just for decoration, but for storytelling.
How to Mix 4+ Colors in Floral Arrangements Without Creating a Mess?
A floral arrangement bursting with a multitude of colors can be the heart of a whimsical theme, but it’s also where many designs fall apart. The line between a vibrant, painterly bouquet and a chaotic “confetti” explosion is perilously thin. The goal is to create a composition that feels joyfully abundant yet artistically coherent. Simply gathering flowers in four or more different colors without a guiding principle will almost certainly result in visual noise. The key is to employ professional techniques that bring order to the beautiful chaos.
Instead of a random mix, think with Intentional Imbalance. This means using a structured approach to make the color diversity feel deliberate. One of the most effective methods is the ‘Bridging Technique,’ where a single, consistent element is woven through every arrangement. This could be a metallic-painted fern, silvery dusty miller leaves, or a specific type of grass. This “bridge” creates a visual thread that ties all the disparate colors together, telling your guests’ eyes that everything belongs in the same family, even with varied palettes.
Another powerful strategy is to focus on texture. When you combine a wide variety of shapes—spiky eryngium, soft peonies, round craspedia, and cascading amaranthus—the textural variation provides so much visual interest that the brain can process more color without feeling overwhelmed. The different forms create structure and rhythm, allowing the colors to coexist harmoniously. For long tables, ‘Color Blocking’ offers a gallery-like effect, where each centerpiece is a monochromatic study in a different color, creating a stunning visual journey down the length of the table.
To help you choose the right approach, this table summarizes the core techniques florists use to create harmony from a diverse color palette, based on insights from sources like The Knot’s guides on DIY wedding decor.
| Technique | How It Works | Best For | Key Tip |
|---|---|---|---|
| Bridging Technique | Use one consistent element (metallic ferns, dusty miller) in every arrangement | Scattered centerpieces | Creates visual continuity across multiple arrangements |
| Color Blocking | Create monochromatic groupings – each table gets a single color | Long reception tables | Produces a gallery effect instead of a ‘confetti’ look |
| Texture Focus | Combine varied shapes (spiky, soft, round, cascading) | Statement pieces | Texture variety allows more color without chaos |
Why You Need One Large “Wow” Piece Instead of 50 Small Trinkets?
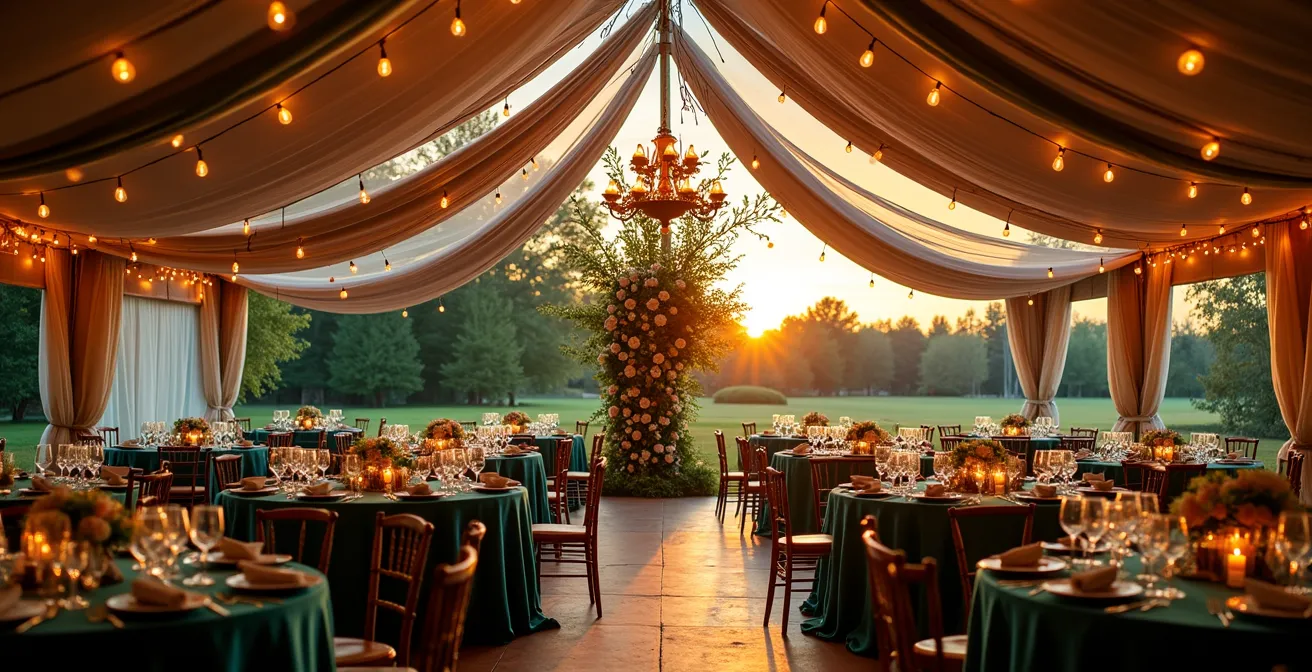
When striving for a whimsical theme, the temptation is to scatter many small, charming objects throughout your venue: little fairy figurines, miniature mushroom statues, tiny colorful bottles. While cute individually, this approach quickly leads to visual clutter. Your guests’ eyes don’t know where to look, and the overall effect feels busy and unfocused, not magical. The secret to creating a powerful, immersive atmosphere lies in the principle of scale. You must practice Focal Point Dramaturgy: creating a single, large-scale “wow” piece that acts as the dramatic heart of your design.
This one monumental installation does the work of a hundred small trinkets. It commands attention, sets the tone for the entire space, and provides the ultimate photo backdrop. By concentrating your budget and creative energy into one unforgettable element, you create a high-impact experience that feels intentional and luxurious. This could be an oversized floral moon-gate arch for your ceremony, a breathtaking installation of hanging florals and lights suspended over the dance floor, or a custom-built architectural backdrop for the sweetheart table. The goal is to create a moment of genuine awe.
This strategy is a cornerstone of professional event design. As professional wedding coordinators at Luxe Productions recommend, you should focus your budget on two to three statement pieces in key photo areas rather than dispersing it thinly. The key is to choose an installation that is proportionate to your venue. A massive floral chandelier in a grand ballroom creates breathtaking drama, while a more delicate, intricate moon-gate might be the perfect focal point for an outdoor garden ceremony. This single, bold statement is what anchors your whimsical theme in a sense of grandeur and purpose, ensuring it feels anything but childish.
Sunset Magic: When to Turn On the Fairy Lights for Maximum Whimsy?
Fairy lights are the quintessential element of whimsical decor, but their magic is all in the timing and application. Simply having them on from the beginning of the event dilutes their impact. To create a truly breathtaking moment, you must think like a lighting designer and embrace the Chiaroscuro of Light—the artful contrast between light and shadow. The most magical time for this reveal is not after dark, but during the “blue hour,” that fleeting period just after the sun has set when the sky is a deep, velvety blue, not yet black.
Turning on a canopy of warm fairy lights against a cool blue sky creates a stunning, high-contrast visual that is utterly enchanting. This painterly effect feels more sophisticated and emotionally resonant than lights twinkling against a pitch-black background. The key is a layered and timed reveal. A professional strategy, as noted in guides like one from HGTV on ‘low cost, high impact’ decor, is to use layered lighting. You might start with subtle bistro lights for the cocktail hour, providing functional ambient light. Then, as the blue hour descends, you execute the grand reveal: a dense canopy of fairy lights over the dance floor or dining area is switched on, transforming the space in an instant. Using smart dimmers allows for a seamless transition, gradually increasing the intensity of the lights as the natural light fades away.
This deliberate orchestration of light creates a moment of collective wonder for your guests. It’s a theatrical reveal that marks a transition in the evening, from the brightness of day to the enchantment of the night. It turns the lighting from a static decoration into a dynamic part of the event’s narrative.
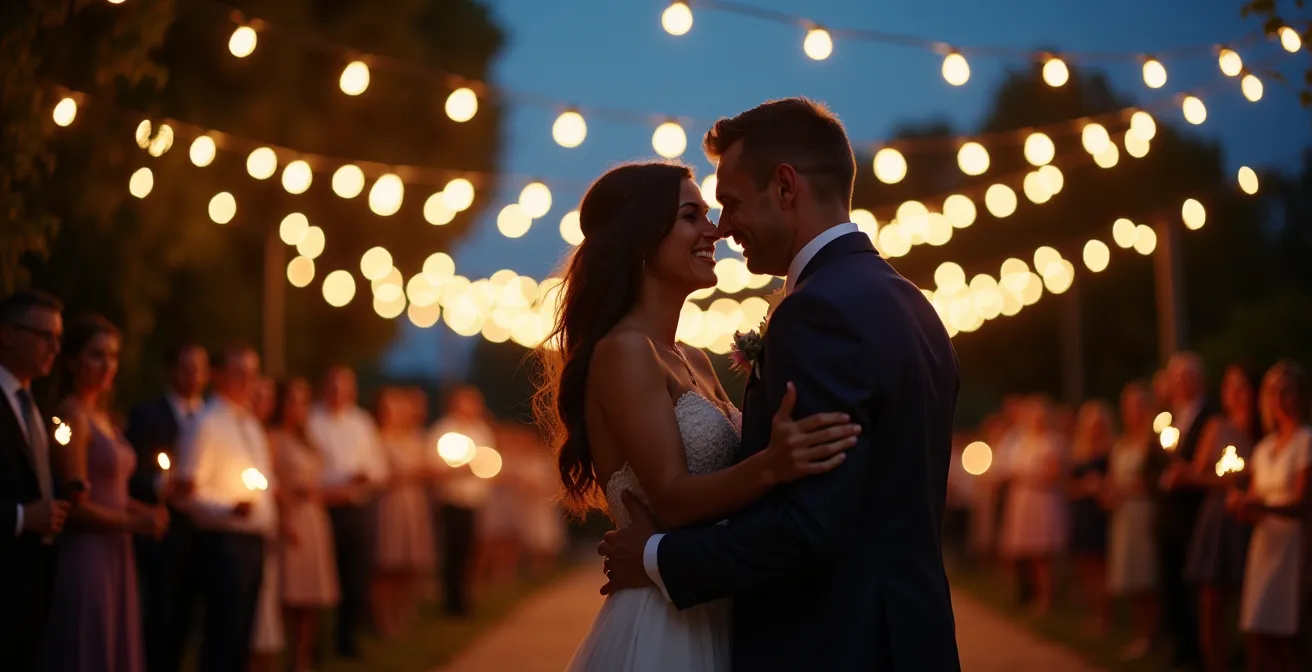
This image perfectly captures the effect. The warm glow of the lights creates an intimate, golden cocoon for the couple, beautifully contrasted against the deep, moody blue of the twilight sky. This isn’t just illumination; it’s atmosphere, it’s emotion, it’s curated magic.
Scenting Your Wedding: How to Diffuse Fragrance Without Triggering Allergies?
True Atmospheric Curation engages all the senses, and scent is one of the most powerful and memorable. A signature fragrance can instantly transport your guests into your fantasy world, solidifying the theme on a subconscious level. However, this is a delicate art. The wrong application—like an overpowering scented candle or a cheap air freshener spray—can feel intrusive and, more importantly, trigger allergies or sensitivities, which is the opposite of a welcoming, magical experience. The goal is to create a subtle, ambient fragrance that guests discover rather than being assaulted by.
The safest and most sophisticated methods avoid airborne particles and heat. Nebulizing diffusers are a professional-grade choice. They use cold-filtered air to break down essential oils into a micro-fine mist without water or heat, preserving the oil’s purity and minimizing the risk of irritation. Placing a few of these in discreet corners of a reception tent can create a consistent, barely-there layer of scent. Another elegant strategy is ‘Scent Zoning.’ This involves assigning different, complementary scents to different areas. A light, fresh scent like eucalyptus could greet guests at the entrance, while a warmer, woody scent could define the lounge area. This allows guests to move between zones and gives them a passive way to avoid a scent they may be sensitive to.
For a zero-risk approach, focus on scenting individual items. High-quality paper menus or place cards can be lightly spritzed with a fragrance. Scented ribbons tied to chairs or napkins can also release a gentle aroma as guests interact with them. This method ensures the scent is localized and not airborne, making it the most considerate option for all attendees. It turns the fragrance into a personal, delightful discovery.
To ensure a pleasant experience for everyone, it is crucial to choose a safe diffusion method. This table outlines several professional options for scenting your event space with minimal allergy risk.
| Method | Allergy Risk | Coverage Area | Best Application |
|---|---|---|---|
| Nebulizing Diffusers (cold-filtered oils) | Low – no heat or water particles | Large spaces | Reception tent corners |
| Scent Zoning (different areas) | Very Low – guests can avoid zones | Targeted areas | Entrance, dining, lounge separately |
| Scented Paper/Ribbons | Minimal – no airborne particles | Individual items | Menus, place cards, chair ribbons |
Key Takeaways
- Ground Your Fantasy: Use rich jewel tones and luxurious textures to provide a mature, sophisticated base for your whimsical elements.
- Master the Focal Point: Invest in one or two large-scale, dramatic installations instead of cluttering your space with small, disconnected trinkets.
- Orchestrate Your Light: Use layered lighting and time your big reveal for the “blue hour” to create a breathtaking, high-contrast moment of magic.
Zig-zag vs. Parallel: Which Layout Creates the Best Sense of Volume?
The layout of your reception tables is more than just a logistical puzzle; it’s a tool for shaping your guests’ experience of the space. A standard, grid-like layout of parallel tables is efficient, but it’s also predictable. It allows guests to see the entire room at a glance, leaving nothing to the imagination. For a whimsical theme rooted in mystery and discovery, this is a missed opportunity. To make a space feel larger, more dynamic, and more magical, you should consider a non-traditional, meandering layout.
A zig-zag or winding arrangement of long tables fundamentally changes the psychology of the room. It forces guests to move through the space and explore. By intentionally obstructing direct sightlines, you create a journey of discovery. Guests turn a corner and are surprised by the cake display; they meander down a path and discover a hidden photo booth or a special performance area. These “reveal moments” are central to a whimsical experience, making the venue feel more expansive and full of secrets than it actually is. It prevents the entire design from being consumed in a single glance, encouraging engagement and a sense of wonder.
This concept of creating an exploratory journey is a key trend in high-end event design, moving away from static, observable setups towards more interactive environments. It’s a perfect alignment for a whimsical theme that values enchantment and surprise over rigid formality.
Case Study: Creating Discovery Through Non-Traditional Layouts
An analysis of creative weddings by the event platform PartySlate shows a clear trend towards layouts that foster exploration. Their findings reveal that zig-zag or serpentine table arrangements make spaces feel larger and more mysterious. By breaking up the room’s open expanse, couples create distinct zones and ‘reveal moments.’ This approach prevents the entire space from being visible at once, forcing guests to engage with their surroundings and discover curated details as they move about, which perfectly enhances the narrative of a whimsical and enchanting event.
How to Install Hanging Dried Palms Safely and Stylishly?
Hanging dried palms and pampas grass from a ceiling can create a stunning, cloud-like textural canopy that is both whimsical and bohemian. However, this is perhaps the single most important element to approach with a “safety first” mindset. Dried botanicals are highly flammable. As a stylist, I can’t stress this enough: an untreated dried installation is a serious fire hazard. Many venues have strict policies against them for this very reason. The first and most crucial step is to treat every single stem with a clear, matte fire-retardant spray. This is a non-negotiable step required by most fire codes and venue regulations.
As experts in event safety compliance, sources like Life Safety Express note that flammable materials are a primary concern for fire marshals. You must verify with your venue that the tent or ceiling material is approved for decorations to be placed near or against it, and you must maintain a safe clearance from any heat sources like lights or electrical equipment. Once safety is addressed, you can focus on style. To create a lush, three-dimensional effect, work in layers. Start with a base layer of larger palm leaves installed flat against the ceiling to cover the area. Then, add a second, lower layer of smaller, angled palms and grasses to create depth and shadow.
The final touch that brings this installation to life is lighting. Don’t just light the room; light the installation itself. Position uplights on the floor, aimed to shine up and through the layers of dried palms. This technique will cast dramatic, dancing shadows across the ceiling and walls, transforming your textural canopy into a dynamic and immersive piece of living art. This interplay of texture and shadow is what elevates a simple decoration into a truly magical, sophisticated feature.
Now that you are armed with these professional principles, you can begin the exciting process of curating your own magical atmosphere. Start applying these concepts of scale, color, light, and safety to your vision board, and watch as your whimsical wedding transforms from a simple theme into a sophisticated and unforgettable work of art.