To make your floral investment truly count, pin spotting must be treated as a precision tool, not just general lighting.
- The primary goal is to protect your centerpiece investment by ensuring it remains a focal point after the sun sets.
- Success hinges on technical details: using narrow beam angles to avoid blinding guests and high-CRI lights to render colors accurately.
Recommendation: Layer pin spots with soft ambient uplighting to create a dramatic, high-end environment that highlights key features without overwhelming the space.
You’ve allocated a significant portion of your wedding budget to stunning floral centerpieces. They look incredible in the daylight, a testament to your vision and your florist’s artistry. But a crucial question often goes unasked: what happens to that investment when the house lights dim for dinner and dancing? In a dimly lit reception hall, expensive arrangements can disappear into the background, their vibrant colors and intricate details lost to the shadows. This is where many couples miss a critical opportunity.
The common solution is often just “more light,” perhaps by turning up the venue’s overheads or relying solely on broad uplighting. However, this washes out the romantic atmosphere you’re trying to create. Pin spotting is the professional’s answer, but simply knowing the term isn’t enough. Effective pin spotting is a matter of precision and strategy. It’s about more than just pointing a light; it’s about sculpting the visual environment to ensure your most important decor elements get the “money shot” they deserve, both in person and in your photographs.
The real key is not just to illuminate, but to do so with surgical accuracy. It involves understanding the interplay between mounting height and beam angle, the science of color rendering that keeps your flowers looking vibrant, and the strategic placement that hides the hardware while maximizing the effect. This is how you transform a beautiful centerpiece into a breathtaking focal point that anchors the room’s entire design.
This guide will walk you through the strategic decisions and technical considerations of a lighting specialist. We will cover how to justify the cost, execute the installation flawlessly, and integrate this powerful tool into a cohesive and unforgettable visual experience.
Summary: How to Use Pin Spots to Make Your Centerpieces Pop in the Dark?
- Is it worth spending $50 per light to illuminate a $150 centerpiece?
- How to install pin spots in a tent without drilling into poles?
- Narrow vs. Wide beam: avoiding blinding guests while lighting the flowers
- Where to mount the lights so guests don’t see the ugly black boxes?
- Are wireless pin spots bright enough to last the whole 6-hour reception?
- How to position pin spots so they don’t bounce blindingly off acrylic chairs?
- Why standard uplights make green leaves look brown and what to use instead?
- How to Create a Cohesive Visual Environment Without Overwhelming the Venue?
Is it worth spending $50 per light to illuminate a $150 centerpiece?
This question shifts when you reframe it from an expense to an investment. The $50 for a pin spot isn’t just a lighting fee; it’s an insurance policy on the $150+ you’ve already spent on the centerpiece, linens, and place settings. When the ambient lighting is lowered to create a romantic dinner atmosphere, unlit floral arrangements unfortunately tend to blend into the background. Your investment becomes virtually invisible for a significant portion of the event. The true value of pin spotting lies in guaranteeing the visual return on investment (Visual ROI) for your entire tablescape.
Considering that analyses show the average American wedding costs approximately $284 per guest, the cost of a pin spot is a small, strategic fraction of the overall spend. Its purpose is to elevate the perceived value of the elements you’ve already paid for. A perfectly lit centerpiece not only enhances the guest experience but also ensures your photographer can capture the stunning detail shots that immortalize your decor choices. Without that focused light, photographers must push their camera’s ISO settings, resulting in grainy, less impactful images.
Not every table may require this treatment. A common professional strategy is selective splurging. Emphasis can be placed on lighting only the most important tables, such as the sweetheart or head tables, and perhaps every other guest table. This creates depth and visual interest across the room while managing costs effectively. The goal is to ensure the money you spent on beauty is actually seen and appreciated throughout the entire evening.
Your Checklist for Protecting Your Centerpiece Investment
- Calculate Total Table Investment: Sum the cost of your centerpiece, specialty linens, chargers, glassware, and stationery for one table to understand the full value at stake.
- Perform the Visibility Test: Ask your venue coordinator to dim the lights to the level planned for dinner. Observe how much detail is lost on the flowers. This demonstrates the problem firsthand.
- Consult Your Photographer: Discuss your lighting plan with your photographer. A test shot with and without a pin spot can be decisive, showing the dramatic difference in photo quality.
- Assess Key Sightlines: Identify which tables are most prominent from the entrance, head table, and dance floor. Prioritize pin spotting these high-impact locations.
- Develop a Selective Splurge Strategy: Decide if you will light every table, every other table, or only key tables like the head table and cake display to balance impact and budget.
How to install pin spots in a tent without drilling into poles?
Installing lighting in a tented venue presents a unique challenge: the structure is temporary and cannot be permanently altered. Drilling into tent poles or fabric is strictly forbidden and unnecessary. Professionals rely on non-destructive mounting hardware designed specifically for these environments. The key is to use clamps and magnets that securely attach to the existing framework without leaving a mark.
The most effective tool for this job is a professional-grade pin spot with a magnetic base. These powerful magnets are strong enough to hold the lightweight fixture securely to any ferrous metal surface, which includes most tent poles and support beams. For structures with drop ceilings or grids, technicians use scissor clamps that clip onto the grid framework. The process is quick, secure, and completely reversible. The fixture is simply attached to the pole or beam, angled towards the centerpiece, and secured.
When hanging multiple pin spots, spacing is also a practical consideration. Placing them at least five feet apart makes it easier for a technician to aim and turn them on or off with a wireless remote without one fixture obstructing the signal to another. This strategic placement ensures a smooth and efficient installation process, respecting the integrity of the venue while delivering a flawless lighting effect.
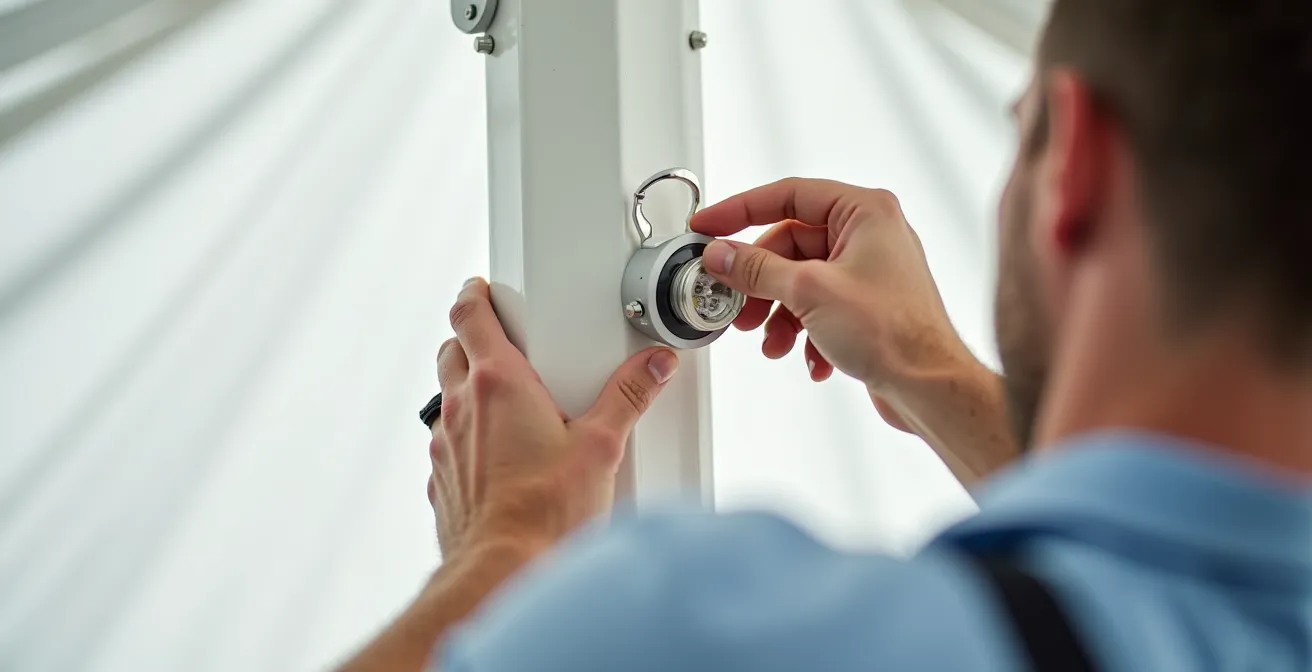
As shown, the technique involves precise placement on the tent’s metal framework. The magnetic base provides a strong hold, allowing the lighting designer to position the fixture at the perfect angle to illuminate the centerpiece below without any risk of damage to the tent structure. This non-invasive method is the industry standard for high-end tented events.
Narrow vs. Wide beam: avoiding blinding guests while lighting the flowers
The single biggest mistake in DIY or inexperienced pin spotting is using a beam of light that is too wide. The goal is to illuminate the centerpiece, not the guests’ faces or the entire tabletop. This is what professionals refer to as light contamination, and it can ruin the guest experience. A wide beam of light shining down on a table will inevitably catch guests in the eyes as they talk, eat, and look across the table, creating uncomfortable glare and distraction. True pin spots are defined by their extremely narrow beam angle.
The choice between a narrow or wide beam is directly related to the mounting height. The higher the light source, the narrower the beam needs to be to maintain a tight, focused circle of light on the table below. As the Wedding Lighting Co notes in their technical specifications, purpose-built fixtures are key. According to their experts, “Pin spots are used to shine a bright light on surfaces and illuminate details of your event from very far away. They take advantage of a narrow one-degree lens to avoid shining in your guest’s eyes.” This precision is what separates a professional effect from an amateur annoyance.
The following guide provides a clear framework for selecting the appropriate beam angle based on where the lights will be mounted. Adhering to these specifications ensures the light hits only the floral arrangement, creating a dramatic “pop” without any distracting or blinding light spill.
| Mounting Height | Recommended Beam Angle | Coverage Diameter | Best For |
|---|---|---|---|
| 10-12 feet | 6-8° | 1.25-1.5 feet | Low centerpieces |
| 15-18 feet | 4-6° | 1.3-1.8 feet | Standard arrangements |
| 20+ feet | 2-4° | 1.5-2 feet | Tall centerpieces |
Where to mount the lights so guests don’t see the ugly black boxes?
The magic of great lighting design lies in seeing the effect, not the source. Exposing guests to a ceiling cluttered with ugly black boxes, cables, and rigging completely shatters the illusion. Strategic concealment is a core principle of professional lighting. This involves a thoughtful pre-installation process that considers the venue’s architecture and the guests’ primary points of view.
First, a lighting designer will map the key sightlines. They’ll stand at the entrance, the head table, and the edge of the dance floor to identify where guests’ eyes will naturally travel. The goal is to place fixtures outside these direct lines of sight. Whenever possible, lights are positioned behind existing architectural features like ceiling beams, cornices, or drapery swags. For a seamless look, it’s also crucial to choose fixtures that match the color of the ceiling; white pin spots should be used for white tents and ceilings to make them virtually disappear.
In venues with high or inaccessible ceilings, or where no mounting points exist, technicians use freestanding solutions. Most often, pin spots are rigged to vertical truss racks, which are then supported by heavy, weighted pipe and base structures. These are typically draped in fabric that matches the decor to blend in. For an even more advanced effect, some florists with highly detailed topiaries or arrangements may require cross-lighting. This technique involves mounting two fixtures from opposing high angles to light the centerpiece from both sides, eliminating shadows and ensuring it is perfectly and evenly lit from all viewpoints.
Are wireless pin spots bright enough to last the whole 6-hour reception?
Yes, but only if you use professional-grade equipment. The reliability of wireless pin spots is a common concern, and the market is flooded with consumer-grade options that are not up to the task. While many budget lights claim long battery life, they often dim significantly after just 2-3 hours, leaving your centerpieces in the dark halfway through the reception. They can also have inconsistent color temperature and brightness, creating a cheap and uneven look.
Professional lighting companies use high-quality, lithium-ion battery-powered LED pin spots from reputable brands like Chauvet DJ or ADJ. These units are specifically designed for the demands of a full event. They offer a consistent, powerful light output that is engineered to last for 8 to 12 hours on a single charge at full power—far exceeding the typical 6-hour reception. While some standard LED units are rated for approximately six hours, professional-grade fixtures provide a crucial buffer and ensure reliability.
Furthermore, professional wireless systems offer greater control. A lighting technician can often dim the lights remotely. For example, the pin spots can be run at 50% power during the cocktail hour and dinner, then brought up to 100% for the main events after sunset. This not only conserves battery but also allows for dynamic adjustments to the room’s ambiance. When you hire a lighting specialist, you are paying for this reliability and control, ensuring your investment is visible and beautiful from the first guest’s arrival to the last dance.
How to position pin spots so they don’t bounce blindingly off acrylic chairs?
The rise of modern decor, including acrylic “ghost” chairs, introduces a new challenge for lighting designers: reflectivity. A poorly aimed pin spot can easily hit the smooth, curved surface of a chair back and create a blindingly bright reflection, or “hot spot,” that shoots across the room or directly into a guest’s eyes. This completely undermines the sophisticated and elegant atmosphere you are trying to create.
The solution lies in one simple geometric principle: the angle of incidence equals the angle of reflection. To avoid reflective glare, you must control the angle at which the light hits the table. The most effective method is to position the pin spot almost directly overhead, creating a steep, near-vertical angle of attack. As the experts at Ship Our Wedding advise, “Mounting from above is optimal because the light can shine down almost directly onto your centerpieces. This will prevent shadows and light from getting into guests’ eyes.”
By using a steep downward angle, the light beam is contained to the tabletop and the centerpiece itself. Any minor reflection from the chair’s surface is directed harmlessly downwards towards the floor, rather than outwards towards other guests. This technique, combined with a very narrow beam, ensures that only the centerpiece is highlighted, preserving the clean, transparent look of the acrylic chairs and maintaining a comfortable, glare-free environment for everyone.
Why standard uplights make green leaves look brown and what to use instead?
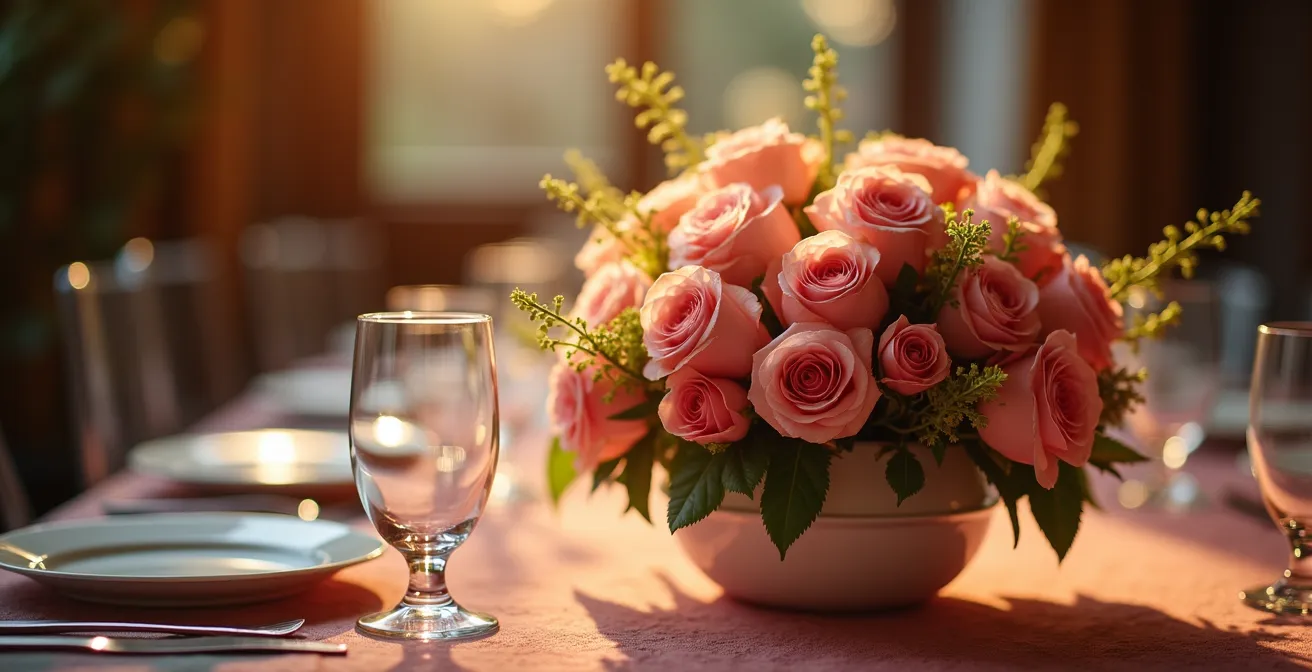
This common and frustrating problem stems from a technical property of light called the Color Rendering Index (CRI). CRI is a scale from 0 to 100 that measures a light source’s ability to reveal the true colors of an object compared to natural sunlight. Many standard LED uplights, especially older or cheaper models, have a low CRI (typically 70-80). While they can produce saturated colors for washing a wall, they are very poor at rendering natural, subtle tones accurately. For florals, this is a disaster. Under a low-CRI light, rich green leaves appear dull, brownish, or muddy, and the complex hues of a rose or peony look flat and lifeless.
The solution is to use a light source with a high CRI, specifically designed for color accuracy. Pin spots are engineered for this purpose. They are focused beams of warm white light that use specialized bulbs or high-CRI LED chips (rated 90+). This high-quality light source ensures that colors are rendered vividly and naturally. Lush greens appear fresh and vibrant, deep reds look rich, and soft whites remain pure, making the floral arrangement “pop” in person and in photographs just as the florist intended.
While high-CRI fixtures come at a premium, the difference in visual impact is undeniable. For couples who have invested heavily in their floral design, ensuring those colors are rendered accurately is not a luxury—it’s essential. Some ultra-high-end fixtures (RGBA/RGBW) even allow for custom-tuning the white light to perfectly complement the specific tones of the flowers.
The following table breaks down how different light sources impact the appearance of your florals. It highlights why investing in high-CRI pin spotting is critical for protecting the color integrity of your arrangements.
| Light Type | CRI Rating | Green Rendering | Cost Impact |
|---|---|---|---|
| Standard LED Uplight | 70-80 | Brown/Muddy | Base cost |
| High-CRI LED Pin Spot | 90+ | Natural/Vibrant | +20% cost |
| RGBA/RGBW Fixture | 95+ | Custom-tunable | +50% cost |
Key Takeaways
- Pin spotting is an investment to protect and enhance your floral and decor budget, not just an added cost.
- Success depends on technical precision: use narrow beams (2-6 degrees) and steep vertical angles to avoid blinding guests.
- Always use high-CRI (90+) pin spots to ensure florals’ colors appear vibrant and true, not muddy or brown.
How to Create a Cohesive Visual Environment Without Overwhelming the Venue?
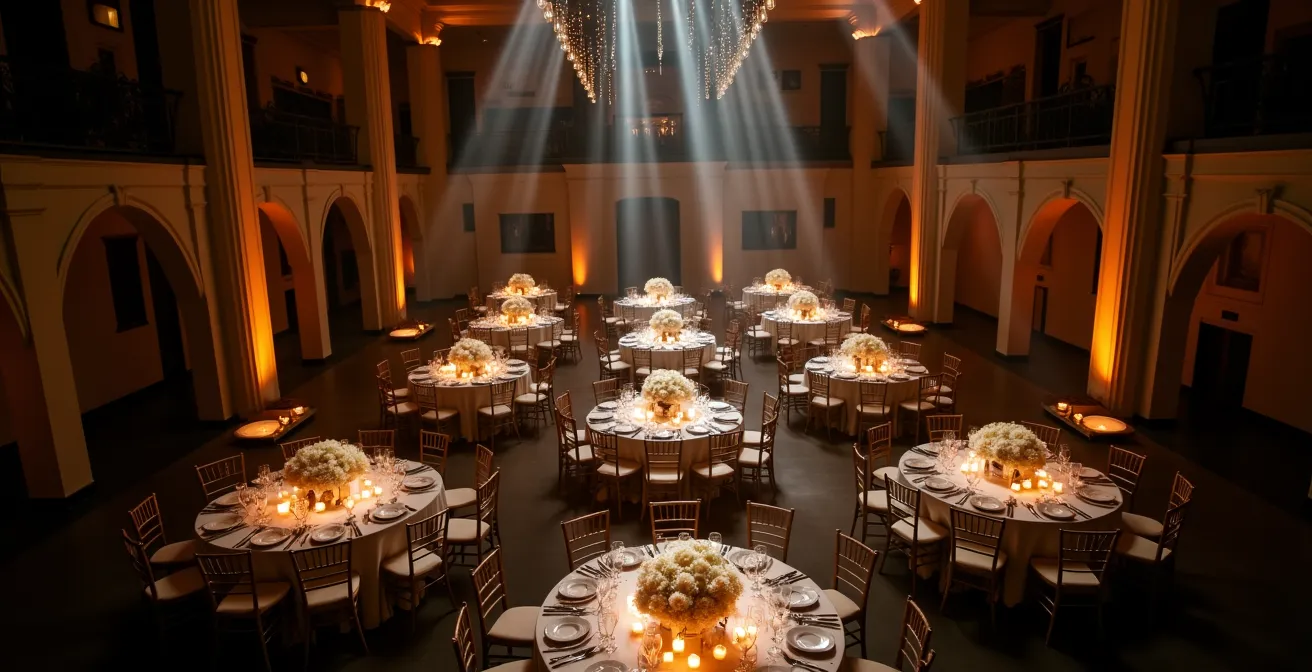
A truly high-end look is never achieved with a single type of lighting. Blasting a room with only one color of uplighting can make it feel flat and monolithic, while using only pin spots can make it feel like a series of disconnected islands in a sea of darkness. The art of luxury wedding lighting lies in creating layers of light that work together to guide the eye and build a cohesive, dynamic environment.
As the design experts at Eggsotic Events explain, “The high-end look you’re trying to achieve comes from layering different types of light. The uplighting creates a colorful wash, then the pin spots create dramatic focal points and keep the room from looking like one solid color.” This combination is what creates visual hierarchy and sophistication. The uplighting sets the mood and defines the space, while the pin spots draw attention to the details you’ve invested in—the centerpieces, the wedding cake, a special piece of art.
A professional lighting designer thinks in three distinct layers to build this environment:
- The Ambient Layer: This is the foundation, usually created with soft uplighting on the walls or ceiling drapery. It establishes the room’s base color and overall mood. (Approx. 30-40% of the lighting budget).
- The Task Layer: This is where pin spots do their work. It’s the functional, focused light that highlights key focal points like centerpieces, the cake, and bars, making them stand out. (Approx. 40-50% of the budget).
- The Accent Layer: This is the “jewelry” of the room. It can include patterned gobo projections on the dance floor or walls, or special lighting on architectural features to add texture and interest. (Approx. 10-20% of the budget).
Finally, a crucial part of this cohesive design is the use of negative space. Not every corner of the room needs to be lit. Intentionally leaving some areas in soft shadow provides visual relief and makes the illuminated areas feel even more special and impactful. This thoughtful balance of light and shadow is what transforms a decorated room into an immersive, unforgettable experience.