For couples craving a lush, garden-like wedding atmosphere without an extravagant floral budget, the challenge seems immense. The solution, however, doesn’t lie in buying more plants. Achieving that luxurious, high-volume look with cascading ferns is about mastering a professional’s trifecta: leveraging hardy species, mastering strategic placement to create an illusion of abundance, and using smart lighting techniques to multiply your visual impact. It’s about strategy, not just spending.
There’s an undeniable magic to a wedding venue overflowing with greenery. It feels alive, intimate, and utterly transportive. For many couples dreaming of a garden or jungle theme, the vision is a canopy of lush, cascading ferns. The reality, however, often crashes against the hard wall of a budget. The common advice—”just buy more ferns”—is both unhelpful and financially daunting. Others suggest mixing in a few fronds with expensive floral arrangements, but that defeats the purpose of using greenery as a cost-effective star of the show.
The truth that seasoned greenery specialists know is that volume isn’t about quantity; it’s about technique. You can achieve a breathtakingly dense and immersive environment with fewer plants than you think. But what if the real secret wasn’t in the ferns themselves, but in how you prepare, place, and light them? The key is shifting focus from simply filling space to creating a carefully engineered illusion of lushness. This involves understanding which ferns can survive the rigors of an event, how height can trick the eye, and how to make a single plant do the visual work of five.
This guide will walk you through the professional strategies to transform your venue with cascading ferns. We will deconstruct the process, from selecting the right species to avoid a wilting disaster, to the logistical secrets of hanging and hydration. You’ll learn how to use light as a design tool and how to integrate larger green elements to build an entire indoor garden ecosystem on a realistic budget.
To help you navigate these professional techniques, this article is structured to build your expertise step-by-step. The following summary outlines the key areas we will cover to help you create your dream green wedding.
Summary: A Strategic Guide to Wedding Fern Installations
- Why you should avoid delicate ferns for installations without water?
- Why hanging ferns need to be at least 8 feet up to look natural?
- How to mask the plastic pot when hanging ferns from a tent ceiling?
- Using gobos to project fern shadows on walls for double the impact
- Misting schedules: keeping ferns perky in a dry air-conditioned hall
- Renting 10-foot trees: are they better space fillers than table flowers?
- Live moss vs. Preserved: which smells better and creates less mess?
- How to Bring the Outdoors In for a Garden-Like Wedding Inside?
Why you should avoid delicate ferns for installations without water?
The first and most critical decision in your greenery plan is selecting the right type of fern. It’s tempting to choose the most intricate and delicate varieties, like the ethereal Maidenhair fern, for their beauty. This is the single biggest mistake a couple can make. These ferns are exceptionally sensitive to dehydration and will begin to look sad, brown, and wilted within hours in a dry, air-conditioned venue, completely ruining the lush effect you’re aiming for.
Your installation will be without a direct water source for the entire event. Therefore, you must prioritize hardiness above all else. Varieties like the Boston Fern (Nephrolepis exaltata) or Sword Fern are far more robust. They have thicker fronds that retain moisture longer and can withstand the challenging environment of a wedding hall. Choosing a hardy fern is the foundation of logistical preparedness; it’s the built-in insurance policy for your design.
In fact, the problem of wilting is so significant that many professionals have a go-to secret. As florist Sophie from Sage Designs, with experience in over 1200 events, points out, high-quality artificial greens are almost always used for complex hanging arrangements. They are lightweight, require no maintenance, look flawless all night, and are reusable, sidestepping the rapid decline of delicate live plants in environments without water. If your heart is set on a very specific, delicate look, going with a quality artificial option is a smarter and safer investment.
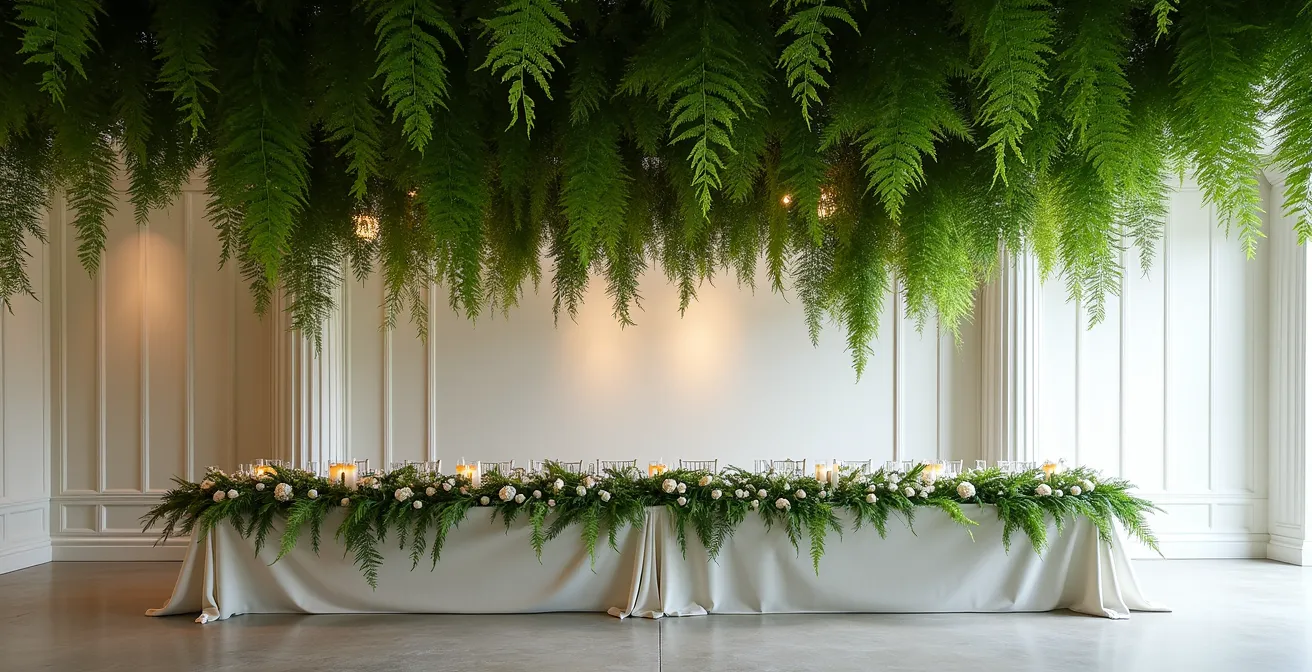
Why hanging ferns need to be at least 8 feet up to look natural?
Once you’ve chosen your hardy ferns, the next strategic decision is placement. The instinct might be to hang them at various levels to fill the space, but this can backfire. There’s a core design principle known as “The 8-Foot Rule” that is non-negotiable for creating an elegant, natural-feeling canopy. Any hanging greenery that dips below eight feet from the floor starts to encroach on personal space, making the room feel smaller and more cluttered.

As the image above illustrates, when ferns are hung high, they create a sense of wonder and draw the eye upward, enhancing the perceived height of the ceiling. This creates an immersive, enchanting canopy effect. When elements are hung too low, guests might subconsciously feel the need to duck or that the decor is “in their way.” According to The Knot’s wedding experts, hanging greenery below this height “breaks the intended ‘enchanted canopy’ illusion” by making guests feel cramped.
Maintaining this minimum height is crucial for the success of your design. It ensures the ferns feel like a natural extension of the architecture rather than intrusive decorations. This single rule elevates the entire look from a simple DIY project to a professional-grade installation, creating a true sense of being outdoors under a lush, green ceiling without sacrificing the comfort and space of your guests below.
How to mask the plastic pot when hanging ferns from a tent ceiling?
You’ve selected a hardy fern and are ready to hang it at the proper height. But now you face a common aesthetic problem: the ugly plastic nursery pot. Nothing shatters the illusion of a natural, wild garden faster than a black plastic pot dangling from the ceiling. Masking this element is a critical detail that separates an amateur setup from a polished, high-end design. Fortunately, there are several methods, each with a different balance of cost, difficulty, and visual style.
While a quick coat of matte black spray paint can help a pot disappear into the shadows, a more organic approach yields far better results. Wrapping the pot in burlap or fabric offers rustic charm, but the most seamless method is the Kokedama-style technique. This involves removing the plant from the pot entirely and wrapping the root ball in moss, securing it with twine. It creates a beautiful, self-contained sphere of green that looks completely natural when hung.
The following table breaks down the most common methods, allowing you to choose the best fit for your budget and skill level.
| Method | Cost Range | Difficulty | Visual Impact |
|---|---|---|---|
| Spray Paint (Matte Black) | $0-5 | Easy | Basic concealment |
| Burlap/Fabric Wrap | $5-15 | Easy | Rustic charm |
| Kokedama Style | $10-20 | Medium | High-end organic |
| Macrame/Ribbon Cage | $15-30 | Medium | Luxe appearance |
Your Action Plan: The Kokedama-Style Pot Concealment
- De-pot the Fern: Carefully remove the entire fern, including its root ball, from its original plastic pot.
- Wrap the Root Ball: Tightly wrap the entire root ball with a generous layer of pre-moistened sphagnum moss.
- Secure the Moss: Use natural twine or green bind wire to wrap around the moss ball repeatedly, securing it firmly.
- Create Hanging Points: Attach heavy-duty zip ties or wire around the top of the moss ball to create strong, reliable loops for hanging.
- Conceal Hardware: If any zip ties or wires are visible, spray paint them matte black so they vanish against the ceiling shadows.
Using gobos to project fern shadows on walls for double the impact
Here is where you move from simple decoration to true design strategy. The most powerful tool for creating lush volume on a budget isn’t a plant—it’s light. By using “gobos” (stencils placed inside a projector light), you can cast beautiful, intricate fern shadow patterns across walls, ceilings, and the dance floor. This technique is the essence of visual multiplication; it takes the presence of a few real ferns and expands their impact exponentially across the entire space.
The effect is transformative. A blank ballroom wall suddenly becomes a dappled forest clearing. Instead of costing thousands to cover a wall with real greenery, a single, well-placed gobo projector can achieve a more dramatic and dynamic effect for a fraction of the price. In fact, lighting design experts have found that one well-placed fern combined with gobo projection can cover five times the visual space of using real ferns alone. This is the ultimate budget-friendly hack for achieving a high-impact look.
Case Study: Dappled Light Forest Canopy Effect
A wedding at The Breakers Palm Beach masterfully used this technique. They combined projectors with fern-patterned gobos to create the illusion of sunlight filtering through a forest canopy onto the dance floor and surrounding walls. By layering these fern projections with soft green and amber uplighting, they created a multi-layered, immersive depth that physical plants alone could not achieve. According to guests, the effect was “totally immersive,” completely transforming a standard ballroom into an enchanted forest.
This approach adds a layer of sophistication and magic that physical installations struggle to match. It’s not just about adding more green; it’s about creating an atmosphere, a feeling. The interplay of real ferns with their projected shadows creates a rich, layered environment that feels both intentional and completely natural.
Misting schedules: keeping ferns perky in a dry air-conditioned hall
Your beautiful, hardy ferns are hung perfectly, but the battle isn’t over. The biggest enemy of live greenery at an indoor event is the dry, recycled air from HVAC systems. Air conditioning is incredibly effective at sucking moisture out of the air—and out of your ferns’ delicate fronds. To combat this, you need a proactive hydration and misting schedule as part of your logistical preparedness.
The process starts 24 hours before the event. The goal is to “super-hydrate” the plants so they have a deep reservoir of moisture to draw from. This involves a thorough soaking of the root balls. Once on-site, a disciplined misting routine is crucial. A fine mist should be sprayed every couple of hours, focusing on the undersides of the leaves (where the pores, or stomata, are located) rather than the soil. Using distilled water is a professional tip to prevent unsightly mineral spots from forming on the leaves as the water evaporates.
A dedicated person should be assigned this task. It may seem minor, but it’s the difference between ferns that look lush and vibrant at the end of the night and those that look tired and crispy. This simple, low-cost maintenance task protects your investment and ensures your vision is sustained for the duration of the celebration. It’s the final step in ensuring your live elements perform flawlessly.
Renting 10-foot trees: are they better space fillers than table flowers?
While cascading ferns are perfect for overhead volume, creating a lush atmosphere also requires attention to the vertical space from the ground up. Here, many couples default to tall floral centerpieces, which can be astronomically expensive. A far more effective and often more budget-friendly strategy is to use large, rented plants as “structural greenery.” Renting several 8-to-10-foot trees, like Ficus or Kentia Palms, can define the space in a way that flowers simply cannot.
Instead of just decorating a table, these trees act as architectural elements. They can be used to create a grand entrance, frame the altar or head table, or even form cozy “rooms within a room” for a lounge area. In terms of sheer visual impact, there is no comparison. In venues with high ceilings, professional event planners calculate that 10-foot trees can provide up to 8 times more visual impact per dollar than tall floral centerpieces. You are filling cubic feet of space, not just square inches on a table.
However, this approach requires logistical planning. A real-world woodland-themed wedding case study highlights that you must account for hidden costs like delivery fees, potential damage deposits for venue floors, and the need for a dedicated setup crew. Despite these logistics, the dramatic, architectural presence provided by the trees created a sense of intimacy and grandeur that dozens of floral arrangements could never have achieved for the same cost.
Live moss vs. Preserved: which smells better and creates less mess?
As you build out your garden theme, moss becomes an invaluable tool for covering bases, creating table runners, and adding textural detail. But a choice immediately presents itself: should you use live moss or preserved moss? The answer has significant implications for scent, mess, and overall logistics. Live moss brings an authentic, earthy scent of petrichor (the smell of rain on dry soil), which can be incredible for atmospheric immersion. However, it is messy, can shed soil, requires moisture, and carries a small risk of harboring insects—not ideal around food service.
Preserved moss, on the other hand, is completely inert. It offers zero mess, is lightweight, and requires no care. While some types may have a faint chemical smell initially, this typically dissipates. Its biggest advantages are cleanliness and reusability. An expert florist offers a crucial perspective on this choice.
Live, untreated moss can harbor small insects, which may not be ideal for a food-service environment like a wedding. Preserved moss, while having a higher initial cost, can be perfectly saved, reused for home decor, or even resold to another DIY bride.
– Sarah, You Floral Victoria BC, Professional Florist Tips for Wedding Moss Selection
For most wedding applications, preserved moss is the clear winner for its reliability and cleanliness, despite a higher initial cost. The peace of mind it offers by eliminating the risk of mess or pests on your big day is well worth the investment.
| Characteristic | Live Moss | Preserved Moss | Winner |
|---|---|---|---|
| Initial Cost | $5-10/sq ft | $15-20/sq ft | Live |
| Scent Profile | Petrichor, damp earth | Faint chemical initially | Depends on preference |
| Allergen Risk | High – spores, pollen | Low – inert material | Preserved |
| Cleanup Effort | High – soil, moisture | Minimal – no debris | Preserved |
| Longevity | 1-2 days without water | Years if stored properly | Preserved |
Key Takeaways
- Prioritize hardy ferns like the Boston Fern to avoid wilting; consider high-quality artificials for delicate looks.
- Strictly adhere to the “8-Foot Rule” for all hanging greenery to create an elegant, non-intrusive canopy effect.
- Use visual multiplication techniques like gobo light projections to dramatically increase the impact of each plant on a budget.
How to Bring the Outdoors In for a Garden-Like Wedding Inside?
Creating a truly immersive indoor garden is about more than just placing plants around the room. It’s about engaging all five senses to build a complete atmospheric immersion. You’ve already addressed sight with your cascading ferns, structural trees, and gobo lighting. Now, it’s time to layer in the other senses to make the experience feel holistic and transportive. Think about what makes a real garden feel special: the subtle sounds of nature, the fresh scent on the air, and the variety of textures.
This multi-sensory approach is the final layer of professional design. You can introduce a subtle nature soundscape (like birds or crickets) in lounge areas with hidden speakers. Use essential oil diffusers placed near air vents to gently circulate scents of fresh-cut grass or damp earth. Incorporate tactile elements like velvet cushions, raw wood tables, and moss table runners. Even your menu can contribute, with herb-infused cocktails and edible flower garnishes.
One advanced strategy is the “elements instead of objects” approach. Instead of just placing a pot of grass, a reception can use grass-textured carpet runners to create pathways. Instead of just a blue wall, project soft cloud patterns on the ceiling. This deconstructed method uses textures and light to evoke the feeling of a garden in a sophisticated, abstract way, achieving a high-end atmosphere for a surprisingly low rental cost. By combining these sensory layers, you move beyond simple decoration and become the architect of a complete, unforgettable experience.
By applying these professional techniques—from choosing the right plant to engineering a full sensory experience—you can create the lush, cascading fern wonderland of your dreams, proving that a spectacular result is born from smart strategy, not an unlimited budget.