The dream of a twinkling wedding canopy often results in a messy, Christmas-light reality. The secret to a sophisticated look isn’t more lights, but a professional designer’s approach to the physics of light and space.
- Prioritize light purity by using strands of a single, consistent color temperature (Kelvin) to ensure flattering and professional photos.
- Calculate the total electrical load (amperage) to prevent dangerous overloads and embarrassing power outages during your event.
- Use specific layouts like parallel lines or zig-zag patterns as architectural tools to intentionally define the volume and intimacy of your space.
Recommendation: Stop thinking of fairy lights as simple decorations and start treating them as architectural elements that shape the ambiance of your wedding.
For many couples, the vision of a celestial canopy of fairy lights is the cornerstone of their wedding decor. It promises romance, intimacy, and a touch of pure magic. Yet, the fear is palpable: what if the final result looks less like a starry night and more like a chaotic, leftover Christmas display? This anxiety is what separates a breathtaking installation from a messy, amateur attempt. The common advice—to wrap them around pillars or stuff them into jars—often misses the point entirely.
The truth, from a lighting designer’s perspective, is that achieving a high-end look has very little to do with the quantity of lights and everything to do with control, precision, and an understanding of light as an architectural tool. The most common mistakes stem from ignoring the technical foundations: mixing light temperatures, overloading circuits, and failing to use pattern and tension to create deliberate shapes. It’s not about just hanging lights; it’s about engineering an atmosphere.
But what if the key to a magical canopy wasn’t in buying more strands, but in understanding the physics behind them? This guide departs from generic decorating tips. Instead, we will explore the professional’s methodology, focusing on the technical decisions that create a truly sophisticated and seamless effect. We will delve into the science of color temperature, the mathematics of power safety, the geometry of layout, and the crucial details of weather-proofing that ensure your magical ambiance lasts, rain or shine.
By following these principles, you will learn to sculpt your space with light, creating an immersive experience that feels intentional, elegant, and anything but messy. Let’s break down the professional process, step by step, to ensure your fairy light vision becomes a flawless reality.
Summary: A Designer’s Blueprint for Flawless Fairy Lights
- Hiding the cords: how to power a canopy without ugly extension cables?
- Warm White vs. Cool White: why mixing strands ruins the photos?
- How many strands can you plug in before blowing the venue’s fuse?
- Zig-zag vs. Parallel: which layout creates the best sense of volume?
- IP ratings: why indoor lights will short circuit if it rains on your patio?
- Sunset magic: when to turn on the fairy lights for maximum whimsy?
- How to use string lights to create a “false ceiling” of intimacy?
- How to Install Crystal Chandeliers safely in Temporary Structures?
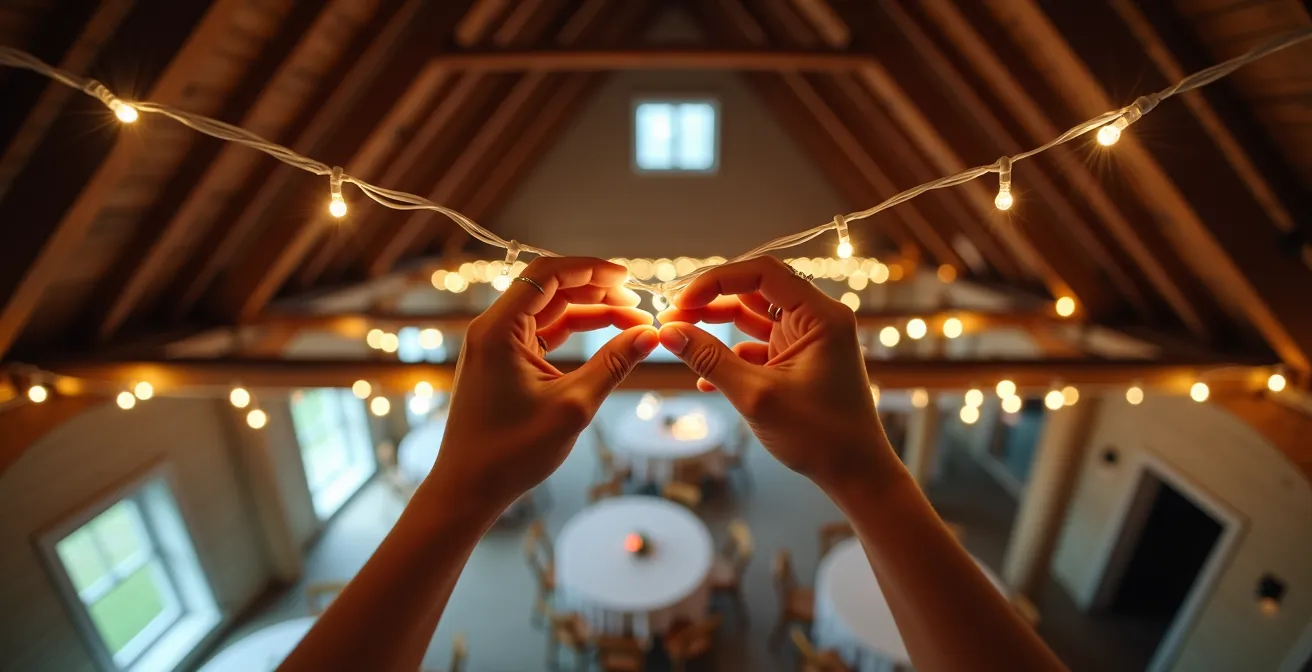
Hiding the cords: how to power a canopy without ugly extension cables?
The fastest way to ruin a magical lighting design is with a web of visible, ugly extension cords. A sophisticated installation appears to float, powered by an invisible source. This isn’t magic; it’s meticulous planning. Before a single light is hung, a professional maps the entire electrical strategy. The first step is to identify every available power outlet on the venue’s floor plan and determine the most discreet routes from those outlets to your installation points. The goal is to make the power cables disappear into the existing architecture.
Run your main power lines along structural elements like beams, columns, or the edges where walls meet the ceiling. This is where your choice of fastening becomes critical. Instead of consumer-grade tape that peels and shines, professionals use gaffer tape. It has a matte, fabric-like finish that absorbs light and can be ordered in colors that perfectly match wood, metal, or painted surfaces, rendering it nearly invisible. For an even more elevated finish, fabric sleeves matching your wedding’s color palette can be used to encase cables running through open areas, turning a functional necessity into a decorative accent.
The final layer of professionalism is consolidating connections. Instead of daisy-chaining multiple small extension cords, run a single, heavy-duty main cable to a central point and then branch out. For any outdoor setups, using weatherproof junction boxes at these connection points is non-negotiable to prevent short circuits. This strategic approach to power ensures the focus remains on the beautiful glow of the lights, not the distracting clutter of the cords that power them.
Action Plan: Professional Cable Concealment Method
- Map all venue power outlets on a floor plan before installation day to create a clear power strategy.
- Calculate total amperage needs to ensure your design doesn’t exceed the circuit’s capacity (Formula: Total Wattage / Voltage = Amps).
- Run main power cables along existing architectural lines like beams, columns, and wall-ceiling joints to hide them in plain sight.
- Use color-matched gaffer tape or custom fabric sleeves that align with your wedding palette to camouflage all visible cords.
- Install weatherproof junction boxes at all outdoor connection points to protect against moisture and ensure reliable operation.
- Test all circuits with venue staff present well before guests arrive to identify and resolve any issues and avoid day-of surprises.
Warm White vs. Cool White: why mixing strands ruins the photos?
The single most important aesthetic decision in lighting design is color temperature, measured in Kelvin (K). It dictates the entire mood of your event and, crucially, how everything will look in your wedding photos. The difference between “warm white” and “cool white” is not just a matter of preference; it’s a matter of light purity. Mixing them is a cardinal sin in professional lighting because it creates a visually jarring and chaotic environment that is a nightmare for photographers.
Warm white lights, typically in the 2200K-3000K range, produce a golden, candle-like glow. This light is incredibly flattering to skin tones, making everyone appear healthier and more radiant. It creates an atmosphere of intimacy and romance. Conversely, cool white lights (4000K and above) emit a blueish, clinical light that can make spaces feel sterile and skin tones appear washed out or sallow. When you mix strands of different Kelvin temperatures, you create pockets of conflicting light. Your photographer’s camera can only be set to balance for one color temperature at a time. This means if they balance for the warm lights, the cool-lit areas will look intensely blue in photos. If they balance for cool, the warm areas will look overly orange and muddy.
This is why consistency is everything. You must commit to a single Kelvin temperature for all decorative lighting. For the vast majority of weddings, a warm white in the 2700K to 3000K range is the gold standard for achieving that timeless, magical glow. Before purchasing or renting lights, verify the Kelvin rating on the packaging and buy all strands from the same batch to ensure perfect uniformity.
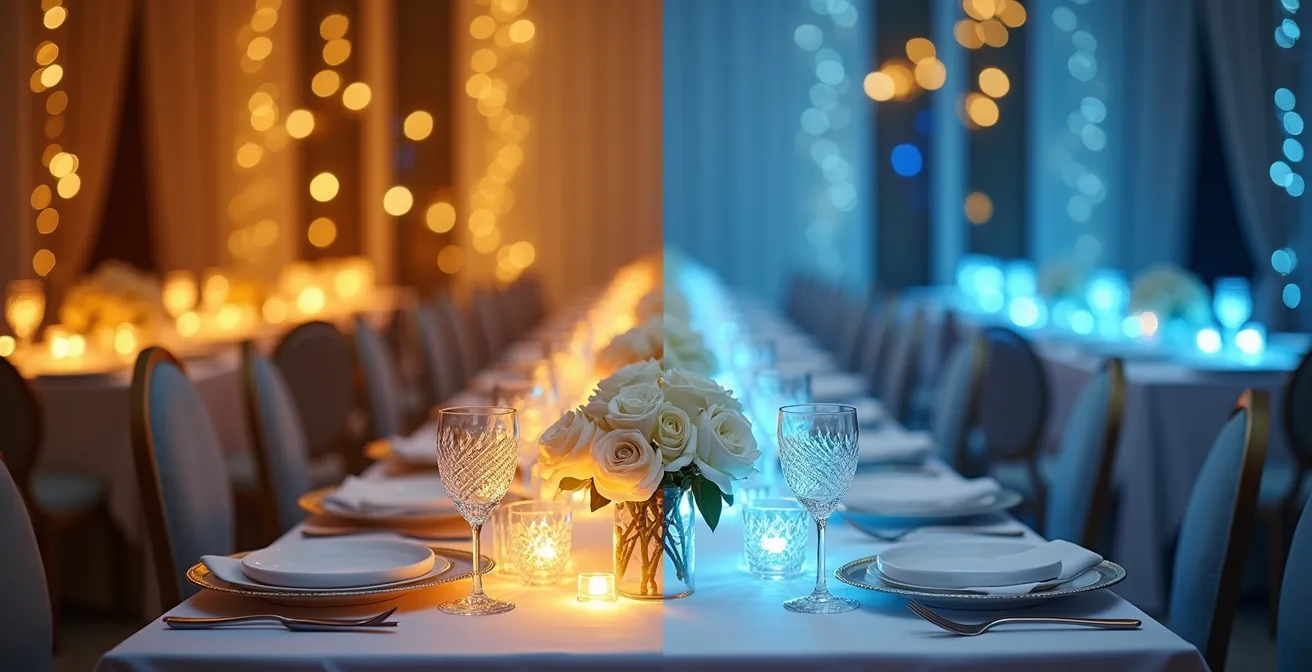
As the image clearly demonstrates, the same decor can look inviting and romantic under warm light or cold and unappealing under cool light. This choice affects the perception of everything from your floral arrangements to your guests’ complexions.
To help you make an informed decision and communicate effectively with your vendors, this guide breaks down the impact of different light temperatures. The following table, based on guidance from professional lighting recommendations for events, serves as a crucial tool.
| Kelvin Range | Color Description | Photo Impact | Best Use Case |
|---|---|---|---|
| 2200K-2700K | Ultra Warm/Candlelight | Romantic golden glow, flattering skin tones | Intimate dinner settings |
| 3000K | Warm White | Natural, cozy atmosphere | General reception lighting |
| 4000K | Neutral White | Clean, modern look | Contemporary venues |
| 5000K+ | Cool White/Daylight | Clinical, can appear harsh in photos | Avoid for weddings |
How many strands can you plug in before blowing the venue’s fuse?
Nothing shatters the magic of a first dance faster than the entire venue plunging into darkness. Overloading a circuit is the most common—and dangerous—technical failure at events with extensive lighting. Each circuit in a venue is protected by a fuse or circuit breaker rated for a specific amount of electrical current, or amperage (amps). Exceeding this limit will instantly cut the power. Therefore, calculating your total electrical load is a non-negotiable step in professional lighting design.
First, confirm the amperage of the circuits you plan to use with the venue manager. Most standard circuits are 15 or 20 amps. The formula to determine your usage is simple: Total Wattage / Voltage = Amps. The voltage in the US is typically 120V. So, for a 15-amp circuit, your maximum allowable wattage is 1,800 watts (15A x 120V). A 20-amp circuit allows for 2,400 watts. Always plan to use no more than 80% of the maximum capacity for a safe margin.
The key difference is between traditional incandescent bulbs and modern LEDs. A single C7 incandescent bulb might use 5-7 watts, meaning a strand of 25 bulbs could pull 175 watts. You could only safely connect about 8 of these strands to a single 15-amp circuit. In contrast, an entire 100-foot strand of LED fairy lights might use only 15-20 watts. You could connect dozens of LED strands without issue. This efficiency is why LEDs are the industry standard. They allow for massive, brilliant designs without the risk of overload or fire hazards.
Case Study: Sonoma Vineyard Wedding Electrical Safety Success
To navigate strict California Fire Marshal regulations, a 2023 vineyard wedding in Sonoma County successfully powered an extensive 200-meter fairy light canopy. The designers achieved this by abandoning traditional power sources and instead opting for modern 5V USB-powered micro-LED strings. These low-voltage lights were paired with programmable 4-hour auto-shutoff timers to further enhance safety. A post-event analysis using thermal imaging confirmed that the temperature of the installations remained below 32°C throughout the entire evening, demonstrating a safe and effective solution for creating ambitious lighting designs within stringent safety parameters.
Zig-zag vs. Parallel: which layout creates the best sense of volume?
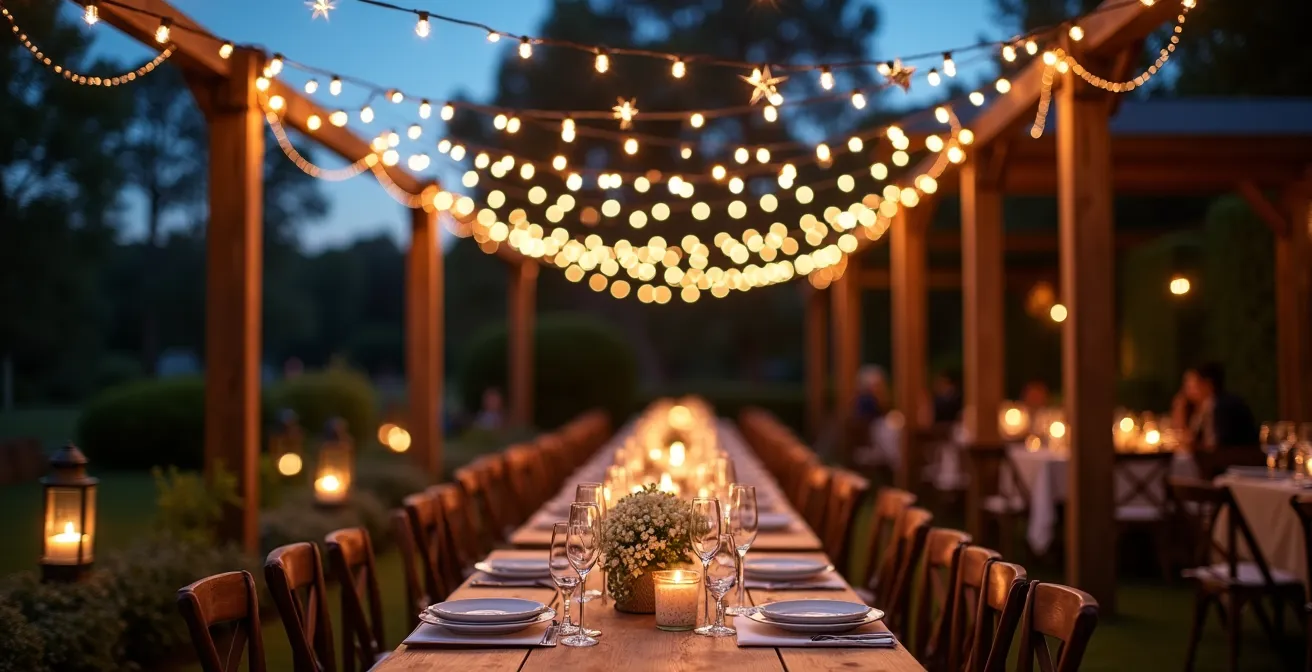
Once you’ve sorted out the technical requirements of power and color, you can move on to the artistry of design: spatial geometry. The pattern in which you hang the lights is not merely decorative; it is an architectural choice that fundamentally alters the perception of the space. The two most common canopy layouts, zig-zag and parallel, create vastly different effects, and the right choice depends on the atmosphere you want to cultivate.
A parallel layout, where strands run in straight, evenly spaced lines, creates a sense of order, elegance, and direction. This pattern is excellent for elongating a space or drawing the eye toward a focal point, like the head table or a stage. It feels clean, classic, and serene, making it ideal for placement over dining areas where you want a calm and sophisticated ambiance. The key to a successful parallel canopy is perfect tension and spacing. The lines must be taut and equidistant to maintain the clean geometry.
Conversely, a zig-zag or cross-hatch pattern creates a feeling of dynamic energy and visual density. By crisscrossing the strands, you build layers of light that give the canopy a much greater sense of volume and depth. This layout is perfect for defining a more intimate or high-energy zone, such as the dance floor. The overlapping points of light create a more immersive, “starry sky” effect. This pattern is also more forgiving of slight imperfections in tension or spacing, as the overall effect is one of organic density rather than rigid geometry.
As this overhead view shows, the same space can feel formal and directed or dense and immersive, based solely on the chosen pattern. A popular professional technique is to use both: employ parallel lines over the dinner tables for elegance, then transition to a dynamic zig-zag pattern over the dance floor to signal a shift in energy for the reception.
IP ratings: why indoor lights will short circuit if it rains on your patio?
For any wedding with an outdoor component—be it a patio, garden, or tent—weather is the ultimate variable. A sudden downpour can be disastrous for a lighting installation if you’ve used the wrong equipment. The durability of an electrical product against solids (like dust) and liquids (like water) is defined by its Ingress Protection or IP rating. Using indoor-rated lights in any outdoor setting is a recipe for short circuits, power failure, and a significant safety hazard.
An IP rating consists of two numbers. The first digit (0-6) indicates protection against solids, and the second digit (0-8) indicates protection against liquids. For wedding lighting, the second digit is the crucial one. A strand of lights with an IP20 rating is for indoor use only; it has no protection against moisture. If it gets wet, it will likely fail immediately.
For a covered patio or tent where lights are protected from direct rain but might be exposed to mist or humidity, a minimum of IP44 (splash-proof) is required. For any installation that is completely exposed to the elements, such as a canopy strung between trees in an open garden, you must use lights with an IP65 (weatherproof) rating. This ensures they can withstand jets of water from any direction. It’s a critical investment in reliability and safety. In fact, an analysis of moisture-related equipment failures found that IP65+ rated lights show 73% fewer failures than their less protected counterparts in outdoor conditions.
This IP rating decoder is an essential reference for selecting the right equipment. Using anything less than the recommended rating for your specific location is a risk you cannot afford to take.
| IP Rating | Protection Level | Safe For | Not Safe For |
|---|---|---|---|
| IP20 | Indoor only | Dry ballrooms, churches | Any outdoor use |
| IP44 | Splash-proof | Covered patios, tents | Direct rain exposure |
| IP65 | Weatherproof | Open gardens, exposed areas | Submersion/puddles |
| IP67 | Temporary immersion | Ground-level installations | Permanent underwater use |
However, even with weatherproof lights, a critical point of failure remains. As the National Fire Protection Association highlights in its safety guidelines, the connections are often the most vulnerable part.
The chain’s weakest link in outdoor installations is often the unprotected power connections, not the lights themselves. Using weatherproof connection boxes is essential.
– National Fire Protection Association, Outdoor Electrical Safety Guidelines 2023
Sunset magic: when to turn on the fairy lights for maximum whimsy?
The most enchanting lighting designs don’t just appear; they evolve with the natural light of the evening. Simply flipping a switch to full brightness the moment it gets dark is a jarring and amateur move. A professional lighting designer choreographs a “progressive glow,” synchronizing the artificial light with the setting sun to create a seamless and truly magical transition. The key is to leverage the “blue hour”—that brief, whimsical period of twilight just after sunset when the sky is a deep, rich blue.
During this window, the ambient light is soft and cool, providing the perfect canvas for warm-toned fairy lights to truly pop. Turning the lights on too early, when the sun is still bright, wastes the effect entirely. Turning them on too late, in complete darkness, misses the most photogenic moment of the day. The goal is to gradually increase the brightness of your canopy so that it feels as if the lights are organically blooming as the sky deepens. This requires a dimmer and a clear timeline.
Modern wedding planners now achieve this effect effortlessly using smart plugs and dimmers that can be programmed and synced to the exact sunset time for the event’s location. This “progressive glow” technique eliminates any harsh transitions, making the lighting feel like a natural extension of the evening’s magic. Guests often don’t even notice the lights being turned on; they simply perceive a space that is growing more beautiful and intimate by the minute. Here is a professional timeline for achieving this effect:
- Sunset minus 30 minutes: Test all light strands at a low setting with the venue coordinator to ensure everything is operational.
- At sunset: Begin the “glow up” by turning the lights on to a low 30% brightness. They should be barely noticeable.
- Sunset plus 10 minutes: As the golden hour fades, increase brightness to 50%. The lights will begin to define the space.
- Sunset plus 20-30 minutes (Blue Hour): This is the moment. Increase to 100% brightness for maximum impact during the most magical light for photos.
- Full darkness: Once the blue hour is over, reduce brightness to a comfortable 70% for dining and conversation.
- First dance/Key moments: Return to 100% brightness to create dramatic, photo-ready focus.
How to use string lights to create a ‘false ceiling’ of intimacy?
In large venues with high ceilings, like barns, industrial lofts, or grand ballrooms, creating a sense of intimacy can be a significant challenge. A dense canopy of string lights offers a brilliant architectural solution: the creation of a “false ceiling.” By strategically lowering the perceived height of the room, you can transform a vast, impersonal space into a cozy, intimate, and human-scale environment. This technique is about sculpting the volume of the room with light.
The effect is achieved by creating a dense, layered web of lights at a lower height than the actual ceiling—typically 10-12 feet from the floor. This new visual plane becomes the “ceiling” of the space, drawing guests’ attention downward and fostering a feeling of enclosure and warmth. Research in event design has even quantified this effect; studies show that a visual ceiling height reduction of 25-30% can increase the perceived intimacy of a space by 45%. It’s a powerful psychological tool for atmosphere creation.
To enhance this effect, designers often interweave the light strands with sheer fabrics like tulle or organza. This serves two purposes: it helps to obscure the actual high ceiling above, and it diffuses the light from the individual bulbs. Instead of sharp points of light, you get a soft, ethereal, and uniform glow that feels incredibly romantic and immersive. The fabric adds texture and softness, turning the light canopy into a multi-dimensional art installation.
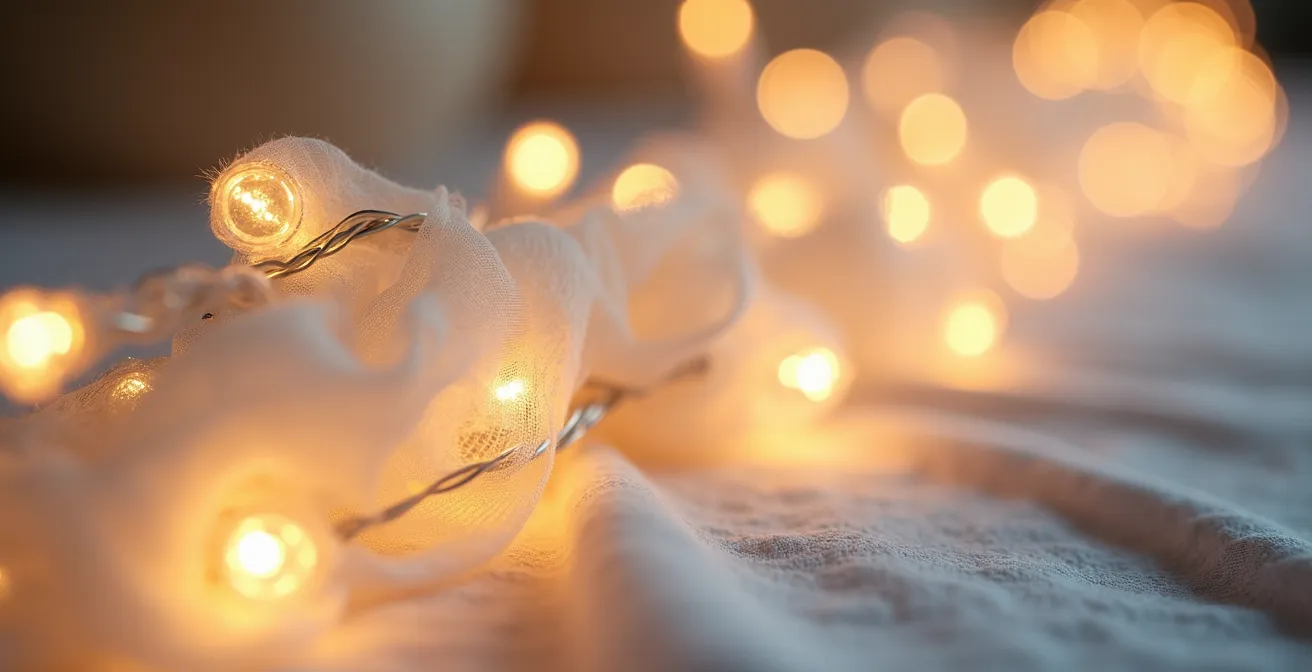
This close-up view reveals the secret: layers of light and texture working in harmony. The shallow depth of field, with some lights in sharp focus and others dissolving into soft bokeh, is exactly the visual experience a guest has when standing under such a canopy. It’s a technique that turns a simple product into an immersive sensory experience.
Key Takeaways
- Think Like an Engineer First: A successful lighting design is built on a foundation of safety and logistics. Always calculate your power load and plan your cable routes before considering aesthetics.
- Light Purity is Non-Negotiable: The most critical artistic choice is maintaining a single, consistent color temperature (Kelvin) to ensure a professional, cohesive look and flattering photographs.
- Use Layout as a Tool: Light patterns are not just decorative. Use them strategically as architectural elements to define zones, direct attention, and manipulate the perceived volume and intimacy of your venue.
How to Install Crystal Chandeliers safely in Temporary Structures?
While fairy lights add whimsy, nothing says “opulence” like a crystal chandelier. However, suspending a heavy, fragile, and electrically complex fixture inside a temporary structure like a tent or marquee is one of the highest-risk installations in event design. It requires a level of structural and electrical diligence far beyond that of simple string lights. Safety is not just a priority; it is the entire foundation of the project.
The first step is a rigorous weight calculation. You must know the exact weight of the chandelier, add the weight of all mounting hardware (chains, clamps, cables), and then multiply that total by a safety factor of at least 1.5. This final number is your minimum required load capacity. You must then obtain written confirmation from the tent or structure provider that the designated rigging points are certified to support this weight. Verbal confirmation is not enough; you need documentation.
Next is power. A large chandelier can draw significant amperage and must always be on a dedicated circuit. Never plug it into the same circuit as the band, the DJ, or other lighting to prevent overload. Finally, wind load must be assessed. In a tent, even a slight breeze can cause a suspended object to swing, creating dangerous stress on the rigging points. The chandelier must be secured with a minimum of a three-point attachment to prevent this pendulum effect. Failure to address any of these three pillars—weight, power, or wind—can lead to catastrophic failure.
A major hotel group in Chicago now mandates UL-listed, battery-operated-only fairy lights for all suspended installations. They require certification documentation on-site and deny setup access to vendors unable to provide proper electrical compliance proof, setting new industry standards for temporary structure safety.
– Chicago Hotel Group Vendor Requirements
This shift in the industry highlights a move toward absolute accountability. The checklist for a safe installation is a professional mandate:
- Weight Calculation: Add chandelier weight plus all hardware, then multiply by 1.5 for a safety margin.
- Certified Rigging Points: Confirm the load capacity of all suspension points in writing with the tent company.
- Dedicated Power Source: Run a separate, dedicated circuit for the chandelier to prevent electrical overload.
- Wind Load Assessment: Secure the fixture with a minimum of a 3-point attachment to prevent swinging.
- Insurance Verification: Confirm that the venue’s liability insurance explicitly covers suspended decorative elements.
Frequently Asked Questions on Styling Fairy Lights
What spacing creates the most magical ‘twinkling cloud’ effect?
For an immersive ‘twinkling cloud’ effect, perfect for intimate dance floors or above a head table, a dense spacing is key. Aim for parallel strands spaced just 1 to 2 feet apart. Combine this with a gentle swag or drape of about 12 to 18 inches between attachment points to create layers and depth.
How much extra length do I need for proper swag?
Never buy the exact length of the span you need to cover. To achieve an elegant, natural drape (or “swag”), you must account for extra length. As a rule of thumb, calculate an additional 20% to 30% of length. For example, to cover a 20-foot span with a beautiful curve, you will need a light strand that is 24 to 26 feet long.
Can I mix patterns in the same space?
Absolutely. Mixing patterns is an advanced design technique used to define different zones within a single space. For example, you can use elegant, orderly parallel lines over the dining areas to create a calm atmosphere, then transition to a dynamic, energetic zig-zag pattern over the dance floor to signal a shift in mood and encourage celebration.