In summary:
- Prioritize safety by treating all dried botanicals with fire retardant to meet venue compliance.
- A professional three-stage cleaning process is essential to prevent debris from falling on guests and tables.
- Use multiple, independent, and structurally sound attachment points to secure any large installation, preventing catastrophic failure.
- Strategic planning for placement, transport, and integration with other decor is the secret to an “effortless” boho-chic look.
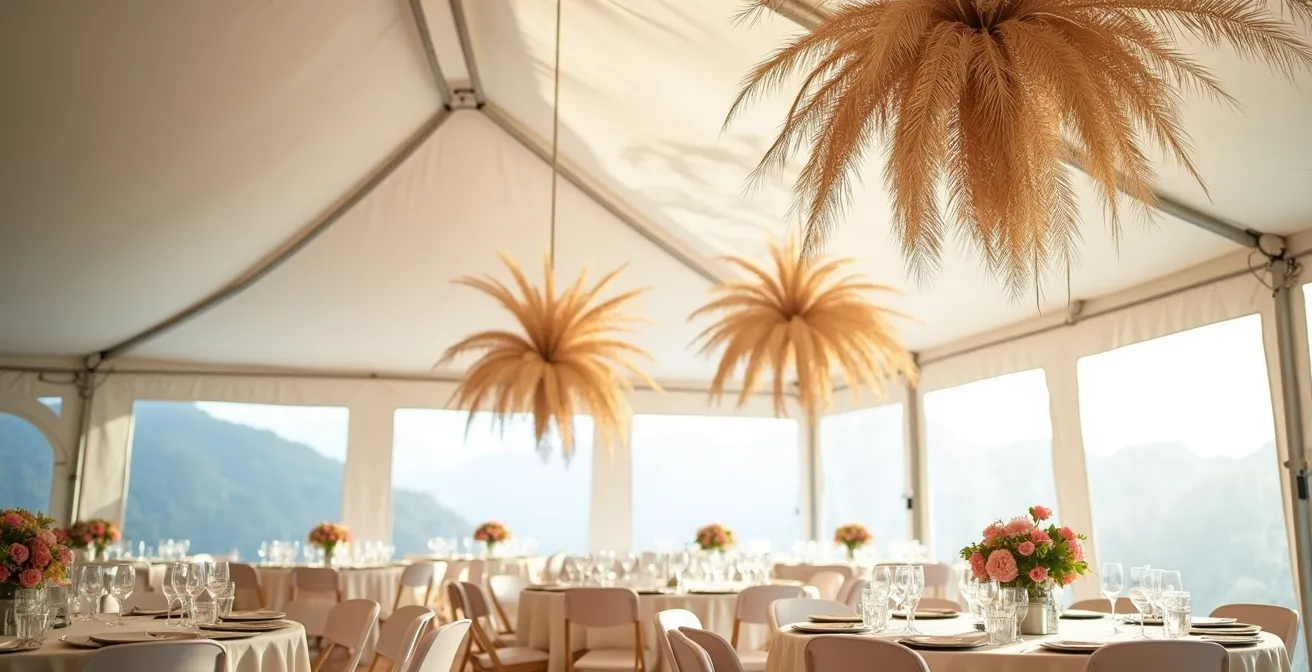
That dreamy, sun-bleached canopy of hanging dried palms you’ve pinned a thousand times feels like the very soul of a modern boho wedding. It’s ethereal, architectural, and makes a breathtaking statement. But between that inspiration photo and your wedding day lies a path of practical hurdles that can feel overwhelming. The common advice is to “just be careful,” but what does that actually mean when you’re dealing with large, brittle, and potentially flammable materials suspended over your guests’ heads? The fear of a drooping installation, a shower of dust on the wedding cake, or a venue coordinator asking for a fire safety certificate is very real.
This is where we shift our perspective. The secret to achieving that effortlessly chic look isn’t just about having a good eye; it’s about adopting a professional’s mindset. The most stunning botanical installations are built on a foundation of logistics, safety, and meticulous preparation. It’s about knowing how to make the palms not only beautiful but also clean, safe, and mechanically sound. Forget simply “hanging” them; we’re going to talk about *engineering* them for both beauty and peace of mind.
This guide will walk you through the essential pro techniques, from mandatory fire safety compliance and debris-free cleaning to the mechanical strategies for creating a full, dramatic canopy. We’ll cover how to transport these fragile giants without damage and how to integrate them flawlessly with your other decor elements, ensuring your statement piece is memorable for all the right reasons.
Summary: Your Guide to Professional Palm Installation
- Flammability risks: treating dried palms with retardant for venue compliance
- How to clean dried palms so they don’t rain debris on the dinner tables?
- Matte vs. Gloss: techniques for painting dried palms to match your palette
- Fan placement: angling palms to cover maximum ceiling area with minimum product
- Packing strategies: preventing tips from snapping during the drive to the venue
- How to hang floating candles or clouds safely in a standard tent?
- Why you need multiple attachment points for large installations?
- How to Use Rattan Furniture for a Modern Look That Isn’t Dated?
Flammability risks: treating dried palms with retardant for venue compliance
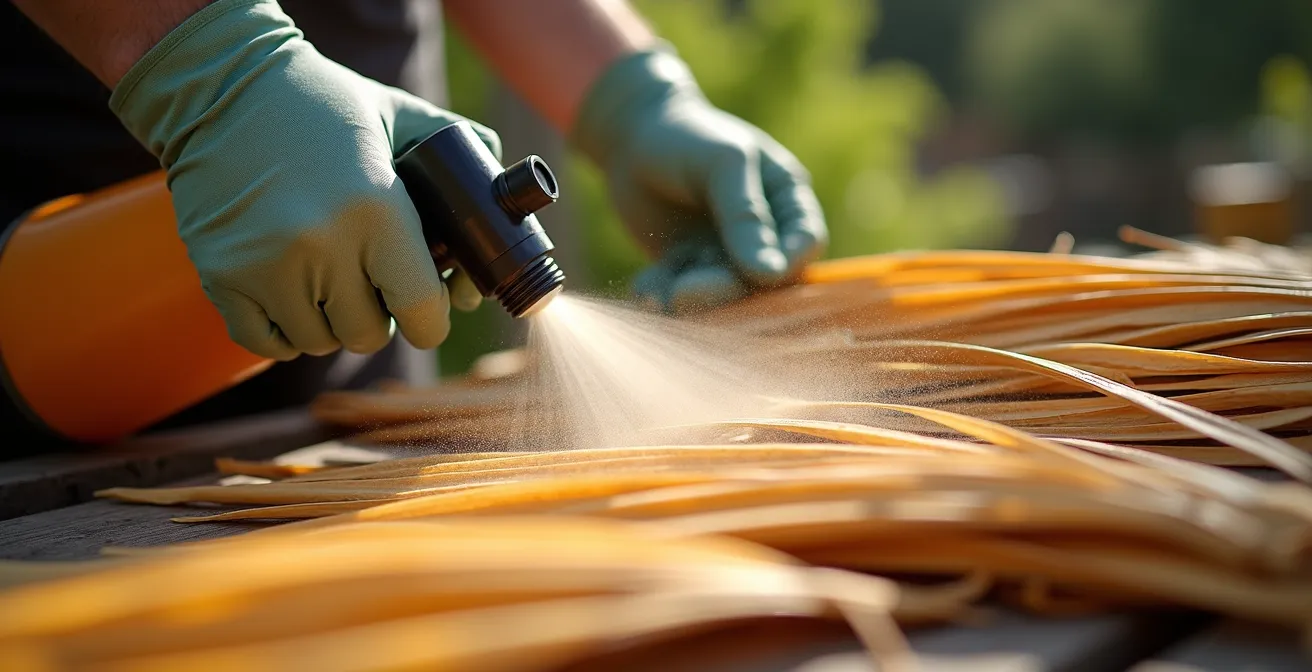
Before you even think about aesthetics, you must address the single most important factor for any hanging installation: fire safety. Dried botanicals are, by nature, highly flammable. Most wedding venues have strict regulations and will require proof that all decorative materials are fire-retardant. This is a non-negotiable safety requirement to protect your guests and the property. Some regions have extremely specific rules, such as the French M1 classification standard required for all decorative materials in public venues. Failing to comply can result in your entire installation being taken down on the day of your wedding.
The solution is a professional-grade fire-retardant spray or dipping solution designed for dried materials. This isn’t a step to DIY with household products. You must use a certified product and, crucially, document the process. Successful application has been proven in complex commercial settings, like the intricate installations at Mr. Fogg’s House of Botanicals, where treatment was applied with minimal disruption using specialized equipment. This demonstrates that even the most ambitious designs can be made safe and compliant.
When applying the treatment, always test a small, inconspicuous area first to check for any discoloration. For complete coverage, a dipping method is often superior to spraying. Once treated and dried, keep the product information and a record of the application date to present to your venue manager. This documentation is your key to getting their confident approval.
How to clean dried palms so they don’t rain debris on the dinner tables?
Once your palms are fire-safe, the next logistical challenge is cleanliness. Dried palm fronds can harbor a surprising amount of dust, tiny insects, and natural debris. The last thing you want is a gentle breeze from a door opening to cause a “rain” of this debris onto your beautifully set dinner tables or into your guests’ champagne. A thorough, multi-stage cleaning process is essential before the palms ever enter your venue.
Start the process outdoors. The most effective first step is to use compressed air to blast away loose dust and any hidden critters from between the fronds. This is a powerful method that gets into tight crevices a simple shake or wipe-down would miss. The goal is to dislodge the majority of the particles before moving to a more detailed clean.
After the initial blast, you can perform a gentler wipe-down. Use a soft, slightly damp microfiber cloth to gently clean the surface of each leaf, removing any remaining film of dust. Finally, before packing, do one last shake-down over a large white drop cloth. The white background makes it easy to see if any significant debris is still falling. If it is, repeat the process. It’s also wise to pack a can of compressed air and a lint roller for any last-minute touch-ups on-site.
Matte vs. Gloss: techniques for painting dried palms to match your palette
With the palms safe and clean, you can now focus on aligning them with your wedding’s color story. Painting dried palms is a fantastic way to either neutralize them to a soft bone-white or add a custom pop of color. However, the choice of paint finish—matte, satin, or metallic—dramatically affects the final look and feel. As a stylist, I recommend using a specialty floral spray paint like Design Master, as these are formulated to adhere to botanicals without cracking and offer a superior finish. Always paint in a well-ventilated area.
The finish you choose should complement the palm’s natural texture and your overall aesthetic. A matte finish is perfect for a rustic, earthy vibe as it preserves the palm’s natural texture. A metallic or satin finish, on the other hand, can add a touch of glamour and reflect light beautifully, but is often best used as an accent—perhaps just on the tips of the fronds for a subtle ombré effect. A color wash, achieved with diluted chalk paint, offers a translucent tint that allows the palm’s texture to show through for a soft, layered look.
This table breaks down the best uses for each finish to help you make a strategic choice.
| Finish Type | Visual Effect | Best Application | Primer Needed |
|---|---|---|---|
| Matte | Natural, rustic texture preserved | Large fan palms | No primer for rustic look |
| Satin | Subtle sheen, slight dimension | Wispy pampas grass | Clear matte primer optional |
| Metallic | Glamorous accent, catches light | Tips only for ombré effect | Clear primer recommended |
| Color Wash | Translucent tint, texture shows through | Diluted chalk paint technique | No primer needed |
Fan placement: angling palms to cover maximum ceiling area with minimum product
Creating a lush, full canopy isn’t about using the maximum number of palms; it’s about the strategic placement and angling of each one. The goal is to maximize visual impact and coverage while minimizing product cost and installation weight. This requires a clear mechanical strategy before you begin hanging the first frond. Start by mapping your ceiling, identifying the structurally sound support points versus purely decorative elements you cannot hang from.
Next, decide on your layout. A grid pattern provides even, uniform coverage, ideal for a classic look. A clustered approach, however, creates more organic, high-impact focal points, often centered over a head table or dance floor. When clustering, apply the “Rule of Odds”—grouping palms in arrangements of 3, 5, or 7 feels more natural and aesthetically pleasing to the eye than even numbers. Layering is another key technique: hang larger, broader fan palms higher up to form the base of your canopy, then suspend smaller, wispier fronds at lower, varying heights to add depth and dimension.
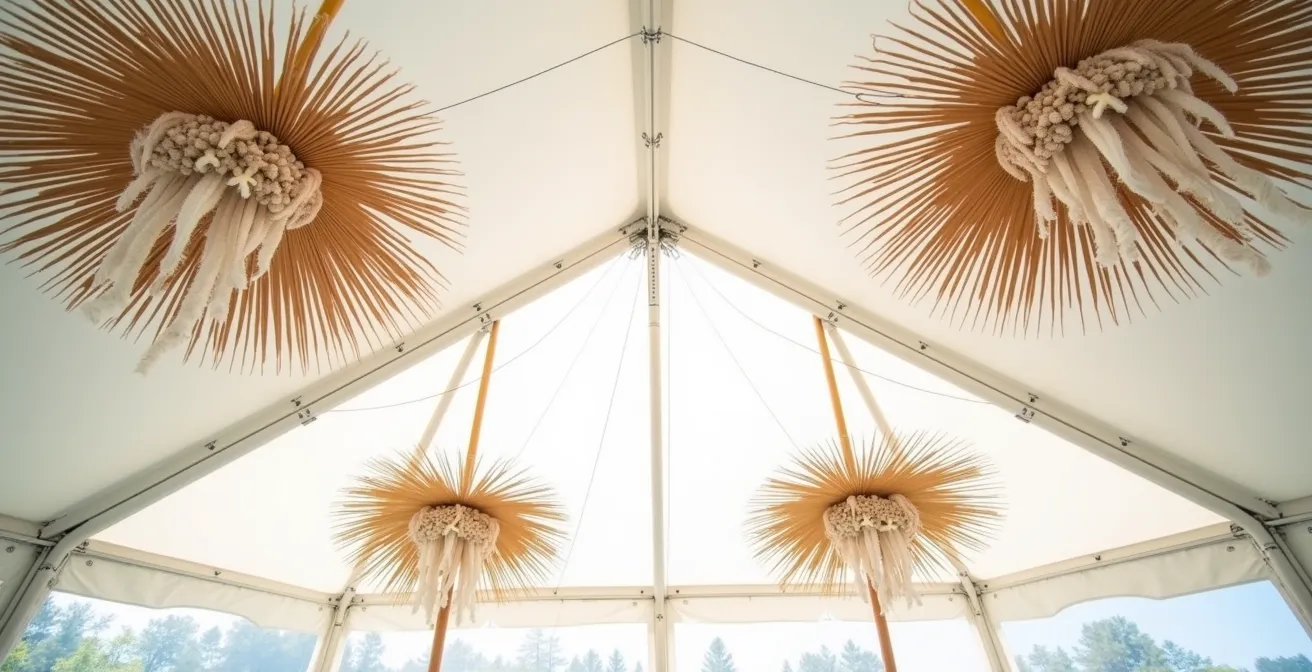
Finally, consider your lighting. Angle the palm fronds to catch and interact with both natural and artificial light sources. The way light filters through the leaves or reflects off a metallic tip can add a dynamic, magical quality to the entire installation. This thoughtful placement transforms a collection of individual palms into a single, cohesive, and breathtaking architectural feature.
Packing strategies: preventing tips from snapping during the drive to the venue
Your beautifully prepared palms are clean, fire-proofed, and painted. Now comes one of the most nerve-wracking steps: transporting them to the venue without the delicate tips snapping off. Dried palms are incredibly brittle, and a bumpy car ride can easily lead to damage. Standard packing methods like bubble wrap can actually cause more harm by catching on the fragile edges. The professional solution requires a different approach.
The single best method for transport is to use tall wardrobe boxes—the kind with a built-in hanging bar. By suspending the palms from the bar using twine, they can hang freely during transit, protected from bumps and from crushing each other. This minimizes contact and is the safest way to move large, awkward fronds. If wardrobe boxes aren’t an option, lay them flat in a large vehicle, but instead of bubble wrap, interleave them with soft, crinkled craft paper or old bedsheets that won’t snag.
Organization is also key. Pre-bundle the palms by their intended installation zone (e.g., “Dance Floor Cluster,” “Bar Accent”) and label them clearly. This will save you an immense amount of time and confusion during on-site setup. Lastly, always pack an emergency repair kit. Include floral wire, clear-drying craft glue, snips, and a small amount of your matching touch-up paint. A quick repair on a minor snap is often invisible from the ground and can save a key piece of your design.
How to hang floating candles or clouds safely in a standard tent?
While dried palms create the main structure, integrating other floating elements like candles or floral clouds can elevate the design to something truly magical. However, this adds another layer of safety considerations, especially inside a tent. Open flames are an absolute no-go. The only safe and venue-approved option is to use high-quality LED candles. Modern LEDs offer incredibly realistic flickering effects and long battery lives, providing all the ambiance with none of the risk.
When hanging these elements, the same mechanical principles apply: secure the core structure first. Whether you’re using a floral foam base for a cloud or a simple wire frame, it’s crucial to suspend the empty mechanism from its final hanging point *before* you start adding flowers or candles. This allows you to test that the anchor point is secure and helps you design the piece perfectly for the space it will occupy, ensuring it hangs at the right height and angle.
Different LED types are suited for different applications. A mix of styles can create a beautifully layered and realistic effect.
| LED Type | Battery Life | Realism Level | Best Placement |
|---|---|---|---|
| Flickering Flame | 100+ hours | High | Within palm clusters |
| Fairy Light Strings | 72 hours | Medium | Woven through fronds |
| Pillar LEDs | 200+ hours | Very High | Suspended individually |
| Tea Light LEDs | 48 hours | Medium | Grouped in clouds |
Why you need multiple attachment points for large installations?
This is the single most critical mechanical rule of large-scale hanging decor: never rely on a single attachment point. A large dried palm installation, especially when bundled into clusters, can be surprisingly heavy. A single point of failure—a knot slipping, a hook bending, a beam cracking—could lead to the entire structure collapsing, posing a serious danger to your guests. The principle of redundancy is your best friend here. By distributing the weight across multiple, independent anchor points, you create a safety net.
As one expert warns, it’s a matter of proactive risk management. According to an Installation Safety Expert in the Event Venue Fire Compliance Guide, “Multiple, independent attachment points ensure that if one fails, the others prevent a catastrophic collapse, protecting guests and property.” This “safety web” approach is the professional standard. It means that even if the worst happens and one anchor fails, the others will hold the installation in place, preventing a disaster.
Identifying these points requires a careful assessment of the venue’s ceiling. You are looking for true structural elements, not decorative ones.
Action Plan: Professional Anchor Point Assessment
- Identify structural points: Look for exposed wooden beams, steel I-beams, or dedicated truss systems designed to bear weight.
- Avoid decorative elements: Never attach anything to drop ceiling grids, drywall, or the thin fabric liners of a tent. These are not designed for load-bearing.
- Test each point individually: Before hanging the full weight, pull firmly on each anchor point to ensure it is solid and secure.
- Create redundancy with a safety web: Distribute the weight of a single cluster across two or three separate anchor points whenever possible.
- Account for dynamic forces: Consider external factors like wind gusts in a tent or vibrations from loud music, which can add stress to your rigging.
Key takeaways
- Fire safety is non-negotiable. Always use professional-grade fire retardant on dried botanicals and document the process for your venue.
- Structural integrity is paramount. A “safety web” of multiple, independent, and load-bearing anchor points is the only way to hang heavy installations securely.
- The “effortless” boho look is a direct result of meticulous logistical planning, from debris-free cleaning and strategic transport to thoughtful placement.
How to Use Rattan Furniture for a Modern Look That Isn’t Dated?
Your stunning palm canopy sets the scene from above, and the perfect way to ground that aesthetic is with carefully chosen rattan furniture below. The key to keeping rattan looking modern and chic, rather than dated or cliché, is through thoughtful contrast and deliberate styling. Don’t just scatter rattan chairs around; create intentional vignettes. A “Peacock” chair flanked by two smaller stools, placed under a dense cluster of palms, becomes an irresistible photo opportunity for guests.
The texture of the palms should inform the style of the rattan. Lighter, wispier palms pair beautifully with delicate, finely woven rattan pieces, while large, bold fan palms can stand up to heavier, more substantial furniture. To give it a modern edge, introduce contrasting materials. Pairing a rattan lounge set with sleek metallic side tables or adding rich velvet cushions in deep jewel tones creates a sophisticated tension that feels fresh and contemporary. This mix of hard and soft, rustic and luxe, is the secret to an elevated look.
Best of all, this is a sustainable choice. Instead of renting, consider purchasing a few key rattan pieces you truly love and would want in your home after the wedding. This not only adds a more personal touch but also aligns with a sustainable ethos, as it’s a beautiful way to ensure 100% of dried palm decor can be upcycled into home decor and a reminder of your special day. This approach turns a wedding expense into a long-term investment in your home’s decor.
By approaching your hanging palm installation with this framework of safety, preparation, and strategic design, you are empowered to create a truly breathtaking feature for your wedding day—one that is as secure and well-executed as it is beautiful.