
Safely hanging a crystal chandelier in a wedding tent is an engineering task, not a decorating one; success depends on verifying structural load capacity before considering aesthetics.
- The total weight on a tent frame includes the fixture, rigging, and dynamic forces from movement, which can drastically increase the static load.
- Non-professional-grade clamps or attaching to the wrong structural points are the most common points of failure, creating immense risk.
Recommendation: Always demand written load-capacity documentation from your tent rental company and have it reviewed by a certified rigging specialist for any chandelier over 50 lbs.
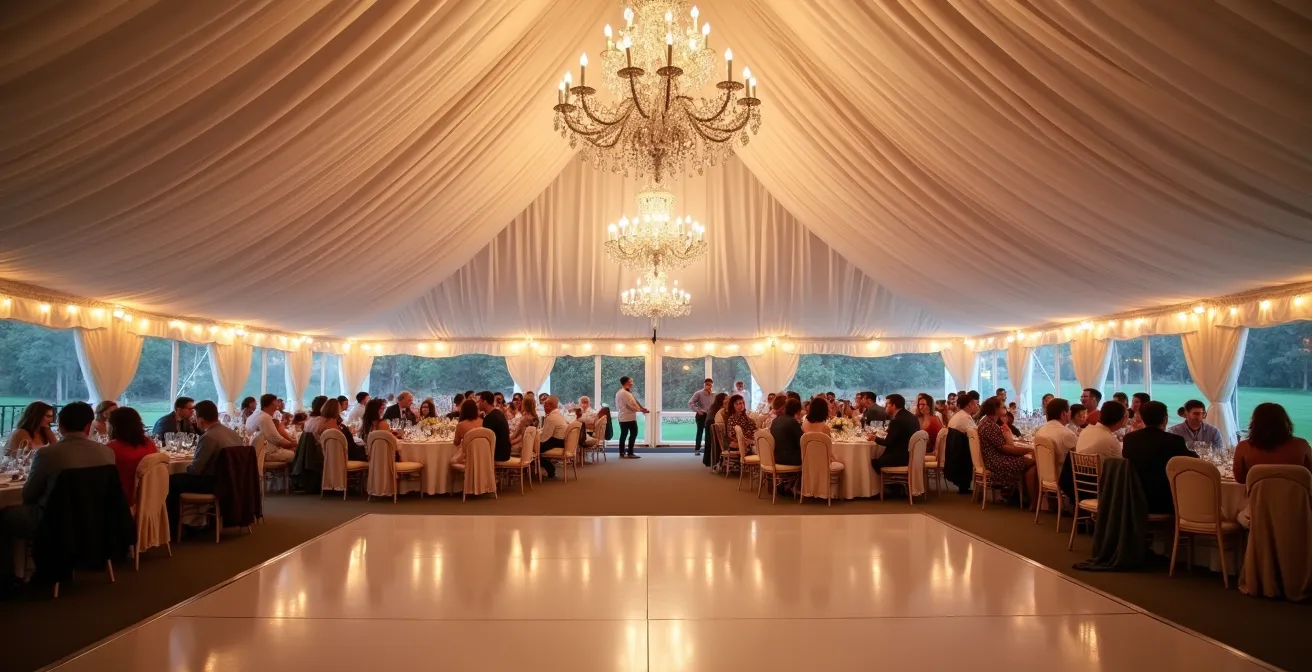
You envision it clearly: the soft glow of a tent, elevated to ballroom status by the breathtaking sparkle of crystal chandeliers. It’s the pinnacle of wedding glamour, a statement piece that promises an unforgettable atmosphere. Many guides will tell you to choose a pretty fixture and simply “hang it securely.” But as a professional rigger, I can tell you that true luxury isn’t just about the sparkle—it’s about the absolute certainty that the sparkle is safe. The moment you decide to suspend an 80-pound crystal and glass fixture over your loved ones, you move from the world of decoration into the realm of structural engineering.
The common advice to “hire a professional” is correct, but it misses the crucial point. You, the client, need to understand the fundamental questions that professional must answer. The key to achieving this opulent look without risk isn’t just finding someone to hang a light; it’s understanding the physics of load, the integrity of the hardware, and the critical safety checks that transform a beautiful idea into an engineered reality. This is not about fear; it’s about empowerment. Knowing the right questions to ask is your best insurance policy.
This guide will walk you through the exact process a luxury lighting rigger follows. We will deconstruct the challenges, from calculating the true weight a tent can bear to choosing a fixture style that works with, not against, the venue’s architecture. We’ll cover the non-negotiable safety protocols that ensure your design is not just stunning, but fundamentally sound, so the only thing your guests will be looking up at is the dazzling light, not a potential hazard.
To help you navigate these critical considerations, this article is structured to address the most pressing questions, from structural integrity to budget-conscious luxury. Explore the sections below to build a complete understanding of what it takes to hang chandeliers with confidence.
Summary: A Comprehensive Guide to Tent Chandelier Installation
- Can the tent frame actually hold three 80lb chandeliers?
- Why antique chandeliers might need rewiring or special bulbs?
- The cleaning schedule: ensuring rented chandeliers aren’t dusty upon arrival
- Sputnik vs. Tear-drop: matching the fixture to the venue architecture
- Safety height: ensuring tall guests don’t hit their heads while jumping
- Clamp systems: how to hang chandeliers without drilling holes?
- How to use antique furniture without sacrificing guest comfort?
- How to Fake Opulent Luxury on a Mid-Range Wedding Budget?
Can the tent frame actually hold three 80lb chandeliers?
This is the first and most important question, and the answer is never a simple “yes.” A tent is a temporary structure, not a steel-beamed ballroom. An 80lb chandelier’s static weight is only the beginning of the calculation. You must account for dynamic loads—forces created by wind, vibrations, or even the setup process itself. As rigging safety standards show, dynamic forces can be significantly larger than static forces, meaning your 80lb fixture can exert much more force on its anchor point than its simple dead weight.
A professional rigger never assumes. We work with a structural integrity chain, where every link, from the fixture to the tent pole, is verified. The critical mistake is creating a single, heavy point load on a part of the frame not designed for it. Instead, the goal is often to distribute the weight. A real-world professional solution, for example, involves creating an aircraft cable grid system inside the tent. By running high-tensile cables between major support poles, the weight of multiple chandeliers is spread across the entire structure, not concentrated on one vulnerable spot. This transforms a risky point load into a manageable, distributed system.
Never take a rental company’s verbal assurance at face value. Always demand the tent’s official engineering specifications, which detail the load-bearing capacity of specific points on the frame. Without this document, you are operating on pure guesswork, and the stakes are simply too high. True safety begins with data, not assumptions.
Your Pre-Installation Structural Verification Plan
- Request load-bearing capacity documentation from the tent rental company for specific frame points.
- Verify that all clamps and rigging hardware are rated for at least 5 times the chandelier’s weight (the standard safety factor).
- Engage a certified rigging specialist to assess the entire support chain, from the tent frame to the fixture.
- Obtain written approval from a structural engineer for any installation exceeding 50 lbs per hanging point.
- If possible, witness a test of the anchor points with calibrated load cells before the final installation.
Ultimately, the question isn’t whether a tent *can* hold the weight, but *how* it has been engineered and verified to do so safely. This meticulous, data-driven approach is the bedrock of any luxury lighting installation.
Why antique chandeliers might need rewiring or special bulbs?
An antique chandelier brings unparalleled character and history to a space, but its beauty can hide significant risks. These fixtures were often built before modern electrical standards existed. Their wiring can be brittle, insulation may be degraded, and sockets might not be compatible with today’s safer, more efficient bulbs. Hanging an antique fixture without a thorough electrical inspection is a serious fire hazard, especially in a fabric-heavy environment like a tent. The structural integrity chain isn’t just about weight; it extends to every electrical component.
Professionals will insist on inspecting any client-provided or vintage-rented chandelier. This often involves complete rewiring with modern, heat-resistant cables and ensuring all components are UL-listed for safety. Furthermore, the original design may have called for incandescent bulbs that produce immense heat and consume significant power. A single 12-arm chandelier with 60-watt incandescent bulbs can draw over 700 watts, potentially overloading a temporary power supply or creating a fire risk. A key part of the upgrade process is an LED conversion. Modern LED filament bulbs can replicate the warm glow of vintage lighting while consuming up to 90% less energy and producing virtually no heat. This not only enhances safety but also reduces the overall power requirements for your event, which is a critical consideration for temporary venues.

This conversion protects the antique fixture itself, prevents electrical overload, and ensures a safe, reliable glow throughout your event. Think of it as preserving the soul of the antique piece while giving it a modern, safe heart. An un-inspected antique is not a charming feature; it is an unknown liability. This is why a specialist event lighting company is essential to bridge the gap between vintage beauty and modern safety standards.
Therefore, when you fall in love with a vintage chandelier, your first question shouldn’t be about its price, but about its service history and whether it has been professionally retrofitted for event use.
The cleaning schedule: ensuring rented chandeliers aren’t dusty upon arrival
You are paying for sparkle. Dust, fingerprints, and cobwebs are the enemies of that investment. It may seem like a minor detail, but the condition of a chandelier upon arrival speaks volumes about the rental company’s professionalism. A high-end lighting provider has a strict protocol for cleaning and maintenance that happens long before the fixture reaches your venue. However, you should never assume. The responsibility for the final, pre-event condition should be clearly defined in your contract.
A professional process involves several key stages. First, insist on a pre-delivery inspection, either in person at the warehouse or via detailed, timestamped photos, at least 48 hours before the event. Upon delivery, your coordinator or a designated person should document the chandelier’s condition immediately. Any issues must be reported before the installation team begins its work. Once hung, the fixture will be out of reach, and it becomes much more difficult to address smudges or dust trapped in the crystal strands. This is a critical checkpoint for quality control.
Even a clean chandelier can gather dust during transport and installation. A dedicated crew member—separate from the rigging team—should be assigned the task of a final touch-up post-installation. Armed with microfiber cloths, white cotton gloves, and a crystal-safe cleaning solution, they perform the final polish. As one tent company’s case study on safe maintenance highlights, this cleaning process at height must be done safely, often requiring its own dedicated equipment like a scaffold or a scissor lift. This access should be factored into the budget and timeline. The final cleaning pass should occur just a few hours before guests arrive, ensuring maximum brilliance when the lights are turned on.
Don’t let a dusty fixture dull your day. By establishing a clear protocol and inspection points, you ensure the chandeliers deliver the dazzling impact you paid for.
Sputnik vs. Tear-drop: matching the fixture to the venue architecture
Once safety and logistics are addressed, you can focus on aesthetics. However, even this choice is guided by physics—what I call fixture-venue symbiosis. The architectural style of your tent and the physical properties of the chandelier must work in harmony. A wide, sprawling Sputnik-style chandelier might look incredible, but its large surface area acts like a sail. In a tent, where wind can cause movement, this “sail effect” can lead to dangerous swaying. A compact, vertically oriented teardrop or Empire-style chandelier, by contrast, has minimal wind resistance and is inherently more stable in a temporary structure.
The tent’s size and ceiling shape also dictate your choice. A grand 40x80ft pole tent with high peaks can accommodate a large, dramatic fixture, whereas a smaller frame tent might be overwhelmed by it. As a guideline, some suppliers specify that a 32.5-inch wide chandelier is suited for larger tents, while a 25.5-inch model fits better in smaller spaces. The goal is to create a sense of scale and balance, not to cram in the largest fixture possible. The light pattern is another key factor. A Sputnik provides a diffuse, 360-degree ambient glow, while a teardrop chandelier creates a more focused, concentrated downlight that sparkles intensely on the tables or dance floor below.
The following table breaks down how different styles perform within a tent environment, considering factors beyond just their look.
| Chandelier Type | Wind Resistance | Light Pattern | Rigging Complexity | Best Tent Size |
|---|---|---|---|---|
| Sputnik (Wide) | Low – High sail effect | Diffuse, 360° spread | High – Multiple points needed | Large (40x80ft+) |
| Teardrop (Compact) | High – Minimal sway | Focused downlight | Low – Single point sufficient | Medium (20x40ft) |
| Empire Style | Medium – Moderate profile | Concentrated sparkle | Medium – Balanced load | All sizes |
By matching the fixture’s physical characteristics to the tent’s architecture, you ensure the chandelier not only looks right but also behaves safely and predictably within the space.
Safety height: ensuring tall guests don’t hit their heads while jumping
A common oversight in event design is calculating hanging height based on static measurements. A chandelier hung at 7 feet might seem fine in an empty tent, but a wedding is a dynamic environment. The real metric to consider is dynamic headroom—the clearance needed during peak activity. This is especially crucial over a dance floor, where guests will be jumping, raising their hands, and lifting partners in celebration. A fixture that is perfectly safe over a dining table can become a serious hazard in an activity zone.
A professional rigger uses a formula to determine the minimum safe height for different zones within the tent. The calculation starts with the height of the tallest anticipated guest (using a safe margin like 6’6″ or around 2 meters) and adds clearance based on the zone’s activity level. For general walkways, an additional foot (30cm) might suffice. But for a high-energy dance floor, you must add at least 3 to 4 feet (about 1 to 1.2 meters) of clearance to that initial guest height. A final safety buffer of another foot is often added to account for any potential fixture sway.
This zonal approach is key to a sophisticated lighting design. It allows you to create intimacy with lower-hanging chandeliers over lounge areas or cake tables while ensuring maximum safety and freedom of movement where it matters most. On the event floor plan, we literally mark “no-go zones” where a fixture’s height falls below the calculated minimum for that area. This prevents placing a dance floor under a chandelier that was hung for a dining setting. It’s a simple but crucial step in preventing accidents.
By planning for movement and energy, not just for static space, you ensure your lighting design is both beautiful and intelligently safe for every moment of the celebration.
Clamp systems: how to hang chandeliers without drilling holes?
In a temporary venue like a tent or a restored barn, drilling into the structure is out of the question. The solution lies in specialized rigging hardware, primarily beam clamps and truss clamps. These devices are the critical connection point in your structural integrity chain, and using the wrong type or attaching it to the wrong place is a recipe for disaster. It’s not enough to use a clamp; you must use the right clamp on the right part of the structure.
Tent frames are typically made of aluminum poles connected by steel fittings. As a core principle of safe rigging, the attachment should always be made to the stronger material. As lighting experts from American Tent advise, the connection must be made to the robust steel fitting, not the softer aluminum pole.
If you’re planning to hang a chandelier in your frame tent, we advise securing it to the steel fitting rather than the aluminum pole. This ensures a stable and safe installation.
– American Tent, Wedding Tent Lighting Ideas Guide
Moreover, the clamp’s rating is meaningless if the beam or pole it’s attached to can’t support the load. A discussion among professional electricians highlighted a chilling reality: a one-ton rated clamp is useless on a beam that can only hold 100 pounds. This is why a rigger’s job involves assessing the entire support system, not just the individual hardware. For any suspended load over 200 lbs, the consensus is clear: a structural engineer must be involved. This is not red tape; it’s a life-saving measure. An improperly rigged 200lb object is more than capable of causing fatal injuries.
Choosing the right clamp and anchor point is a decision based on material science and engineering, proving once again that safety is an integral part of the aesthetic design.
How to use antique furniture without sacrificing guest comfort?
Integrating antique furniture, like vintage settees or ornate tables, can beautifully complement the opulent theme set by your chandeliers. However, these pieces were often designed for aesthetics over ergonomics. The key to success is strategic placement, not widespread replacement. A practical approach is the 80/20 rule: reserve 80% of your guest seating for modern, comfortable dining chairs that are designed for long periods of sitting. The remaining 20% can be antique pieces used as powerful accents.
Instead of scattering them randomly, create intentional themed vignettes. Place a Louis XVI settee and a small table under a smaller, complementary chandelier to create a dedicated photo-op area. This allows guests to admire and interact with the pieces without being forced to sit on them for a three-hour dinner. This strategy provides the desired historical character while ensuring the primary guest experience—dining comfort—is never compromised.
When placing antiques in a tent, you must also consider the flooring. Uneven grass or temporary flooring can make delicate furniture unstable. Use small, custom-built platforms or discreet shims to level the pieces securely. Additionally, to protect both the rental furniture and the venue’s floor, apply protective felt or coasters under all legs, especially in a tent where moisture from the ground can damage antique wood. This thoughtful integration ensures your antique furniture adds to the luxury without creating discomfort or safety issues.
By using antiques as targeted grace notes rather than functional workhorses, you achieve the perfect blend of historical charm and modern comfort.
Key Takeaways
- Structural verification is paramount: Always obtain written load ratings for a tent frame before hanging any weight.
- Dynamic loads are critical: The effective weight of a chandelier increases with movement, requiring a significant safety factor in all rigging.
- Safety is a chain: From the tent pole to the fixture’s wiring, every component must be professionally rated and inspected.
How to Fake Opulent Luxury on a Mid-Range Wedding Budget?
Achieving a look of opulent luxury doesn’t necessarily require a dozen expensive chandeliers. The secret lies in strategic, intelligent lighting design that maximizes impact. It’s about creating the *feeling* of opulence through layering and focus. As rental pricing analyses show, basic perimeter lighting can start under $1,000, while a full canopy of chandeliers runs into the thousands. The smart money is spent somewhere in the middle, using a “hero piece” strategy.
This approach focuses the budget on one or two spectacular, high-impact chandeliers placed in a key location, such as over the dance floor or the head table. This becomes the undeniable centerpiece of the room. The rest of the atmosphere is built out with more cost-effective lighting techniques. Pin-spotting, for example, uses narrow beams of light to individually illuminate each table centerpiece, making them pop in a dramatic fashion. Wash lighting can be used to cast a warm, ambient color over the tent’s ceiling, and texture fixtures can project patterns (like foliage or stars) onto the dance floor or walls, adding depth and visual interest.
This layering technique creates a rich, complex visual experience that feels far more expensive than it is. It directs the eye, creates drama, and builds a cohesive atmosphere around the statement chandelier.
Case Study: The “Hero Piece” Strategy
The experts at Images by Lighting demonstrated this concept perfectly. By anchoring their design with a single, spectacular centerpiece chandelier, they created an immediate focal point. They then used targeted pin-spot lights to hit the crystals, making them sparkle dramatically. This was complemented by wash and texture fixtures that filled the space with color and pattern. The result was a high-end, magical atmosphere achieved without the expense of hanging numerous large fixtures, proving that strategic layering delivers a luxurious feel within a manageable budget.
To put these powerful lighting strategies into practice, your next step should be to discuss this layered, “hero piece” approach with your lighting designer to create a custom plan that delivers maximum opulence for your specific budget.