In summary:
- Stop trying to fill a huge hall with small decor; it’s a losing battle. Instead, use strategic architectural and lighting tricks to control the space.
- Leverage “volume over surface.” A few tall trees or hanging installations have more impact than dozens of expensive floral centerpieces.
- Use pipe and drape to physically shrink the room to fit your guest count, creating instant intimacy and saving on decor.
- Invest in one massive focal point, like a floral arch. Its “visual weight” tricks the eye into ignoring less glamorous details like standard chairs.
- Treat your venue’s empty corners as opportunities for curated lounge zones or photo stations, not dead space.
You’ve secured the venue. It’s vast, impressive, and can comfortably fit your 300-plus guests. But as you stand in the echoing expanse of the ballroom or marquee, a chilling realization dawns: the budget that felt generous now seems laughably small for the sheer volume of space you need to decorate. The conventional wisdom is to start pricing out floral arrangements for every table, and the numbers quickly become terrifying. This approach—trying to fill an enormous space with dozens of small, expensive items—is the single biggest mistake couples make. It dilutes your budget and results in a space that still feels empty and unfinished.
Many articles will suggest generic tips like “use candles” or “add some balloons.” While not wrong, these are tactical details, not a strategy. As a large-scale event planner, I can tell you that transforming a cavernous hall is not about adding more stuff. It’s about fundamentally changing the perception of the space. The real key isn’t in what you fill the room with, but in how you control the guest’s eye and architect an experience within the existing structure. It’s about manipulating scale, light, and zones to create perceived intimacy and high-impact moments.
This guide will walk you through the professional planner’s playbook. We will explore how to use spatial architecture to redefine your venue, leverage the power of light to paint with volume, and make strategic investments that deliver an outsized return on visual impact. Forget thinking like a decorator; it’s time to think like an event architect.
To guide you through this strategic process, we’ve broken down the core principles used by professionals to master large venues. The following sections will provide actionable insights into each critical component of a successful design.
Summary: A Planner’s Guide to Mastering Large Venue Decor
- Pipe and drape tricks: cutting a room in half to fit your guest count
- Why colored uplighting fills volume cheaper than physical decor?
- Avoiding the high school prom look in large rectangular halls
- Renting 10-foot trees: are they better space fillers than table flowers?
- The “corners rule”: what to put in the empty edges of a large room?
- Why one massive floral arch hides a multitude of cheap chairs?
- Why hanging ferns need to be at least 8 feet up to look natural?
- How to Decorate a Marquee Tent so It Doesn’t Look Like a Camping Trip?
Pipe and Drape Tricks: Cutting a Room in Half to Fit Your Guest Count
The most effective and often overlooked strategy for a massive hall isn’t to decorate it, but to shrink it. Pipe and drape is the ultimate tool for this form of spatial architecture. By creating a “room-within-a-room,” you immediately solve the problem of empty space and focus your budget on a smaller, more manageable area. This isn’t just about putting up a wall; it’s about creating a grand reveal. You can hide the dining area during the cocktail hour, building anticipation before welcoming guests into a perfectly proportioned and intimate setting.
The financial logic is undeniable. While professional wedding draping costs range from $350 to $4,500 depending on the complexity, this investment often eliminates the need for decor in the sectioned-off portion of the hall, leading to significant net savings. Beyond the visual, fabric draping has a powerful acoustic benefit. It dampens sound and reduces echo, transforming a cavernous, noisy hall into a space where conversations can happen comfortably. This change in acoustics alone drastically increases the feeling of perceived intimacy.
When planning, a good rule of thumb is to allocate 12-15 square feet per guest for a comfortable dining setup. Measure your venue and use drapes to create a perimeter that fits this calculation precisely. For a DIY approach, rental kits are available, but ensure the pipes are at least 8-10 feet high to maintain a sense of scale and grandeur. For a more structured look, consider alternatives like tall boxwood hedge rentals or modular panels, which achieve the same spatial division with a more architectural feel.
Why Colored Uplighting Fills Volume Cheaper than Physical Decor?
Once you’ve defined your space, the next challenge is filling the vertical volume. This is where most budgets are wasted on tall, expensive floral arrangements. A planner’s secret weapon is light. Colored uplighting is the single most cost-effective way to fill a room, creating drama, depth, and ambiance for a fraction of the cost of physical decor. Instead of buying objects to fill the space, you are essentially painting the air itself. Columns of light draw the eye upward, highlighting architectural features and making the ceiling feel intentional rather than distant.
The return on investment is staggering. A professional uplighting package can completely transform a bland ballroom, and the cost-benefit analysis proves its value. It can take up to $10,000 worth of professional fixtures to properly light a large space, but couples typically pay only a fraction of that for the service. This demonstrates how lighting provides massive visual impact at a minimal cost compared to physical decorations of an equivalent scale.
Case Study: The Unseen Value of Professional Lighting
A typical wedding uplighting installation requires 16-30 professional fixtures, each valued at $250-$500. This brings approximately $10,000 worth of equipment to transform a ballroom, yet couples typically pay only $800-$1,600 for the service. This demonstrates how uplighting provides massive visual impact at a fraction of the cost of equivalent physical decorations, essentially leveraging high-value assets for a low rental price.
This photo powerfully illustrates the concept. The unlit side is flat and uninspired, while the side washed in amber and gold light has depth, warmth, and a clear mood. Light doesn’t just fill space; it creates an emotional atmosphere and can cleverly mask less-than-ideal features of a venue, like dated wallpaper or scuffed walls.
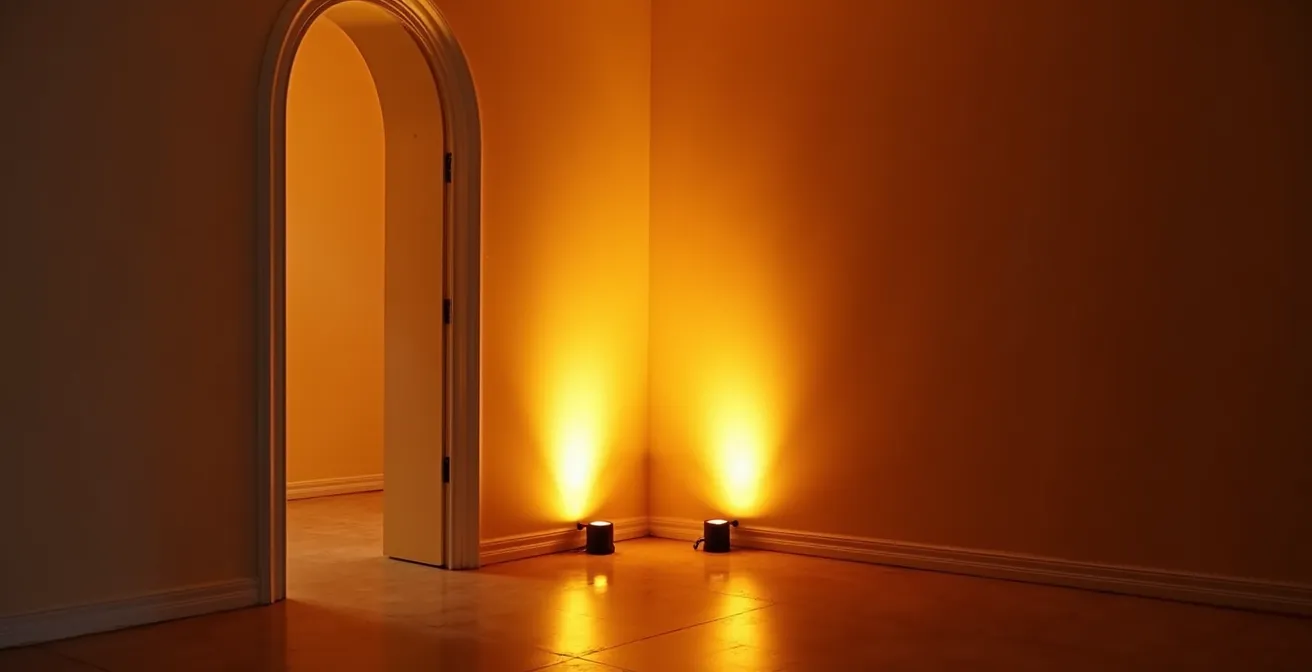
When discussing with your lighting provider, think in terms of “washing” walls with color rather than just pointing lights at them. Amber, soft gold, and blush tones create a warm, romantic glow, while blues and purples offer a more dramatic, modern feel. The key is to choose a color that complements your palette and use it consistently to create a cohesive and immersive experience.
Avoiding the High School Prom Look in Large Rectangular Halls
A large, rectangular hall, often found in hotels or community centers, is a blank canvas that can easily drift into “high school prom” territory. This look is characterized by shiny satin, uniform table spacing, and a single, predictable focal point. To achieve a sophisticated, high-end feel, you must intentionally break these conventions through zone curation and a focus on texture and asymmetry. Instead of one large, homogenous space, your goal is to create multiple, smaller, curated experiences within the hall.
Use area rugs and furniture groupings to designate distinct zones: a cozy lounge area with velvet armchairs for conversation, a high-energy dance floor, and the formal dining space. This breaks up the visual monotony and encourages guests to move around and interact with the venue in different ways. The choice of materials is also critical. Layering matte textures like linen tablecloths, wood accents, and suede seating over a few strategically placed metallic elements creates depth and a sense of luxury that shiny fabrics lack.
Asymmetry is your friend in a large, boxy room. Instead of placing the dance floor dead center, consider positioning it to one side. This creates a more dynamic layout and allows you to create a massive focal point on a single wall—perhaps a textured installation, a custom neon sign, or a dramatic projection. This one powerful feature will have far more visual weight than dozens of identical, symmetrically placed centerpieces.
| Element | High School Prom Style | Sophisticated Wedding Approach |
|---|---|---|
| Materials | Shiny satin, glitter, metallic balloons | Matte textures: velvet lounge seating, linen tablecloths, mixed metallics |
| Layout | Rigid symmetry, uniform spacing | Asymmetrical design with varied centerpiece heights |
| Zones | One large open space | Multiple defined areas using rugs and furniture groupings |
| Focal Points | Centered stage or arch | Off-center dance floor, single dramatic wall feature |
Renting 10-Foot Trees: Are They Better Space Fillers than Table Flowers?
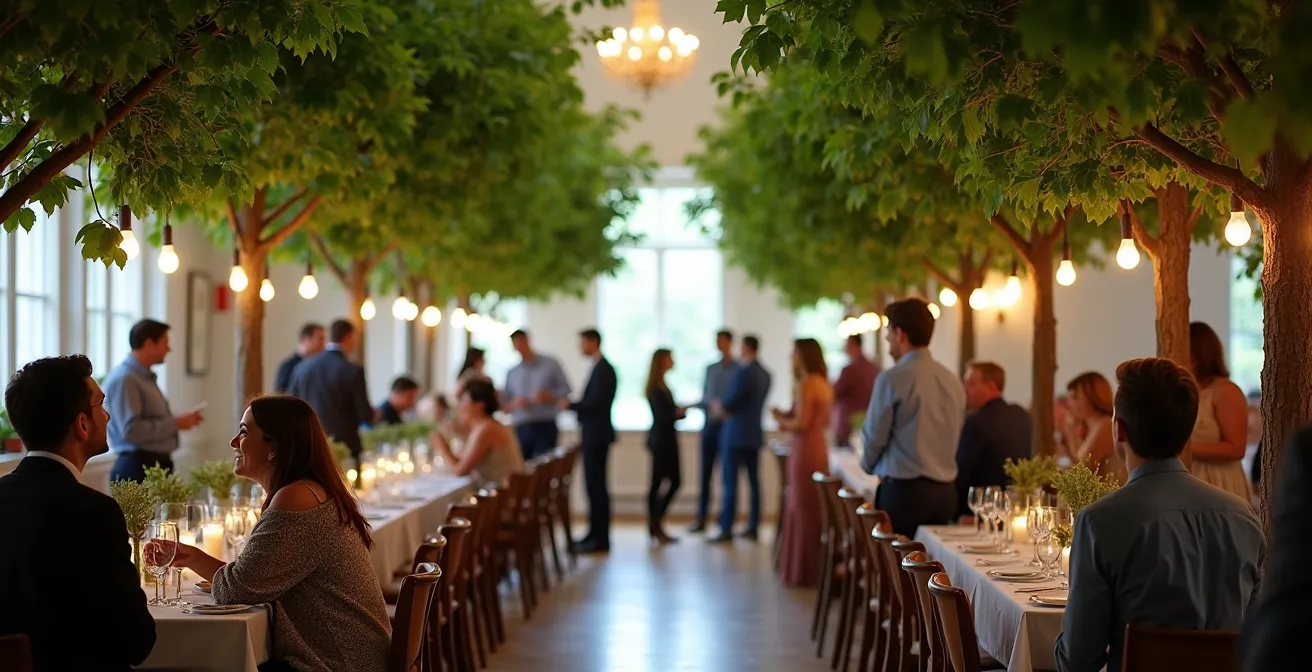
When it comes to filling volume on a budget, the math is simple: go vertical. The traditional approach of placing a floral centerpiece on every one of your 30+ tables is an exercise in diminishing returns. While beautiful up close, they do little to impact the overall feel of a massive room. This is where you must shift your mindset from decorating surfaces to filling volume. Renting a few large, 10-foot trees is an incredibly effective strategy to achieve this.
Positioned along the perimeter of the room or to frame key areas like the dance floor or entrance, these trees draw the eye upward, creating a natural canopy that makes the space feel more intimate and enchanting. This strategy of lining the room edges with plants creates what some event designers call a fairytale garden atmosphere indoors, instantly elevating the venue.
Cost-Benefit Analysis: Trees vs. Floral Centerpieces
Consider the cost comparison. Renting four large 10-foot trees might cost approximately $400-$600 total. In contrast, creating 20 elaborate floral centerpieces could easily run from $1,500 to $3,000. For a third of the price, the trees provide significantly more vertical impact, fill more cubic space, and create a much more dramatic transformation of the room’s atmosphere. The ROI is clear.
By investing in vertical elements like trees, you can then simplify your table decor. Simple bud vases, scattered greenery, or even elegant candles become sufficient because the trees are doing the heavy lifting of defining the space. You’ve created a high-impact look while allocating your budget far more strategically. It’s a classic planner’s move: spend big on what fills the most space and save on the details that have less overall impact.
The “Corners Rule”: What to Put in the Empty Edges of a Large Room?
In any large hall, the corners are the areas most likely to become “dead space”—awkward, empty voids that make the room feel unfinished. A strategic planner doesn’t see dead space; they see an opportunity for zone curation. The “corners rule” dictates that every edge of your venue should be treated as a curated scene with a distinct purpose. This transforms forgotten areas into engaging destinations that draw guests in and make the entire venue feel utilized and intentional.
Instead of trying to fill corners with random, small decor items, think bigger. Dedicate each corner to a specific function. One corner could become a cozy lounge area, complete with rented armchairs, a small rug, and a floor lamp. This provides a quiet space for guests to chat away from the music. Another corner can be transformed into an interactive photo booth with a custom backdrop and props, turning an unused area into a hub of activity and a source of lasting memories.
Case Study: Venue Transformation Through Corner Activation
Many village halls or community centers have underutilized stage areas or corners that are perfect for statement decor. By treating each corner as a curated scene—whether a lounge, a dessert bar, or a decorative vignette—couples can transform these empty edges into Instagram-worthy moments. These activated corners become highlights that guests actively seek out, turning potential dead space into some of the most photographed areas of the entire reception.
Other ideas include setting up a self-service coffee or dessert bar to activate a corner near the kitchen, or creating a purely decorative vignette with a single, dramatic statement piece. For example, a single ornate, oversized mirror leaning against a wall, a cluster of large floor lanterns, or even one massive 5-foot paper lantern can have far more impact than a scattering of smaller items. The key is to be bold and purposeful, giving each corner a reason to exist.
Why One Massive Floral Arch Hides a Multitude of Cheap Chairs?
In large-scale event design, the concept of visual weight is paramount. This principle states that the human eye is naturally drawn to the largest, most detailed, or most illuminated object in its field of vision. A single, massive, beautifully executed floral arch has immense visual weight. When you create one spectacular focal point, you strategically command your guests’ attention. Everything else in the room, from the standard-issue banquet chairs to the simple linen tablecloths, fades into the background.
This is a powerful psychological trick that allows you to allocate your budget with surgical precision. By investing heavily in one “wow” moment, you are given a pass on spending money on upgrading dozens of smaller elements. The arch becomes the anchor for the entire room’s design and the backdrop for your most important photos—the ceremony, the head table, and even the cake cutting.
A stunning arch becomes the primary focal point, and the brain effectively ‘downgrades’ the importance of secondary details like standard banquet chairs.
– Wedding Design Psychology Expert, Wedding Decoration Strategy Guide
To maximize your return on this significant investment, the arch should be treated as a mobile asset throughout the event. Position it as the ceremony backdrop for vows. After the ceremony, have your coordination team move it behind the head table to frame you during dinner. It can then be relocated to the cake-cutting area or serve as a grand entrance to the dance floor. For budget-conscious options, consider non-floral alternatives like a dramatic copper moon gate draped in simple greenery or a backdrop of cascading ribbons, which can achieve a similar scale and impact for less cost.
Why Hanging Ferns Need to be at Least 8 Feet up to Look Natural?
As we’ve established, filling vertical volume is key in a large venue. Hanging installations, like clusters of ferns or greenery, are a fantastic way to do this. However, there is a critical rule that separates a professional, high-end look from an amateurish one: height. Professional event designers consistently hang all overhead greenery at a minimum height of 8 feet. This isn’t an arbitrary number; it’s rooted in the principle of preserving natural sightlines and creating the right psychological effect.
When greenery is hung too low, it encroaches on the guests’ personal space. It can feel claustrophobic, block views across the room, and even get in the way of taller guests. It looks unnatural and cluttered. By raising the installations to 8 feet or higher, you are lifting the decor out of the human activity zone and into the architectural space above. This mimics the feeling of a natural forest canopy, drawing the eyes upward and creating a sense of wonder and openness, rather than confinement.
Case Study: Natural Sightline Preservation in Event Design
The 8-foot rule is a standard in professional event design for a reason. It ensures that sightlines across the room remain open, allowing guests to see and interact with each other freely. When this technique is combined with pin spot lighting aimed down from above the ferns, the effect is multiplied. The resulting dappled shadows that fall on the tables and dance floor add a layer of texture and movement, doubling the visual impact of the installation without any additional physical decor or cost.
This small detail makes a huge difference. It’s the kind of expert touch that elevates a design from simply “decorated” to “designed.” When planning any hanging elements, whether they are ferns, floral clouds, or lanterns, always communicate this minimum height requirement to your florist or decor team. It ensures the installation enhances the room’s grandeur instead of detracting from it.
Key takeaways
- Think like an architect: Your primary job is to manage and define space, not just fill it with flowers.
- Light is your most powerful tool. It fills volume, creates mood, and hides flaws for a fraction of the cost of physical decor.
- Invest in scale. One huge arch or a few tall trees will have more impact than 100 small centerpieces. Focus on vertical space.
How to Decorate a Marquee Tent so It Doesn’t Look Like a Camping Trip?
A marquee tent presents a unique set of challenges. It’s a blank canvas, but its raw, structural elements—poles, a vinyl ceiling, and often just grass underfoot—can easily feel more like a functional shelter than a luxurious wedding venue. The key to transforming a tent is to systematically address these raw elements, starting from the ground up. The floor is the first and most critical step in erasing the “camping” vibe. Investing in temporary flooring or even large, well-placed sisal rugs immediately defines the space and signals a proper event.
Once the ground is addressed, turn the tent’s structure from a liability into a design feature. Instead of trying to hide the support poles, embrace them. Wrap them elegantly in fabric, twine them with fairy lights, or use them as anchors for climbing greenery. This integrates them into your design and adds much-needed texture and vertical interest. The ceiling is another prime opportunity. Use the tent’s framework as a built-in grid for hanging installations. Chandeliers, clusters of paper lanterns, or sweeping drapes of fabric can completely hide the vinyl ceiling and create a breathtaking canopy.
Your Action Plan: Transforming a Marquee Tent
- Address the ground first: Invest in rugs or temporary flooring to eliminate the ‘camping’ feel.
- Wrap tent poles: Elegantly cover poles in fabric, fairy lights, or climbing greenery instead of hiding them.
- Create a dedicated entrance: Use a draped walkway or a wooden archway to design a formal point of entry.
- Use the tent structure: Leverage the framework for hanging installations like chandeliers, lanterns, or greenery.
- Add perimeter uplighting: Wash the tent walls with color to create architectural interest and a warm glow.
Finally, apply the same principles of lighting and zone creation. Use perimeter uplighting to wash the tent walls with soft color, which will make the space glow from the outside and feel intimate on the inside. Create a dedicated entrance with a draped walkway to build anticipation. By systematically layering flooring, wrapping structural elements, hanging decor from the ceiling, and adding strategic lighting, you transform a basic tent into a bespoke, elegant, and unforgettable wedding venue.
| Flooring Type | Approximate Cost | Visual Impact | Installation Complexity |
|---|---|---|---|
| Full Temporary Flooring | $3-8 per sq ft | Complete transformation | Professional required |
| Large Sisal Rugs | $200-500 per zone | Defines specific areas | DIY friendly |
| Custom Dance Floor Decal | $500-1500 | Focal point creation | Professional recommended |
| Grass/Turf Coverage | $1-3 per sq ft | Natural enhancement | DIY possible |
By applying these strategic principles, you can confidently approach any large venue not as a problem to be solved, but as an opportunity to create a truly spectacular and personal wedding experience—all while keeping your budget firmly intact.