Transforming a tent into a luxury venue isn’t about covering it in flowers; it’s about mastering its underlying structure first.
- Draping choices, specifically full ceiling liners, are what truly define the interior architecture and hide the metal skeleton.
- A solid, professionally installed cassette floor provides the level, stable foundation essential for guest comfort and a high-end feel.
- Professional rigging with a certified load plan is non-negotiable for safely hanging any significant weight, like chandeliers.
Recommendation: Prioritize your budget and planning on these foundational elements—flooring, draping, and rigging—before allocating funds to purely aesthetic decor.
There’s a specific anxiety that comes with planning a marquee wedding. You’ve invested in exquisite catering, a stunning dress, and beautiful floral arrangements, yet a nagging fear remains: what if, after all that effort, your venue still just feels like a tent? The image of exposed metal poles, rumpled canvas, and guests teetering on uneven grass can undermine the entire vision of a sophisticated, elegant affair. It’s the risk of creating a beautiful party inside a structure that screams “temporary” and, at worst, “camping.”
Most advice focuses on camouflage through decoration: cover everything with fairy lights, hang floral garlands, and choose a strong color scheme. While these elements are important, they are merely cosmetic touches on a much deeper structural issue. They are decorative layers applied to a frame that still fundamentally looks and feels like a tent. This approach often fails to address the core problem—the industrial nature of the poles, the instability of the ground, and the logistical challenges of climate control and lighting.
But what if the secret to making a marquee feel like a permanent, luxury building has less to do with the decorations you add, and everything to do with the structural decisions you make beforehand? The real transformation from a temporary shelter to a bespoke venue happens at the engineering level. It’s about understanding the interplay of fabric, flooring, and rigging to completely redefine the architecture of the space. This is where you move from decorating a tent to constructing a venue.
This guide will walk you through the critical, specialist-level choices that truly matter. We will analyze the foundational elements—from the fabrics that erase the metal frame to the flooring that provides a solid footing and the professional rigging required to safely bring your most ambitious lighting designs to life. By focusing on these core components first, you can build a venue that feels intentional, luxurious, and permanent, creating the perfect canvas for your final decorative touches.
To navigate these crucial decisions, we have broken down the essential structural and logistical aspects of elevating a marquee tent. This summary outlines the key areas we will explore, providing a clear roadmap to transform your temporary structure into a breathtaking, permanent-feeling space.
Summary: Elevating Your Marquee from Tent to Luxury Venue
- Leg drapes vs. Ceiling liners: which fabric hides the ugly metal best?
- Cassette floor vs. Matting: do you really need a full wood floor?
- Hiding the AC ducts: how to keep the tent cool without ruining photos?
- Clamp systems: how to hang chandeliers without drilling holes?
- Why the tent needs to go up 3 days before the wedding?
- Can the tent frame actually hold three 80lb chandeliers?
- Vinyl vs. Parquet: which dance floor surface prevents slips in heels?
- How to Install Crystal Chandeliers safely in Temporary Structures?
Leg drapes vs. Ceiling liners: which fabric hides the ugly metal best?
When tasked with hiding the industrial metal skeleton of a marquee, fabric is your primary tool, but not all draping is created equal. Many couples opt for simple leg drapes—fabric wrapped around the vertical support poles. While this softens the look, it’s a cosmetic fix that leaves the most telling feature exposed: the metal-beamed ceiling. This approach only partially solves the problem, as guests’ eyes are naturally drawn upwards, where the entire “tent” structure remains visible.
For a complete transformation, a full ceiling liner is the superior, albeit more involved, solution. A liner is a complete fabric ceiling installed below the tent’s actual roof, effectively creating a new, elegant interior. It hides every single pole, truss, and cable, instantly converting the space from a temporary structure into what feels like the inside of a finished building. It offers total coverage, creating a soft, uniform, and luxurious atmosphere that leg drapes alone can never achieve. Liners also provide a clean, neutral background, making any subsequent lighting or floral installations look more intentional and impactful.
The choice between these options often comes down to budget and desired effect. Leg drapes are a cost-effective way to add a touch of elegance, but they don’t fundamentally change the space. A full liner is a significant investment in both cost and installation time, but it is the single most effective way to erase the “tent” look and create a truly high-end feel. The decision depends on whether you want to decorate a tent or create a new room entirely.
The following table breaks down the practical differences in coverage, cost, and installation requirements, providing a clearer picture of what each option entails. As the data from a leading rental company like American Tent shows, more complete coverage requires a greater investment.
| Draping Type | Coverage | Cost Range | Installation Time | Airflow Impact |
|---|---|---|---|---|
| Leg Drapes Only | Poles only | $15-20/linear foot | 2-3 hours | Minimal |
| Ceiling Swags | Partial ceiling | $20-25/linear foot | 3-4 hours | Moderate |
| Full Ceiling Liner | Complete coverage | $25-35/linear foot | 4-6 hours | Significant – may require extra AC |
Cassette floor vs. Matting: do you really need a full wood floor?
The ground beneath your guests’ feet is one of the most significant factors separating a “camping trip” vibe from a luxury event experience. While simple matting or leaving the grass exposed might seem like a rustic and budget-friendly choice, it presents numerous problems. Uneven ground can cause tables to wobble and chairs to sink, while dampness from dew or unexpected rain can quickly turn the floor into a muddy mess. More importantly, it constantly reminds guests that they are, in fact, in a field.
A professional cassette floor is the definitive solution. This isn’t just a layer of wood; it’s a modular, engineered system built on a leveled metal sub-structure. This framework allows installers to create a perfectly flat, solid, and raised surface, regardless of the lumps and slopes of the ground underneath. The result is a floor that feels as stable and secure as one in a permanent building. Guests can walk confidently in heels, tables remain perfectly steady, and the entire space is protected from ground moisture.
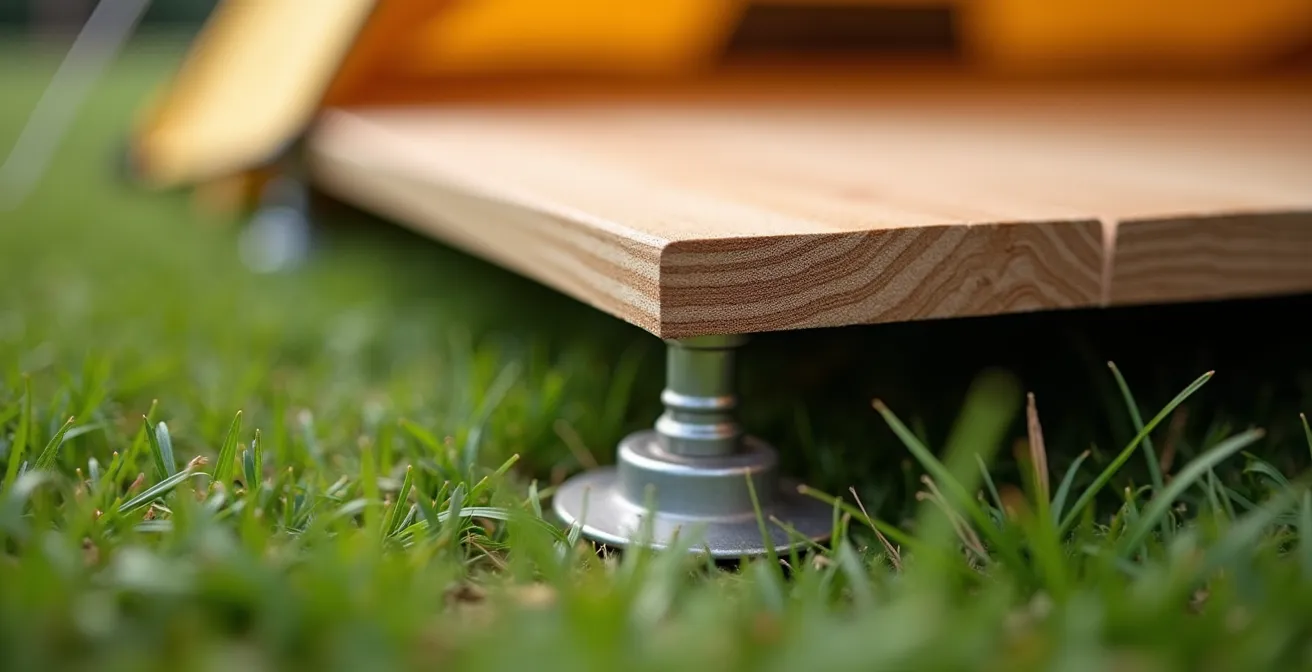
The investment in a cassette floor pays dividends in guest comfort and safety. As Madison Party Rental noted in a case study, their clients who chose cassette flooring for outdoor weddings consistently reported higher guest satisfaction. One event on uneven terrain saw no issues with stability for 200 guests, and the raised platform kept the interior completely dry despite morning dew. Such a professional installation is a significant logistical undertaking; event planners recommend scheduling tent flooring installation requires a minimum 72-hour setup time to allow for precise leveling and finishing.
Hiding the AC ducts: how to keep the tent cool without ruining photos?
Climate control in a marquee, especially during warmer months, is a non-negotiable necessity. However, the solution—large, industrial AC units and bulky air ducts—can be a major eyesore, threatening to ruin the aesthetic you’ve worked so hard to create. Simply placing them outside the tent is not enough, as the ducts must run into the space, often along the ceiling or walls, creating a jarring industrial element in wedding photos.
The key to successful climate control integration is strategic planning and creative camouflage. Instead of treating ducts as a problem to be hidden at the last minute, they should be incorporated into the decor plan from the outset. A pre-installation meeting with both the tent and HVAC vendors is critical to determine the least obtrusive placement. Positioning the main units near service areas, like the catering entrance or behind the head table, can minimize their visual impact.
Once positioned, the ducts themselves can be transformed. Here are a few professional strategies:
- Fabric Boxing: Build a simple frame around the ducts and cover it with the same fabric used for your ceiling or wall liners, making them blend seamlessly into the background.
- Structural Greenery: Use the ducts as a structural base for cascading floral or greenery installations. This turns a functional necessity into a stunning design feature. A luxury wedding planner successfully wrapped ducts in greenery garlands and fairy lights, creating a ‘living installation’ that guests assumed was purely decorative.
- Strategic Uplighting: Use lighting to draw the eye away from mechanical elements and towards focal points like the dance floor or head table.
- High-End Alternatives: For some events, consider investing in sleeker, white ‘portacool’ units that are more aesthetically pleasing and can sometimes be used without extensive ducting.
Clamp systems: how to hang chandeliers without drilling holes?
Nothing says “luxury” quite like a cascade of crystal chandeliers. However, suspending heavy objects from a temporary structure is a serious engineering challenge. Drilling into the tent’s metal frame is strictly forbidden, as it compromises its structural integrity and violates rental agreements. The solution lies in professional-grade rigging hardware, specifically designed for temporary structures.
The industry standard is to use a system of beam clamps and trusses. Certified beam clamps are heavy-duty C-clamps that securely grip the marquee’s main support beams without any drilling or permanent alteration. For heavier or multiple fixtures, a secondary metal bar, known as a truss, is often suspended between two main beams using these clamps. This truss then serves as a versatile and safe rigging point for hanging chandeliers, lighting rigs, or floral installations. This method distributes weight across multiple points on the tent’s frame, preventing any single point from being overloaded.
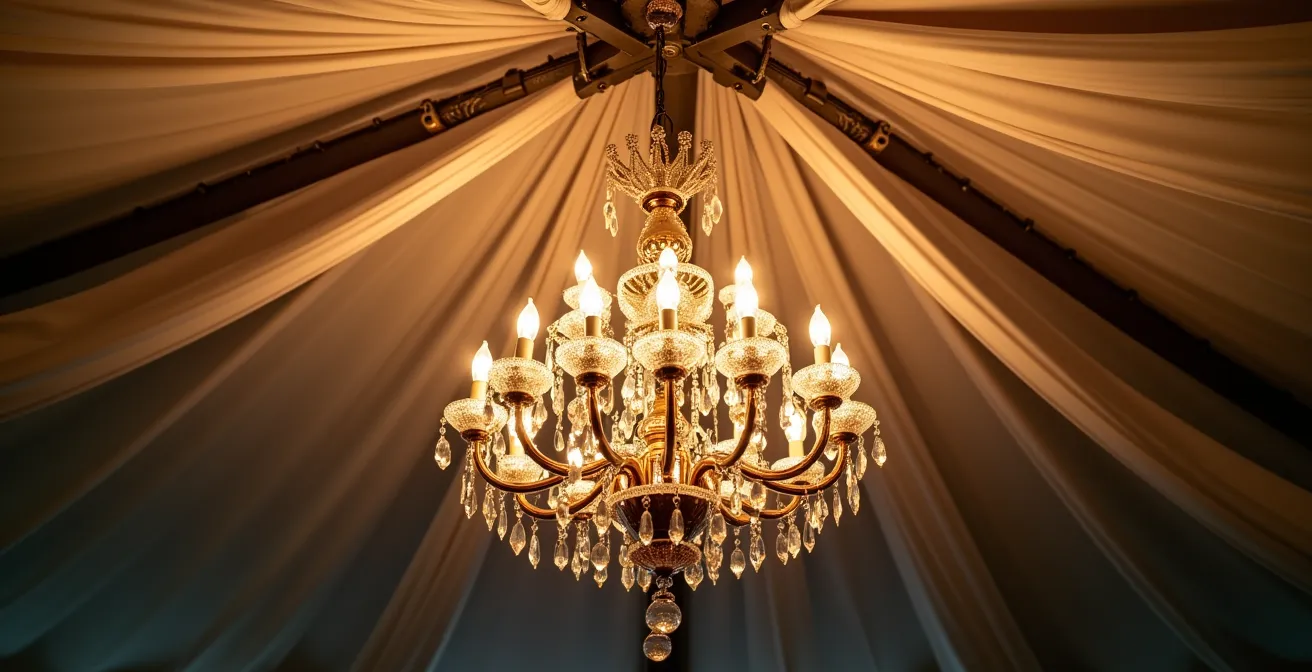
This is not a DIY task. The weight of chandeliers, combined with the dynamic loads of a temporary structure, requires certified professionals. Before signing any contract, it is imperative to verify the vendor’s qualifications and safety protocols. Your tent company must provide an engineered “rigging plot” that specifies exactly what can be hung and where. Entrusting this work to anyone other than a certified and insured rigger is a risk to property and, more importantly, to your guests.
Your Vendor Verification Checklist for Safe Rigging
- Is the stated load capacity certified by a structural engineer?
- Do you provide certified clamps and rigging hardware for the installation?
- Is your installation crew fully insured for overhead rigging work?
- Can you provide a written rigging plot with detailed weight specifications for my plan?
- What secondary safety cables are included in the installation as a backup?
Why the tent needs to go up 3 days before the wedding?
A common point of confusion for couples is the seemingly long setup time required for a high-end marquee wedding. Why does the tent need to be installed a full 72 hours before the event? The answer lies in logistics, safety, and the sequential nature of building a venue from scratch. This three-day window is not a buffer; it is a meticulously planned production schedule.
Day 1 is for the primary structure and power. The tent company erects the main frame and canvas. This is a significant construction project that can be impacted by weather, requiring a buffer for potential delays. Immediately following, electricians run primary power lines to the tent, laying the groundwork for lighting, sound, and catering. This must be done before any flooring or decor is in place.
Day 2 is for the interior build-out. This is when the “room” is created. Flooring installers lay and level the cassette floor. Draping and lighting crews then move in to install ceiling liners, wall drapes, and hang the primary rigging for chandeliers. These tasks require an empty tent and significant manpower. According to Wisconsin-based vendor Madison Party Rental, this sequencing is critical to ensure vendors can work efficiently without rushing or damaging each other’s work. The structure also needs about 24 hours to “settle,” allowing crews to re-tighten stakes and adjust fabric tension before final decor is added.
Day 3 is for the final layers and finishes. With the core structure complete, florists, decorators, and the catering team can now access the space. They bring in tables, chairs, floral arrangements, and set up the bar and kitchen areas. The day culminates with a final walkthrough with your planner to ensure every detail is perfect. Attempting to compress this schedule into one or two days creates a chaotic and unsafe environment, risking costly mistakes and compromising the final result.
Can the tent frame actually hold three 80lb chandeliers?
The question of whether a marquee frame can support heavy decorative elements like multiple large chandeliers—totaling 240 lbs in this case—is not a matter of guesswork. It is a question of structural engineering and precise load calculations. The answer is yes, it’s often possible, but only if done correctly with professional oversight. Simply hanging an 80-pound fixture from a random point on the ceiling is exceptionally dangerous and will likely exceed the structure’s point load capacity.
A tent’s frame is rated for two types of loads: point load (the maximum weight that can be hung from a single spot) and distributed load (the total weight that can be spread across a larger section or the entire structure). According to structural engineering standards, many frame tents can support 50-75 pounds per attachment point when properly engineered. An 80-pound chandelier would exceed this limit, making direct attachment unsafe. Therefore, the weight must be distributed. This is achieved by using a truss system, as discussed earlier, which spreads the 240 lbs total weight across multiple, stronger anchor points on the tent’s main beams.
Before committing to such a design, you must obtain critical documentation from your tent provider. A refusal or inability to provide these documents is a major red flag that the company is not qualified for this type of work. Your checklist should include:
- A written ‘rigging plot’ stamped by a licensed engineer, showing exactly where and how much weight can be hung.
- Confirmation of insurance that specifically covers overhead installations and potential damages.
- A calculation of the total load (chandeliers, chains, electrical) versus the structure’s certified capacity.
- Verification that secondary safety cables, rated for at least 5 times the chandelier’s weight, will be used as a failsafe.
Vinyl vs. Parquet: which dance floor surface prevents slips in heels?
The dance floor is the heart of the celebration, but the wrong surface can pose a significant safety hazard, especially for guests in heels. In a tent environment, where moisture and temperature fluctuations are common, the choice of material is even more critical. While traditional parquet wood floors offer a classic look, they are often a poor choice for temporary outdoor events.
Parquet’s main drawback is its vulnerability to moisture. Dew or a sudden rain shower can cause the wood to warp, creating an uneven surface. The small gaps between the wood tiles are also notorious for catching and snapping thin heels, leading to falls or damaged shoes. Glossy vinyl floors, while waterproof, present their own problem: they become extremely slippery when even slightly wet from a spilled drink or condensation. Furthermore, in high heat, glossy finishes can become tacky, causing shoes to stick uncomfortably.
For safety and performance, matte vinyl is the superior choice. Its non-reflective finish provides excellent grip for all types of footwear, significantly reducing the risk of slips. Like all vinyl, it is completely waterproof and easy to clean. A case study from a summer wedding highlighted a custom-printed matte vinyl floor that performed perfectly in 85°F heat with zero stickiness and no heel-related incidents reported among 150 guests. Faux wood vinyl offers a good compromise, providing the look of wood with better stability and water resistance than the real thing.
The following table compares the most common dance floor options on key metrics for a tented wedding, highlighting why material choice goes far beyond simple aesthetics.
| Surface Type | Heel Safety | Weather Resistance | Customization Options | Temperature Sensitivity |
|---|---|---|---|---|
| Parquet Wood | Gaps can catch thin heels | Poor – warps with moisture | Limited to natural finish | Stable in all temperatures |
| Glossy Vinyl | Very slippery when wet | Excellent waterproof | Full color/pattern printing | Can become sticky in heat |
| Matte Vinyl | Best grip for dancing | Excellent waterproof | Monograms and patterns | Minimal stickiness |
| Faux Wood Vinyl | Good heel stability | Excellent waterproof | Wood-look patterns | Moderate heat sensitivity |
Key Takeaways
- A full ceiling liner, not just leg drapes, is the key to hiding the tent’s metal skeleton and creating a truly finished interior.
- Solid cassette flooring is a crucial investment for guest comfort and safety, eliminating the risks and instability of uneven ground.
- Always demand a certified rigging plot from your tent vendor before hanging any significant weight, especially heavy chandeliers.
How to Install Crystal Chandeliers safely in Temporary Structures?
Safely installing heavy crystal chandeliers in a temporary marquee is a precise, multi-step process that should only be executed by a team of certified rigging professionals. It combines careful planning, specialized equipment, and a strict adherence to safety protocols. Attempting this without proper expertise is not only a breach of contract with the rental company but a grave safety risk. Understanding the professional process helps you ensure your vendor is following the correct procedures.
The installation is a logistical sequence that begins long before the hoist is engaged. A professional team will follow a rigorous plan like this:
- Verify the Rigging Plot: The crew leader starts by cross-referencing the engineer-stamped rigging plot with the actual tent structure, marking the exact, pre-approved attachment points.
- Build the Support Truss: The support truss and certified hoists are attached to the tent’s main beams using beam clamps.
- Ground-Level Assembly: The chandelier is fully assembled and inspected on the ground. This is also when all electrical connections are tested to ensure they work before the fixture is in the air.
- The Hoist: With a minimum of three crew members spotting—one operating the hoist and two guiding the fixture—the chandelier is slowly and carefully lifted into position.
- Primary and Secondary Connections: Once at the correct height, the primary clamps, rated for at least twice the chandelier’s weight, are attached to the truss. Immediately after, secondary safety cables are installed at multiple points, providing a critical failsafe.
- Final Electrical Connection: The chandelier is connected to a dedicated, dimmer-controlled electrical circuit to prevent overloads.
This level of professional labor comes with a significant cost beyond the rental fee for the fixture itself. As a guideline, industry professionals report that professional chandelier installation can add $3,000-$6,000 or more to the budget, depending on the complexity, weight, and number of fixtures. This cost reflects the expertise, insurance, and equipment necessary to perform the job safely and transform your vision into a stunning, secure reality.
Frequently Asked Questions About Tent Wedding Setup
Can the tent be set up just one day before?
While technically possible, this eliminates any buffer for weather delays, vendor issues, or structural adjustments that may be needed after the initial setup. It creates an extremely high-risk and stressful environment for all involved.
What happens during the ‘settling period’?
After initial erection, the structure needs roughly 24 hours to settle into position on the ground. During this time, stakes may need to be re-tightened, and any fabric stretching or sagging can be adjusted before the interior decoration begins, ensuring a taut, clean finish.
Who needs access during the 3-day window?
The schedule is sequential. Day 1 is reserved for the tent company and electricians. Day 2 is primarily for flooring installers, lighting teams, and draping crews. Day 3 is for the final layers: florists, caterers, decorators, and the final walkthrough teams who add the finishing touches.