Creating an airy feel in a low-ceiling room isn’t about minimal decor; it’s about the strategic manipulation of vertical space and perception.
- Drawing the eye upward with strong vertical lines is the most powerful illusion for creating perceived height.
- Reducing the ‘visual weight’ of elements at eye-level is more effective than simply adding more decorations.
Recommendation: Focus your efforts on mastering sightlines, light, and negative space to trick the eye, rather than trying to fill the room.
You’ve found it. The wedding venue with the perfect location, the right capacity, and a date that works. But there’s a catch: the ceilings feel oppressively low, threatening to turn your dream of a light, open celebration into a cramped affair. It’s a common frustration that can make even the most beautiful space feel confined and dark. Many couples immediately think of common fixes like uplighting or adding a few mirrors, hoping for the best. These are the standard, expected solutions, but they often only scratch the surface of what’s possible.
But what if the real solution wasn’t just about adding light, but about fundamentally altering perception? The secret to transforming a low-ceilinged room lies not in decoration, but in illusion. It requires thinking like a spatial illusionist, using precise techniques to manipulate sightlines, manage visual weight, and trick the eye into seeing height and airiness that isn’t physically there. It’s about creating a ‘perceptual ceiling’ that soars far above the physical one. This is less about what you add and more about how you control what the eye sees, and where it travels.
This guide will move beyond the generic advice. We will deconstruct the eight core principles of spatial illusion for wedding decor. From the mathematical formula for centerpiece height to the sensory tricks that expand a room beyond its visual boundaries, you will learn how to masterfully craft an atmosphere of effortless elegance and space, even within the most challenging architectural constraints.
To navigate this masterclass in spatial perception, here is a breakdown of the core techniques we will explore. Each section builds upon the last, providing a complete blueprint for transforming your venue from cramped to capacious.
Summary: A Spatial Illusionist’s Guide to an Airy Wedding Venue
- Why tall, thin centerpieces make a low ceiling feel higher?
- Reducing table count: why 8 guests per table feels airier than 10?
- The “elbow room” metric: minimum spacing to prevent claustrophobia
- Strategic mirror placement: where to put them to expand the room?
- Window treatments: to drape or not to drape for maximum openness?
- How to use string lights to create a “false ceiling” of intimacy?
- The 3 decor items you should cut to improve the overall visual impact
- How to Transform a Generic Hotel Ballroom into a Unique Wedding Venue?
Why tall, thin centerpieces make a low ceiling feel higher?
The most powerful tool in a spatial illusionist’s kit is the control of the eye’s movement. A low ceiling encourages the eye to scan horizontally, reinforcing the room’s compressed dimensions. The primary goal is to break this pattern and force the gaze onto a vertical axis. This is where tall, slender centerpieces become invaluable. Their form creates a strong upward line that the eye naturally follows, generating a subconscious perception of height.
However, “tall” is a relative term that can backfire if not executed with precision. A centerpiece that is too tall can draw attention to just how close it is to the ceiling, shattering the illusion. The key is finding the sweet spot. According to professional event design standards, tall centerpieces should be at least 24 inches to rise above eye level and command a vertical presence. Conversely, low centerpieces should be kept under 12 inches to allow for conversation.
For a low-ceiling venue, the “Golden Ratio” is to aim for a maximum centerpiece height that is two-thirds of the distance from the tabletop to the ceiling. This ensures the arrangement has vertical impact without visually crashing into the ceiling. To further enhance this effect, use vessels made of clear glass or acrylic. These materials have minimal visual weight, allowing the flowers or branches to appear as if they are floating, further contributing to the airy, upward momentum you want to create.
Reducing table count: why 8 guests per table feels airier than 10?
While vertical illusions draw the eye upward, creating an airy dynamic also depends on managing the horizontal plane. The feeling of being cramped often originates at eye level, in the immediate space surrounding your guests. One of the most effective, yet often overlooked, strategies is to increase the negative space around each guest by reducing the number of people per table. The difference between seating ten guests at a standard 60-inch round table versus seating eight is profound.
With ten guests, chairs are practically shoulder-to-shoulder, and place settings are crowded. This creates a high visual density that stops the eye and signals “fullness” or clutter. By reducing the count to eight, you introduce critical breathing room. This negative space between place settings and chairs acts as a visual channel, allowing the eye to travel more freely across the table and even to the floor beyond. The table feels less like a barrier and more like an elegant, permeable feature within the room.
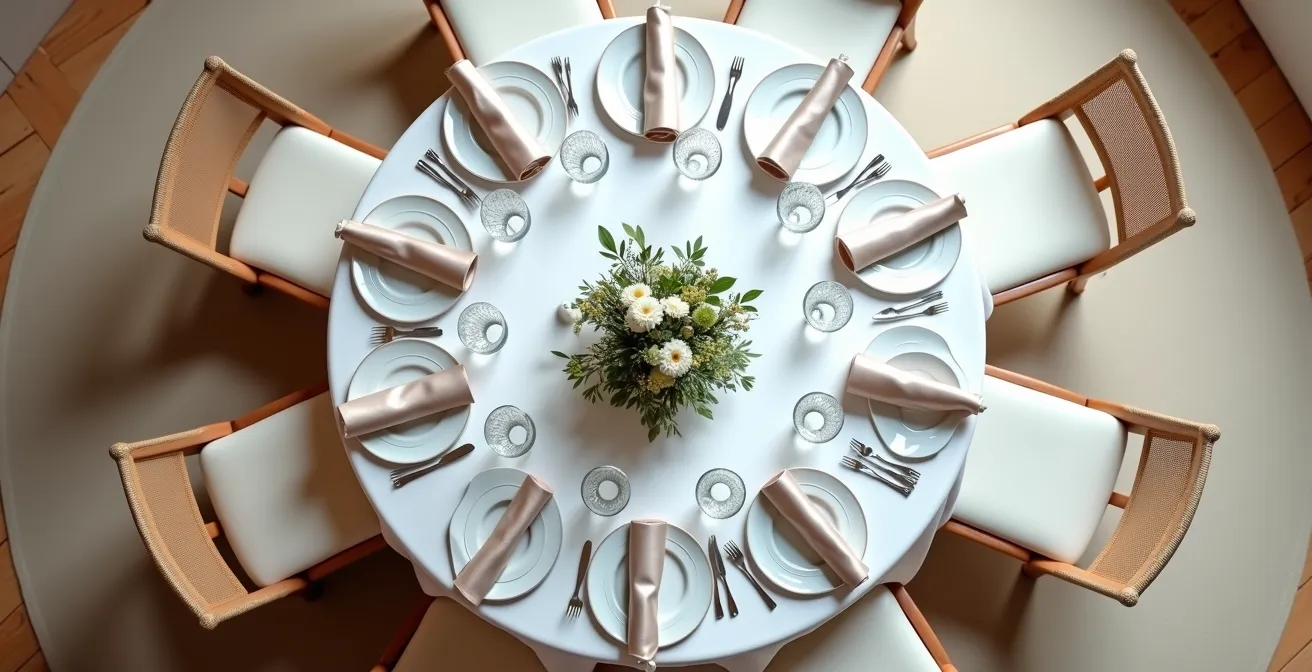
As the image above demonstrates, the space between each of the eight settings is not empty; it’s an active component of the design. It contributes to a sense of order, calm, and luxury. This approach is not about having fewer guests, but about distributing them more thoughtfully. Using more tables with fewer guests per table ultimately reduces the perceived density of the room, preventing the psychological feeling of being in a crowded, confined space. It’s a simple change with a massive impact on the overall feeling of openness.
The “elbow room” metric: minimum spacing to prevent claustrophobia
The perception of space is not just visual; it’s physical and psychological. Guests (and vendors) need to be able to move freely without bumping into chairs or feeling trapped at their tables. This functional space, or “elbow room,” is a critical metric for preventing a claustrophobic atmosphere. Even the most beautiful decor will fail if the layout itself feels constricted. The absolute baseline for comfort and maneuverability is the space behind a seated guest’s chair.
To ensure staff can serve and guests can push back their chairs without issue, event planning professionals recommend a minimum clearance of 36 inches behind each chair. Anything less creates bottlenecks and a subconscious feeling of being boxed in. This metric is the foundation, but a truly airy venue considers all traffic patterns, from main thoroughfares to the invisible “work zones” required by photographers and other vendors.
This systematic approach to spatial planning goes beyond simple measurements; it influences how guests experience the entire event. As an analysis of event layouts shows, different functions require different spatial considerations to manage the psychological impact on guests. Allocating sufficient space is a non-negotiable aspect of creating a relaxed and open environment.
| Function | Minimum Space Required | Impact on Guest Psychology |
|---|---|---|
| Service Flow Behind Chairs | 36 inches | Prevents feeling trapped |
| Main Thoroughfares | 48-60 inches | Enables free movement |
| Photographer Access | 48+ inches | Allows unobtrusive documentation |
| Dance Floor Perimeter | 60+ inches | Creates energy flow zone |
By implementing these metrics, you are designing not just a floor plan, but an experience of effortless flow. You are giving your guests the psychological gift of freedom, which is the very essence of an airy and welcoming space.
Strategic mirror placement: where to put them to expand the room?
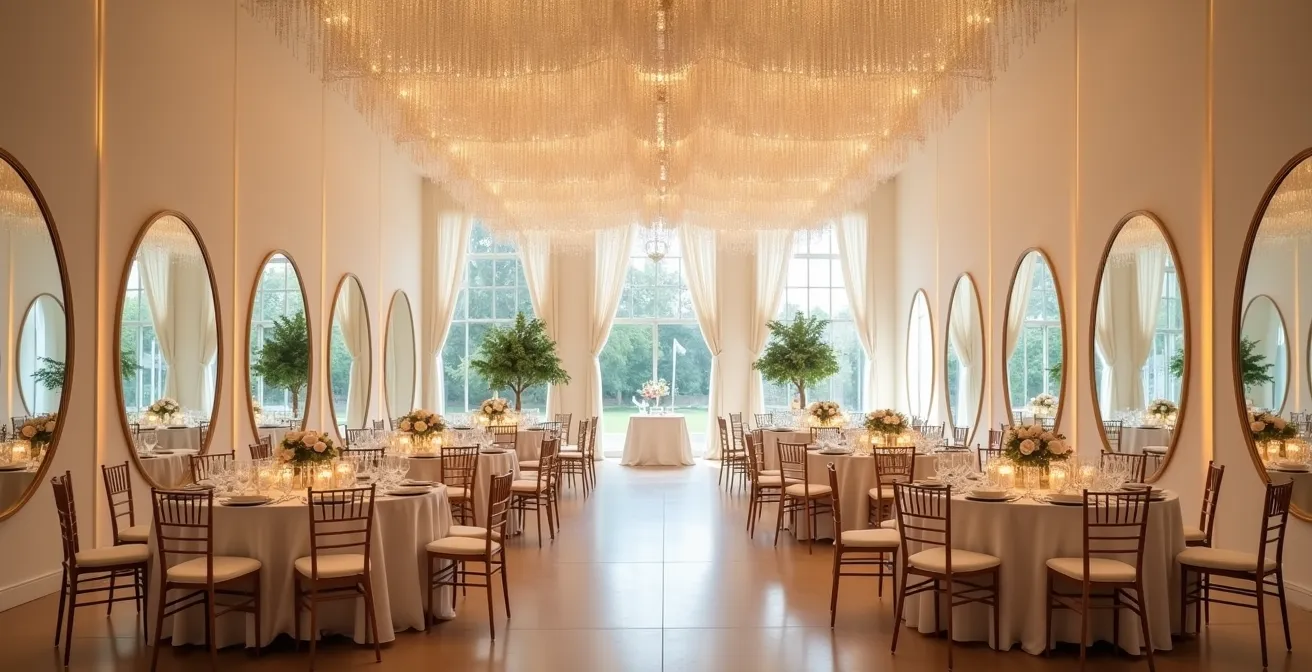
Simply “adding mirrors” is one of the most common pieces of advice for small spaces, but it’s also one of the most misused. A poorly placed mirror can reflect clutter, an unattractive feature, or a crowded area, effectively doubling the problem you’re trying to solve. The illusionist’s approach is to use mirrors with surgical precision to achieve specific goals: multiplying light, extending sightlines, and creating an illusion of infinite depth.
The first rule of strategic mirror placement is to consider what you want to see more of. Position a large, floor-to-ceiling mirror opposite a key light source, such as a window or a beautifully lit feature wall. This will not only bounce natural and artificial light deep into the room, making it feel brighter and more open, but it will also reflect the view, bringing a sense of the outdoors in or duplicating your most beautiful decor elements.
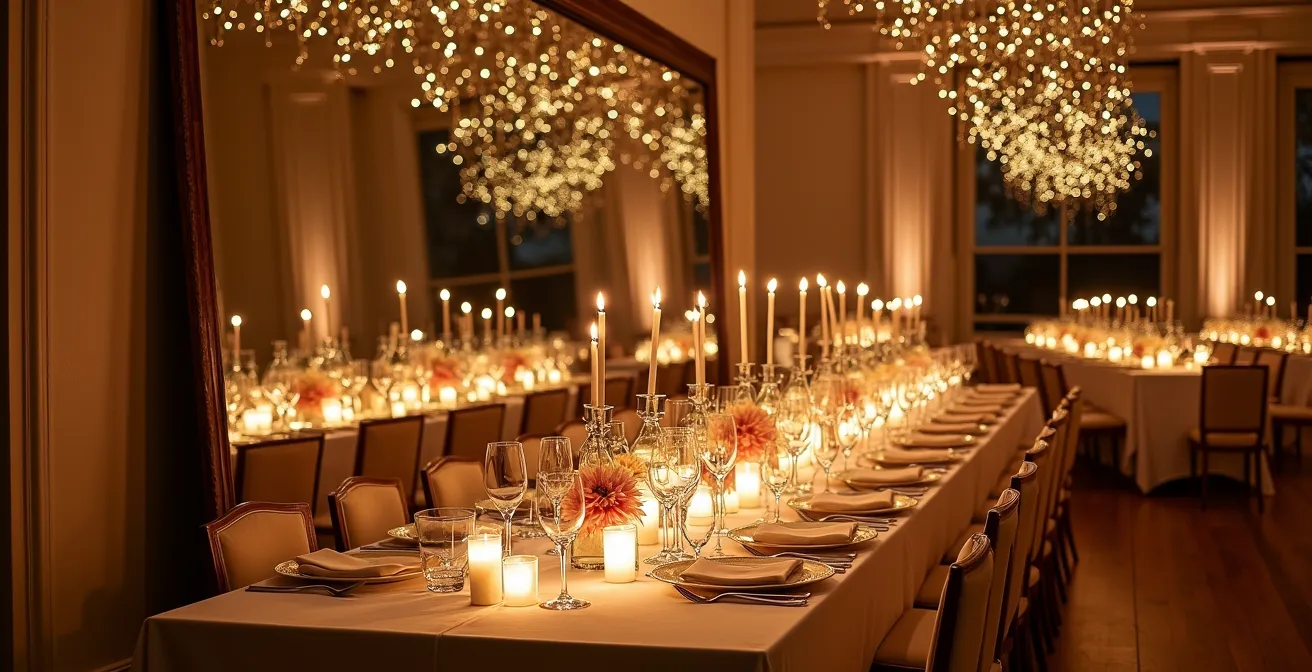
The second rule is to place mirrors on the longest wall of the room. This technique tricks the brain into perceiving the wall as being much farther away, dramatically extending the perceived length or width of the space. The reflection creates a “false” continuation of the room, as seen in the image, where candlelight and table settings seem to stretch into the distance. For maximum effect, use large, unframed mirrors or groups of mirrors to create a seamless reflective surface. Avoid small, decorative mirrors, as they break up the illusion and act more like wall art than a tool for spatial expansion.
Window treatments: to drape or not to drape for maximum openness?
Windows are a room’s natural connection to the outside world, and how you treat them can either enhance or inhibit the feeling of spaciousness. The decision to drape or not to drape is less about style and more about a strategic choice to either maximize light and views or conceal undesirable elements. In a low-ceiling room, every choice must contribute to the illusion of height and openness.
If the venue has beautiful windows with a pleasant view, the best treatment is often no treatment at all. Leaving windows unadorned allows the maximum amount of natural light to flood the space and visually merges the indoor and outdoor areas, making the room feel boundless. However, if the view is unattractive or the window frames themselves are unsightly, draping becomes a necessary tool of concealment and illusion. The key is in the technique. To create height, you must employ the “High and Wide Mounting Principle.”
As noted by design experts, this involves mounting the curtain rod 6-12 inches above the actual window frame and extending it 8-12 inches beyond the frame on each side. When the drapes are open, they frame the window without covering any of the glass, making the window itself appear significantly larger. Using floor-to-ceiling drapes, even on a small window, creates a strong, unbroken vertical line that draws the eye upward, as recommended for making low ceilings look higher. For this purpose, choose lightweight, sheer fabrics like voile or chiffon in a color that matches the walls. This creates a soft, ethereal effect that diffuses light beautifully while maintaining a cohesive, expansive look.
How to use string lights to create a “false ceiling” of intimacy?
It sounds counter-intuitive, but sometimes the best way to deal with a low ceiling is not to fight it, but to embrace it by creating a new, lower “perceptual ceiling.” This technique is particularly effective over dining areas or dance floors. By hanging a dense canopy of string lights horizontally, you create a sparkling, defined zone of intimacy. The human eye is naturally drawn to the brightest points in a room, so guests’ attention will be focused on the warm glow of the lights, not on the dark, empty space just a few feet above them.
This ‘false ceiling’ effectively makes the physical ceiling disappear. The space above the lights recedes into darkness, and the area below becomes a cozy, magical grotto. This transforms the liability of a low ceiling into an asset, fostering an intimate and romantic atmosphere. The key to making this feel magical rather than claustrophobic is the quality of the light itself. For a warm, inviting ambiance that flatters skin tones and creates a sense of closeness, lighting specialists recommend a color temperature between 2700K and 3000K.
This horizontal approach can be powerfully combined with vertical techniques in other parts of the room. For instance, you can use vertical “curtains” of light against walls to add perceived height in lounge areas or along the perimeter. By using both horizontal canopies and vertical curtains, you are engaging in sophisticated sensory zoning—using light to define different areas and create varied experiences within the same space, all while masterfully controlling the perception of height and intimacy.
Key Takeaways
- Master the use of strong vertical lines with tall, slender centerpieces and floor-to-ceiling drapes to draw the eye upward.
- Prioritize negative space and functional flow by reducing guest counts per table and adhering to minimum clearance metrics.
- Manipulate light and reflection with strategically placed mirrors and warm-toned lighting to create illusions of depth and intimacy.
The 3 decor items you should cut to improve the overall visual impact
In the quest to make a room feel special, the instinct is often to add more. More flowers, more fabric, more details. However, for a low-ceiling venue, the more effective strategy is often subtraction. Every decor element has a ‘visual weight,’ and items that are bulky, low, or create strong horizontal lines will anchor the eye downwards, actively working against your efforts to create an airy, vertical feel. To maximize your visual impact, you must be ruthless in eliminating these three specific items.
First, eliminate bulky chair covers and sashes. While they can hide unattractive chairs, they add significant visual bulk at eye level. They create a sea of lumpy, uniform shapes that make the room feel heavy and crowded. Instead, consider investing in rental chairs like Chiavari, Ghost, or Cross-back chairs. Their slender profiles and open backs allow light and sight to pass through them, dramatically reducing their visual weight.
Second, remove low, wide, and dense centerpieces. As discussed, the goal is to draw the eye up. A squat, heavy floral arrangement does the exact opposite. It acts as a visual stop sign on the table, pulling focus downward and making the table feel cluttered. Opt for tall, thin arrangements or a collection of very low, delicate bud vases that barely register, preserving the clean horizontal plane of the table.
Finally, cut contrasting table runners. A bold runner creates a strong horizontal line that visually shortens the table and, by extension, the room. It breaks the unity of the tablescape. For a more expansive feel, use high-quality, single-color linens that create a clean, unbroken surface. This unified look provides a calm, neutral base that allows your carefully chosen vertical elements to take center stage.
How to Transform a Generic Hotel Ballroom into a Unique Wedding Venue?
Transforming a generic, low-ceiling ballroom goes beyond visual tricks; it requires a holistic, sensory approach. The goal is to create a complete environmental shift, making guests forget they are in a standard hotel space. This involves layering solutions that address not just sight, but also sound, smell, and the feeling of movement. By engaging multiple senses, you can build a rich, immersive world that completely overwrites the room’s architectural shortcomings.
In a low-ceilinged room, sound can feel trapped and stagnant. Addressing the acoustics is a subtle but powerful way to make the space feel more pleasant and open. Similarly, a light, fresh scent can combat the feeling of stuffy, recycled air common in such spaces. This process of sensory zoning helps define the space in non-visual ways, adding layers of perceived dimension. The most successful transformations consider every sensory input as a design opportunity.
| Sense | Problem in Low Ceilings | Solution | Implementation |
|---|---|---|---|
| Sound | Trapped noise, echo | Acoustic panels as art | Disguised fabric panels on walls |
| Smell | Stagnant air feeling | Light scent-scaping | Verbena or green tea diffusers |
| Visual | Horizontal compression | Zone creation | Lighting variations by area |
| Spatial | Cramped feeling | Journey design | Distinct lounge/dining/dance zones |
Ultimately, your vision must be communicated clearly to the professionals who will help you execute it. Your vendors are your partners in illusion. Providing them with a clear mandate focused on the unique challenges of a low ceiling is crucial for success. This ensures everyone is working toward the same goal of creating a light, airy, and unforgettable atmosphere.
Your Low-Ceiling Mandate: A Checklist for Vendors
- Photographer: Prioritize wide-angle lenses and lower shooting angles to minimize the ceiling’s appearance in photos and emphasize the vertical elements.
- DJ/Band: Mandate the use of sleek, low-profile column speakers instead of bulky speaker boxes on tripods that add visual clutter.
- Florist: All tall arrangements must strictly adhere to the 2/3rds verticality rule (two-thirds of the distance from tabletop to ceiling).
- Lighting Designer: The primary strategy must be uplighting walls and highlighting vertical features, not mounting fixtures on the low ceiling itself.
- Caterer: The final floor plan must be approved with a non-negotiable 36-inch minimum clearance behind all guest chairs for service flow.
Now that you are armed with the techniques of a spatial illusionist, the next step is to synthesize these strategies into a cohesive design brief for your wedding. Start by identifying the key vertical and lighting opportunities in your specific venue and build your plan from there.