Lighting & Visual Atmospheres
Lighting transforms a wedding venue from a simple space into an emotional experience. While flowers, fabrics, and furniture set the visual stage, it’s the strategic use of light—its color, intensity, placement, and timing—that determines whether your celebration feels intimate or grand, romantic or energetic, cohesive or chaotic. The difference between flat, uninspiring photos and images that capture genuine emotion often comes down to how thoughtfully lighting was planned and executed.
For couples planning their wedding decor, understanding lighting fundamentals isn’t just about avoiding technical disasters. It’s about harnessing one of the most powerful design tools at your disposal. This comprehensive exploration covers the emotional impact of different light sources, the critical timing of transitions throughout your event, color temperature’s subtle influence on mood, photography considerations that prevent expensive regrets, fixture selection strategies, and the technical essentials that ensure your vision becomes reality safely and beautifully.
Understanding Light’s Emotional Power in Wedding Design
Think of lighting as the soundtrack to your visual design—it sets the emotional tone even when guests aren’t consciously aware of its influence. Just as minor keys evoke different feelings than major ones in music, lighting temperature and intensity shape how people experience your wedding atmosphere at a visceral level.
Beyond Visibility: Light as Emotional Connection
The primary mistake couples make is treating lighting purely as a functional necessity—ensuring guests can see their dinner plates. In reality, lighting creates emotional connection by directing attention, establishing intimacy levels, and triggering psychological responses. Warm, dimmed lighting naturally encourages closeness and conversation, while brighter, cooler light energizes and activates. A reception that maintains the same lighting level from cocktails through dancing misses opportunities to guide the emotional arc of your celebration.
Consider how a single candle at each table creates pockets of intimacy, making a 200-person reception feel like dozens of small gatherings rather than one overwhelming crowd. This isn’t accidental—localized light sources psychologically define personal space and encourage guests to lean in and connect.
Natural vs. Artificial Light Dynamics
Natural light offers unmatched clarity and flattering skin tones, but it’s completely outside your control and operates on nature’s timeline, not your event schedule. Maximizing natural light before sunset requires strategic ceremony timing—typically scheduling “I do” moments 2-3 hours before dusk to capture that soft, diffused quality without harsh overhead sun.
The transition from natural to artificial light marks one of the most critical design moments in your event. Done poorly, it creates an abrupt shift that feels jarring; done well, it’s so gradual guests don’t notice the changeover. This is where dimmer switches and layered lighting design become invaluable, allowing you to slowly introduce artificial sources as daylight fades rather than suddenly flipping switches when darkness arrives.
Mastering Light Transitions Throughout Your Event
Your wedding isn’t a static moment—it’s a progression from anticipation through celebration. Your lighting should evolve alongside that emotional journey, supporting each phase with appropriate atmosphere.
The Golden Hour Advantage and Timing Strategy
Photographers obsess over golden hour—that magical window roughly one hour before sunset when sunlight turns warm and directional—for good reason. This natural phenomenon bathes everything in flattering amber tones and creates dramatic but soft shadows. Timing your ceremony or couple portraits to coincide with this window is one of the highest-value scheduling decisions you’ll make.
However, chasing golden hour creates planning constraints. For summer weddings in northern regions, this might mean an 7:30 PM ceremony; in winter, perhaps 4:00 PM. The alternative is simulating similar qualities with warm-temperature artificial lighting (2700-3000K range) positioned at low angles, though it never quite matches nature’s version.
Managing Intensity from Ceremony Through Dancing
A thoughtfully designed lighting plan follows this typical progression:
- Ceremony: Maximum brightness for visibility and photography, whether natural light or well-lit artificial sources
- Cocktail hour: Begin subtle dimming, introduce ambient accent lighting like uplighting on architectural features
- Dinner service: Reduced overall brightness with focused table lighting, creating intimate dining pockets
- Dancing: Dynamic lighting with colored washes, moving effects, or dramatic contrasts that energize the space
This progression requires infrastructure—specifically dimmer switches or smart lighting systems that allow gradual adjustments. The cost difference between dimmable and non-dimmable installations is minimal, but the impact on atmosphere is substantial. Without dimming capability, you’re forced into abrupt lighting changes that disrupt the flow of your event.
Using Darkness Intentionally as Design
Western design culture often equates more light with better outcomes, but strategic darkness is equally powerful. Allowing portions of your venue to fall into shadow creates depth, mystery, and visual contrast that makes illuminated areas more dramatic. A ballroom with even, overall lighting feels flat; the same room with focused lighting on tables, a dramatic wash on one accent wall, and shadows in the corners feels layered and sophisticated.
This principle applies especially to tent receptions, where the temptation is to wash every surface with light. Instead, consider lighting the perimeter or specific features while allowing the upper tent structure to recede into darkness, which psychologically lowers the ceiling and creates a more intimate feeling despite the large space.
Color Temperature: The Invisible Mood Setter
If lighting intensity is obvious in its effects, color temperature works more subtly—yet its impact on mood and cohesion is equally significant.
Understanding the Kelvin Scale
Color temperature measures the warmth or coolness of white light on the Kelvin (K) scale. Counterintuitively, lower numbers (2200-3000K) produce warm, amber-orange light reminiscent of candlelight and sunset, while higher numbers (5000-6500K) create cool, blue-white light similar to overcast daylight or hospital fluorescents.
Most wedding lighting falls into three practical ranges: warm white (2700-3000K) for romantic, intimate settings; neutral white (3500-4100K) for natural-looking general illumination; and daylight (5000-6000K) for simulating natural outdoor light indoors. Mixing these temperatures unintentionally creates visual discord that’s hard to pinpoint but unmistakably “off.”
Temperature Shifts for Evening Progression
Just as your lighting intensity should evolve throughout the event, strategic temperature shifts support the emotional progression. Starting with cooler, brighter light (4000K) during cocktails maintains the energy of your ceremony, then transitioning to warmer tones (2700-3000K) during dinner signals relaxation and intimacy. Some couples even introduce amber or golden washes (2200K) during dancing for a celebratory, almost firelit quality.
This technique requires color-tunable fixtures or careful layering of different fixed-temperature sources that can be independently controlled. The investment pays dividends in creating a reception that feels thoughtfully orchestrated rather than static.
Impact on Colored Surfaces and Materials
Color temperature dramatically affects how your other decor elements appear. Warm lighting enhances reds, oranges, peaches, and gold tones while muting blues and purples. Cool lighting does the opposite. A blush pink tablecloth under warm 2700K light appears peachy and romantic; under cool 5000K light, it can look washed out or even grayish.
This is particularly critical when lighting living greenery—ferns, eucalyptus garlands, and potted plants. Cool-white light (4000K+) maintains their natural green vibrancy, while warm light can make foliage appear yellowish or brown. If your design features significant botanical elements, testing your lighting temperature against actual plant samples prevents disappointing color shifts on the day itself.
Lighting for Photography and Visual Cohesion
Beautiful decor means little if it doesn’t photograph well, and even the most thoughtful design can feel chaotic without proper lighting to unify disparate elements.
Common Photography Pitfalls
Professional photographers can work magic with challenging lighting, but certain scenarios create problems even skilled shooters struggle to overcome:
- Extreme contrast: Brightly lit subjects against very dark backgrounds force cameras to choose between properly exposing faces (making backgrounds pure black) or capturing background detail (overexposing faces)
- Glare and reflections: Shiny surfaces like polished floors, glass table tops, or metallic chargers become mirrors under direct lighting, creating distracting hot spots in photos
- Inconsistent color temperature: Mixing warm candles with cool LED uplighting creates color casts that require extensive editing to correct
- Harsh noon shadows: Outdoor ceremonies under midday sun create unflattering shadows under eyes, noses, and chins—one reason morning or late-afternoon timing is strongly preferred
The solution isn’t necessarily more light, but more thoughtfully placed light. Backlighting (light behind subjects) creates separation from backgrounds but requires fill light from the front to prevent silhouettes. Diffused, multi-directional lighting eliminates harsh shadows and creates the even illumination cameras love.
Unifying Disparate Decor Elements
Perhaps you’re combining vintage furniture, modern linens, rustic wooden elements, and elegant florals—a mix that risks feeling disjointed. Strategic lighting creates cohesion by establishing a dominant color palette and directing attention. A warm amber wash applied consistently across all elements ties them together under a unified color story, making eclectic choices feel intentionally curated rather than accidentally mismatched.
This washing technique works especially well for tented receptions or venues with structural elements you can’t change. Rather than fighting against existing features, a color wash from uplighting or wash fixtures essentially repaints the space in your chosen hue, creating a cohesive visual environment that allows your decor to shine within it.
Choosing Wedding Lighting Fixtures Wisely
The lighting market offers overwhelming options, from affordable DIY solutions to high-end professional installations. Understanding fixture categories helps you allocate budget where it matters most.
Statement Pieces: Chandeliers and Pendants
Few lighting choices make a more dramatic impact than overhead statement fixtures. Crystal chandeliers communicate luxury and elegance; rattan or woven pendants create bohemian or tropical vibes; industrial cage fixtures signal modern or urban aesthetics. These pieces function as both light source and decor element.
The primary challenge is installation—especially for vintage or substantial chandeliers that require significant structural support and substantial power. A vintage crystal chandelier might draw 800-1200 watts, requiring dedicated circuits and secure attachment points capable of supporting 50+ pounds. For tented events, this means professional rigging to the tent frame using engineered mounting hardware, not improvised solutions.
Budget-conscious alternatives include LED chandelier replicas that offer similar aesthetic impact at a fraction of the weight and power requirements, or clustering smaller pendants at varied heights to create visual interest without individual heavy fixtures.
Ambient Options: Candles and Fairy Lights
Candles remain the gold standard for romantic, intimate lighting—but venues increasingly restrict open flames due to safety and insurance concerns. Understanding your venue’s regulations early prevents last-minute scrambles. Some allow candles only within glass sleeves or hurricane holders; others ban real flames entirely.
Modern LED candle alternatives have improved dramatically, with realistic flicker patterns and warm color temperatures virtually indistinguishable from real wax at a distance. Battery-powered options eliminate cord management challenges, though rechargeable versions require logistics for ensuring all units are charged before the event.
Fairy lights or string lights walk a fine line between sophisticated and cheap-looking. The difference comes down to three factors: warm color temperature (not cool white), deliberate installation (not haphazard draping), and invisible cable management. Lights with dark or clear cables integrated into architecture or foliage look intentional; exposed extension cords and tangled wires destroy the effect entirely.
Accent Lighting: Pin Spots and Uplighting
Pin spotting—narrow-beam fixtures aimed at specific targets like centerpieces or cake displays—creates dramatic focal points that draw the eye and elevate ordinary decor to extraordinary. A simple floral arrangement becomes a showpiece under a dedicated pin spot. The cost-benefit analysis often favors pin spotting because it allows you to invest less in the physical decor items themselves while achieving greater visual impact through lighting.
Fixtures range from magnetic options that attach to standard rigging, clamp fixtures that grip existing infrastructure, to battery-powered spotlights for locations where running power is impractical. Beam angle matters significantly—too narrow and you illuminate only the top of a centerpiece; too wide and the focused effect is lost. Most table applications work best with 15-25 degree beam angles.
Uplighting—fixtures placed at floor level aimed upward—transforms walls, draping, and architectural features. A plain white tent becomes an environment bathed in your wedding colors; a historic venue’s brick walls gain dramatic depth and texture. The barrier to entry is low (rentals often cost $15-30 per fixture), making this one of the highest-value lighting investments available.
Technical Essentials for Safe, Professional Results
Even the most beautiful lighting design fails if technical execution is inadequate or unsafe. Understanding these fundamentals prevents catastrophic problems.
Power, Circuits, and Load Management
Every venue has electrical capacity limits—typically measured in amperage per circuit. Standard U.S. household circuits provide 15-20 amps at 120 volts, equating to roughly 1800-2400 watts of safe capacity per circuit (accounting for the 80% rule to prevent breaker trips). Exceeding this causes breakers to trip, plunging portions of your reception into darkness mid-event.
Calculate your total power draw before installation day. LED fixtures consume far less power than traditional incandescent or halogen equivalents—a crucial advantage when designing extensive lighting schemes. For example, 20 traditional pin spots might draw 1000 watts total; 20 LED pin spots might use only 200 watts, potentially running on a single circuit instead of requiring multiple dedicated lines.
For events with substantial lighting needs, professional installers may bring generators or work with venues to access additional circuits. Never daisy-chain extension cords to bypass circuit limitations—this creates fire hazards and virtually guarantees power failures.
Venue Restrictions and Installation Methods
Historic venues often impose strict regulations protecting structural integrity—no nails, screws, or adhesives on walls; weight limits on ceiling-mounted elements; specific rigging methods for chandeliers. Understanding these restrictions during planning rather than during installation prevents expensive redesigns.
Professional lighting designers maintain arsenals of non-invasive installation solutions: freestanding truss systems that support overhead fixtures without touching venue structures, magnetic attachments for metal beams, specialized clamps that grip without damaging surfaces. For tented events, lighting rigs typically attach to the tent frame itself using engineered mounting hardware rated for the loads involved.
Waterproofing and Cable Management
Outdoor or partially covered venues require waterproof fixtures rated IP65 or higher—meaning they’re sealed against moisture intrusion. Using indoor-rated fixtures outdoors isn’t just risky for the equipment; it’s a safety hazard that can cause electrical failures or shocks.
Cable management separates amateur installations from professional ones. Visible power cords running across floors create trip hazards and visual clutter that undermines your design investment. Professional solutions include cable ramps where crossing walkways is unavoidable, routing cables along walls or under draping, and using battery-powered fixtures in locations where running power would require extensive visible cabling.
Color temperature consistency across all fixtures prevents the patchwork appearance of mixing various light sources. Maintain a master list of every fixture’s color temperature specification, ensuring they all fall within the same range—or, if using multiple temperatures intentionally, that each zone maintains internal consistency.
Lighting transforms wedding spaces from ordinary to extraordinary, but only when approached with both creative vision and technical competence. By understanding how light influences emotion, mastering the timing and transitions that support your event’s progression, choosing appropriate fixtures for your specific needs, and executing installations safely and professionally, you harness one of the most powerful design tools available. Whether you’re working with a professional lighting designer or executing elements yourself, these fundamental principles ensure your visual atmosphere matches your wedding vision—and that the memories captured in photographs reflect the magic you created.

How to Install Crystal Chandeliers safely in Temporary Structures?
Safely hanging a crystal chandelier in a wedding tent is an engineering task, not a decorating one; success depends on verifying structural load capacity before considering aesthetics. The total weight on a tent frame includes the fixture, rigging, and dynamic…
Read more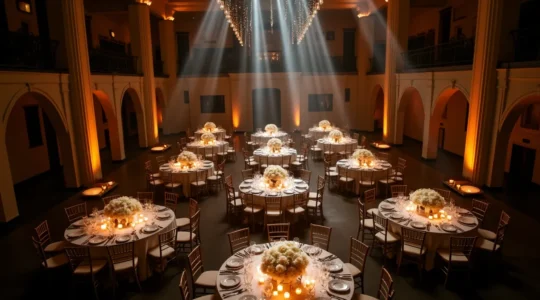
How to Use Pin Spots to Make Your Centerpieces Pop in the Dark?
To make your floral investment truly count, pin spotting must be treated as a precision tool, not just general lighting. The primary goal is to protect your centerpiece investment by ensuring it remains a focal point after the sun sets….
Read more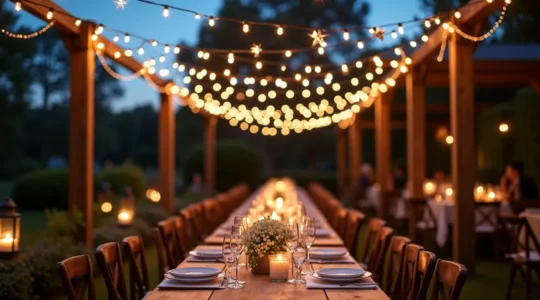
How to Style Fairy Lights So They Look Magical, Not Messy?
The dream of a twinkling wedding canopy often results in a messy, Christmas-light reality. The secret to a sophisticated look isn’t more lights, but a professional designer’s approach to the physics of light and space. Prioritize light purity by using…
Read more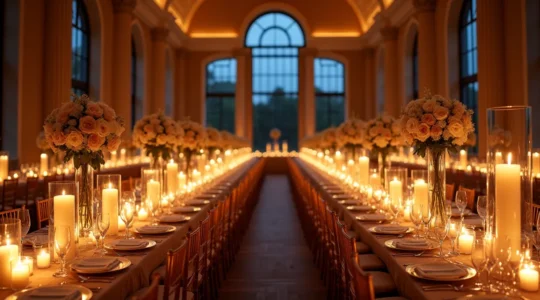
How to Maximize Candlelight Impact Without Burning the Venue Down
Achieving a breathtaking candlelit wedding isn’t about hoping for the best; it’s about mastering the science of safety and ambiance to create romance with confidence. Understand the “thermal load” of your candles to work with your venue’s HVAC system, not…
Read more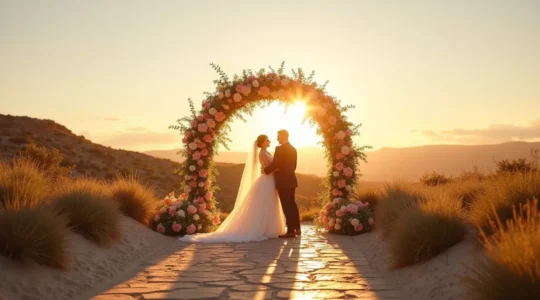
How to Manage Natural Daylight to Ensure Flattering Photos?
In summary: Position your ceremony for backlighting by placing the sun behind your arch, ideally 1.5-2 hours before sunset. Combat harsh midday sun by using sheer fabric draping or sailcloth tents to diffuse light and create a soft, even glow….
Read more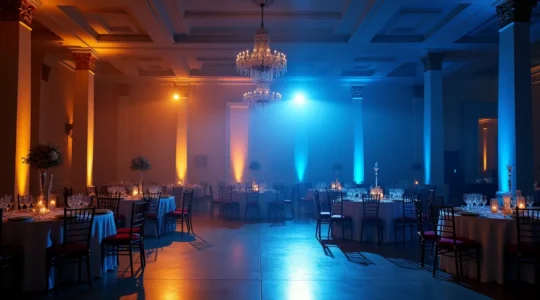
How to Manage Lighting Intensity to Control the Energy of the Night?
Most couples view wedding lighting as mere decoration. This is a fundamental misunderstanding. The truth is, light is the most powerful tool you have to direct your guests’ energy and choreograph the entire emotional arc of your reception. It’s not…
Read more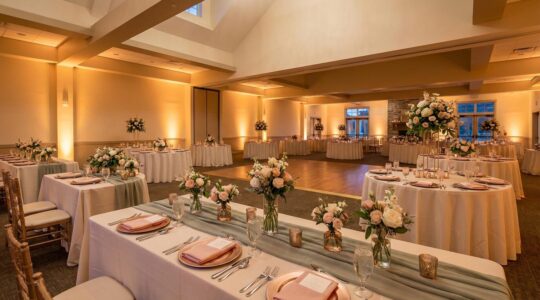
How to Create a Cohesive Visual Environment Without Overwhelming the Venue?
True visual cohesion in wedding design comes from strategic subtraction, not overwhelming addition. Master the 60-30-10 color rule to establish a balanced, non-fatiguing visual foundation. Use consistent lighting and repeating textural elements to unify disparate spaces and furniture. Recommendation: Use…
Read more